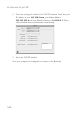
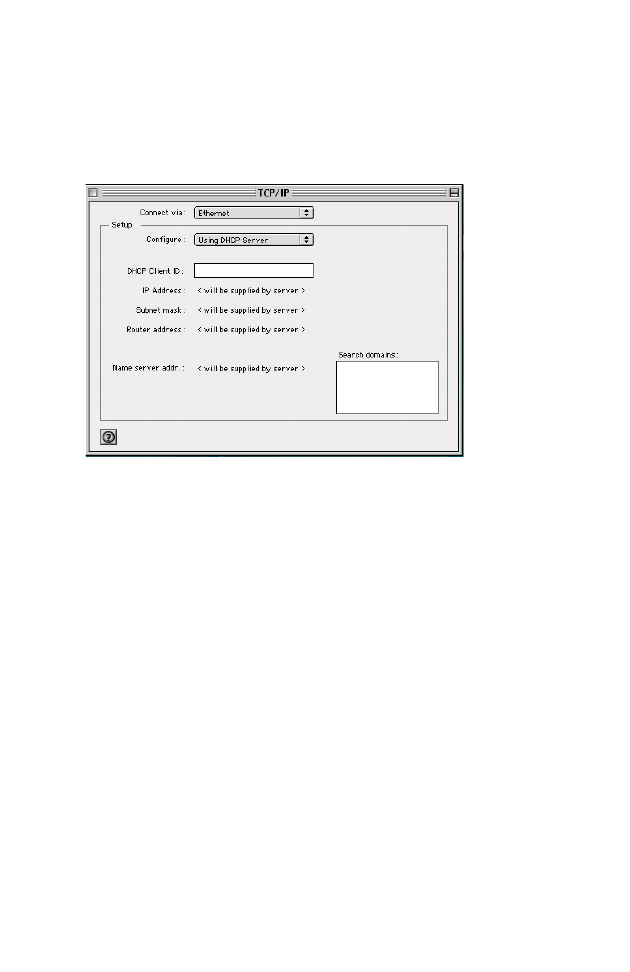
CONFIGURING CLIENT PC 2. Your new settings are shown in the TCP/IP window. Verify that your IP Address is now 192.168.2.xxx, your Subnet Mask is 255.255.255.0 and your Default Gateway is 192.168.2.1. These values confirm that your Barricade is functioning. 3. Close the TCP/IP window. Now your computer is configured to connect to the Barricade.
CHAPTER 4 CONFIGURING THE BARRICADE After you have configured TCP/IP on a client computer, use a Web browser to configure the Barricade. The Barricade can be configured by any Java-supported browser including Internet Explorer 4.0 or above, or Netscape Navigator 4.0 or above. Using the Web management interface, you may configure the Barricade and view statistics to monitor network activity. To access the Barricade’s management interface, enter the IP address of the Barricade in your web browser: http://192.
CONFIGURING THE BARRICADE Navigating the Web Browser Interface The Barricade’s management interface consists of a Setup Wizard and an Advanced Setup section. Setup Wizard: Use the Setup Wizard if you want to quickly set up the Barricade. Go to “Setup Wizard” on page 4-3. Advanced Setup: Advanced Setup supports more advanced functions like hacker attack detection, IP and MAC address filtering, virtual server setup, virtual DMZ host, as well as other functions. Go to “Advanced Setup” on page 4-13.
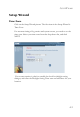
SETUP WIZARD Setup Wizard Time Zone Click on the Setup Wizard picture. The first item in the Setup Wizard is Time Zone. For accurate timing of log entries and system events, you need to set the time zone. Select your time zone from the drop-down list, and click NEXT. If your area requires it, check to enable the clock for daylight saving changes, and enter the Daylight Saving Time start and end dates for your location.
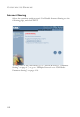
CONFIGURING THE BARRICADE Internet Sharing Select the operation mode protocol. For Disable Internet Sharing see the following page, and click NEXT. To select one of the other modes, go to “PPPoE & PPPoA - Parameter Setting” on page 4-7, or go to “Multiple Protocol over ATM Mode Parameter Setting” on page 4-10.
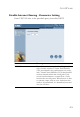
SETUP WIZARD Disable Internet Sharing - Parameter Setting Enter VPI/VCI value in the provided spaces, then click NEXT. Parameter Description VPI/VCI Data flows are broken up into fixed length cells, each of which contains a Virtual Path Identifier (VPI) that identifies the path between two nodes, and a Virtual Circuit Identifier (VCI) that identifies the data channel within that virtual path. Each virtual circuit maintains a constant flow of cells between the two end points.
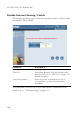
CONFIGURING THE BARRICADE Disable Internet Sharing - Finish The Finish page allows you to view the connection status, as well as other information. Click APPLY. Parameter Description Protocol Indicates the protocol used. VPI/VCI Virtual Path Identifier (VPI) and Virtual Circuit Identifier (VCI). Go to “VPI/VCI” on page 4-5 for detailed description. AAL5 Encapsulation Shows the packet encapsulation type. Go to “Encapsulation” on page 4-20 for detailed description. Your Barricade is now set up.
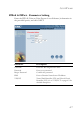
SETUP WIZARD PPPoE & PPPoA - Parameter Setting Enter the PPPoE (Point-to-Point Protocol over Ethernet) information in the provided spaces, and click NEXT. Parameter Description Username Enter the ISP assigned user name. Password Enter your password. Retype Password Confirm the password. DNS Enter a Domain Name Server IP address. VPI/VCI Virtual Path Identifier (VPI) and Virtual Circuit Identifier (VCI). Go to “VPI/VCI” on page 4-5 for detailed description.
CONFIGURING THE BARRICADE PPPoE & PPPoA - Finish The Finish page allows you to view the connection status, as well as other information. Click APPLY. Parameter Description ADSL Operation Mode (WAN) Protocol Indicates the protocol used VPI/VCI Virtual Path Identifier (VPI) and Virtual Circuit Identifier (VCI). Go to “VPI/VCI” on page 4-5 for detailed description. AAL5 Encapsulation Shows the packet encapsulation type. Go to “Encapsulation” on page 4-20 for detailed description.
SETUP WIZARD Parameter Description DHCP Parameters Default Gateway The default gateway IP address. If the Barricade cannot find the destination address within its local network, it will forward the packets to the Default Gateway (usually supplied by your ISP). Subnet Mask The network subnet mask. Name Server 1 Primary name server IP address. Name Server 2 Alternate name server IP address. Name Server 3 Alternate name server IP address.
CONFIGURING THE BARRICADE Multiple Protocol over ATM Mode - Parameter Setting Enter ATM (Asynchronous Transfer Mode) information in the provided spaces, and click NEXT. Parameter Description DNS Enter a Domain Name Server IP address. WAN IP Enter an IP address for the Barricade WAN interface. Subnet Mask Enter a subnet mask. VPI/VCI Virtual Path Identifier (VPI) and Virtual Circuit Identifier (VCI). Go to “VPI/VCI” on page 4-5 for detailed description.
SETUP WIZARD Multiple Protocol over ATM Mode - Finish The Finish page allows you to view the connection status, as well as other information. Click APPLY. Parameter Description ADSL Operation Mode (WAN) Protocol Indicates the protocol used. VPI/VCI Virtual Path Identifier (VPI) and Virtual Circuit Identifier (VCI). Go to “VPI/VCI” on page 4-5 for detailed description. AAL5 Encapsulation Shows the packet encapsulation type. Go to “Encapsulation” on page 4-20 for detailed description.
CONFIGURING THE BARRICADE Parameter Description DHCP Parameters Default Gateway The default gateway IP address. If the Barricade cannot find the destination address within its local network, it will forward the packets to the Default Gateway (usually supplied by your ISP). Subnet Mask The network subnet mask. Name Server 1 Primary name server IP address. Name Server 2 Alternate name server IP address. Name Server 3 Alternate name server IP address.
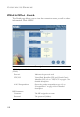
ADVANCED SETUP Advanced Setup Click on the Advanced Setup picture. The left-hand side displays the main menu and the right-hand side shows descriptive information. The main menu links are used to navigate to other menus that display configuration parameters and statistics. The Barricade’s advanced management interface contains eleven main menu items – System, WAN, LAN, Wireless, NAT, Routing system, Firewall, SNMP, ADSL, Tools, and Status.
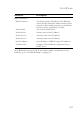
CONFIGURING THE BARRICADE The following table briefly describes the Advanced Setup menu items. Menu Description System Sets the local time zone, the password for administrator access, the IP address of a PC that will be allowed to manage the Barricade remotely, and the IP address of a Domain Name Server. WAN Specifies the Internet connection settings. LAN Sets the TCP/IP configuration for the Barricade LAN interface and DHCP clients. Wireless Sets wireless parameters and encryption settings.
SYSTEM SETTINGS System Settings Time Zone Select your local time zone from the drop-down list, and configure the time server for the Router. This information is used for log entries and client filtering. If your area requires it, check to enable the clock for daylight saving changes, and enter the Daylight Saving Time start and end dates for your location.
CONFIGURING THE BARRICADE Password Settings Use this page to restrict access based on a password. By default, there is no password. For security you should assign one before exposing the Barricade to the Internet. Passwords can contain from 3 ~ 12 alphanumeric characters and are not case sensitive.
SYSTEM SETTINGS Remote Management By default, management access is only available to users on your local network. However, you can also manage the Barricade from a remote host by entering the IP address of a remote computer on this screen. Check the Enabled checkbox to enable this function. Enter the Host Address and click APPLY. Notes: 1. To access your Barricade from a remote location, you will need to know the IP address of the WAN interface shown under the Status page. 2.
CONFIGURING THE BARRICADE DNS Domain Name Servers (DNS) are used to map a domain name (e.g., www.smc.com) to the equivalent numerical IP address (e.g., 64.147.25.20). Your ISP should provide the IP address of one or more Domain Name Servers. Enter those addresses on this page, and click APPLY.
WAN WAN Specify the WAN connection type provided by your Internet Service Provider (ISP). PPPoE (PPP over Ethernet) Enter the PPPoE (Point-to-Point over Ethernet) interface parameters on this page. Click APPLY. Parameter Description Enable/Disable Enables/disables the PPPoE Interface. IP Address If your IP address is assigned by the ISP each time you connect, leave this field all zeros. Otherwise, enter your ISP supplied static IP address here.
CONFIGURING THE BARRICADE 4-20 Parameter Description VPI/VCI Virtual Path Identifier (VPI) and Virtual Circuit Identifier (VCI). Go to “VPI/VCI” on page 4-5 for detailed description. Encapsulation Specifies how to handle multiple protocols at the ATM transport layer. • VC-MUX: Point-to-Point Protocol over ATM Virtual Circuit Multiplexer (null encapsulation) allows only one protocol running per virtual circuit with less overhead.
WAN ATM Enter ATM (Asynchronous Transfer Mode) interface information on this page. Click APPLY. Parameter Protocol Description • Disable: Disables the connection. • 1483 Bridging: Bridging is a standardized layer 2 technology. It is typically used in corporate networks to extend the physical reach of a single LAN segment and increase the number of stations on a LAN without compromising performance. Bridged data is encapsulated using the RFC1483 protocol to enable data transport.
CONFIGURING THE BARRICADE Parameter IP Address Description IP address of the ATM interface. Subnet Mask Subnet mask of the ATM interface. VPI/VCI Virtual Path Indicator/Virtual Channel Indicator: Each connection must have a unique pair of VPI/VCI settings. Go to “VPI/VCI” on page 4-5 for detailed description. Encapsulation Specifies how to handle multiple protocols at the ATM transport layer. Go to “Encapsulation” on page 4-20 for detailed description.
LAN LAN Use the LAN menu to configure the LAN IP address and to enable the DHCP server for dynamic client address allocation. Parameter Description LAN IP IP Address The IP address of the Barricade. IP Subnet Mask The subnet mask of the network. DHCP Server To dynamically assign an IP address to client PCs, enable the DHCP (Dynamic Host Configuration Protocol) Server. Lease Time Set the DHCP lease time.
CONFIGURING THE BARRICADE Parameter Description IP Address Pool Start IP Address Specify the start IP address of the DHCP pool. Do not include the gateway address of the Barricade in the client address pool. If you change the pool range, make sure the first three octets match the gateway’s IP address, i.e., 192.168.2.xxx. End IP Address Specify the end IP address of the DHCP pool. Domain Name If your network uses a domain name, enter it here.