
User guide


Configuring Client TCP/IP
5-22
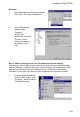
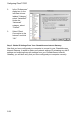
2. In the TCP/IP dialog
box, make sure that
“Ethernet” is selected
in the “Connect Via:”
field.
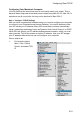
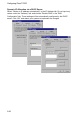
If “Using DHCP Server” is
already selected in the
“Configure” field, your
computer is already
configured for DHCP. Close
the TCP/IP dialog box, and
skip to Step 2 “Disable HTTP
Proxy.”
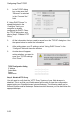
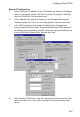
3. All the information that you need to record is on the “TCP/IP” dialog box. Use
the space below to record the information.
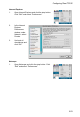
4. After writing down your IP settings, select “Using DHCP Server” in the
“Configure” field and close the window.
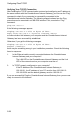
5. Another box will appear
asking whether you want to
save your TCP/IP settings.
Click “Save.”
Step 2. Disable HTTP Proxy
You will need to verify that the “HTTP Proxy” feature of your Web browser is
disabled. This is so that your Web browser will be able to view the configuration
pages inside your CheetahAccess Internet Gateway. The following steps are for
Internet Explorer and for Netscape. Determine which browser you use and follow the
appropriate steps.
TCP/IP Configuration Setting
IP Address ____.____.____.____
Subnet Mask ____.____.____.____
Router ____.____.____.____
Name Server ____.____.____.____