
User's Manual


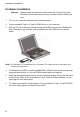

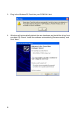


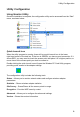

Table Of Contents

Hardware Installation
4
Hardware Installation
Warning: Network cards are sensitive to static electricity. To protect the card,
always touch the metal chassis of your computer before handling the
card.
1. Turn on your computer and boot your operating system.
2. Find an available Type II or Type III PCMCIA slot in your computer.
3. With the PC Card’s 68-pin connector facing the PCMCIA slot and the “Wireless PC
Card” label facing up, slide the card completely into the PCMCIA slot as shown
below.
Note:
The Wireless PC Card allows you to “hot swap” PC Cards any time, even when your
computer is powered on.
4. For Windows 95 (OSR2.1 or above)/98/Me/2000, PCMCIA card and socket services
compliant with revision 2.10 of the PCMCIA specification are required.
5. Install the appropriate network driver for your operating system. Drivers can be found
on the Driver, Utility, & Documentation CD. See “Driver & Utility Installation” on the
next page for more information.
6. To modify or reinstall the Utility program for your wireless PC card. The SETUP.EXE
file of the utiltiy program can be found on the CD.