CheetaHub Power-3008P/3016P Quick Installation Guide
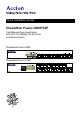
Quick Installation Guide CheetaHub Power-3008P/16P Fast Ethernet Dual-Speed Hubs with 8/16 10/100Mbps (RJ-45) Ports, and Internal Switch CheetaHub Power-3008P CheetaHub Power-3016P
Copyright © 1999 by Accton Technology Corporation. All rights reserved. No part of this document may be copied or reproduced in any form or by any means without the prior written consent of Accton Technology Corporation. Accton makes no warranties with respect to this documentation and disclaims any implied warranties of merchantability, quality, or fitness for any particular purpose. The information in this document is subject to change without notice.
Contents Introduction 1 Installing the Hub 1 Package Contents Description of Hardware Mounting the Hub Stacking Hubs on a Flat Surface Mounting Hubs in a Rack Connecting the Hub System Making a Connection via an RJ-45 Station Port Making a Connection via an MDI Daisy-Chain Port 1 1 2 2 3 3 3 4 Powering On the Hub 5 Verifying Port Status 5 Verifying System Operation 6 Applications 6 Product Specifications 7 Repeater Criteria Internal Switching Criteria Troubleshooting 7 8 8 Diagnosing H
ii
Quick Installation Guide Introduction The CheetaHub Power-3008P/16P provides 8 (16) RJ-45 ports that automatically adjust to the speed of the attached device (for 10Mbps Ethernet or 100Mbps Fast Ethernet connections). These dual-speed hubs contain two internal repeater buses – one for 10Mbps traffic and another for 100Mbps traffic. Traffic passing between attached devices that operate at the same speed is confined within the appropriate repeater bus.
CheetaHub Power-3008P/3016P containing the destination node via a 2-port switch that connects the two repeater buses. By confining traffic to its respective collision domain, and only forwarding traffic to the other segment when required, the overall load on the network is significantly reduced. These hubs provide a friendly design that simplifies installation and network troubleshooting.
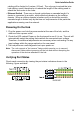
Quick Installation Guide 2. Place the first hub on a firm flat surface where you want to install the stack. 3. Repeat step 1 for each hub before stacking them. The rubber foot pads cushion the hub against shock/vibrations and provide space between each hub for ventilation. Mounting Hubs in a Rack Please comply with the following instructions to ensure that your hub is securely mounted in the rack. 1. Use a standard EIA 19-inch rack. 2. Use the brackets and screws supplied in the rack mounting kit. 3.
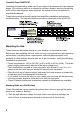
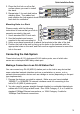
CheetaHub Power-3008P/3016P 3. Connect one end of the cable to the RJ-45 port of the network interface card, and the other end to any available (MDI-X) station port on the hub. The RJ-45 ports support 10Mbps and 100Mbps Ethernet connections. When inserting an RJ-45 plug, be sure the tab on the plug clicks into position to ensure that it is properly seated. Using a hub in a stand-alone configuration, you can network up to 8 (16) end nodes. Do not plug a phone jack connector into any RJ-45 port.
Quick Installation Guide cabling will be limited to 5 meters (16 feet). The only way to extend the interhub cabling, would therefore be to reduce the length of the cabling used to attach the end nodes to the hubs. • Ethernet Switch - There are no formal restrictions on cascade length if a device is connected to a switch, which effectively breaks up the collision domain.
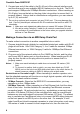
CheetaHub Power-3008P/3016P Port and Hub Status LEDs LEDs Condition Status Power Green Hub is receiving power. Link Yellow Indicates a valid 10BASE-T connection between port and attached device. Green Indicates a valid 100BASE-TX connection between port and attached device. Partition Yellow Port has been partitioned due to an abnormal condition. Col Flashing Yellow Indicates that a packet collision has been detected on the indicated segment.
Quick Installation Guide Connecting to a Network Backbone - You can easily connect to a collapsed backbone switch via the RJ-45 MDI daisy-chain port on the front panel. Because a switch breaks up the collision domain, it can be used to connect multiple CheetaHubs.
CheetaHub Power-3008P/3016P Maximum Current Temperature Humidity Certification Emissions Immunity Safety 0.3A RMS max. @ 110VAC, 0.1ARMS max. @ 240VAC 0°C to 50°C (32 to 122°F) Standard Operating, -40~70°C (-40~158°F) Storage 5% to 95% (Noncondensing) CE Mark FCC Class A, VCCI Class A, EN55022 (CISPR22) Class A IEC 1000-4-2/3/4/6 CSA/NRTL (C22.2.
Quick Installation Guide Power and Cooling Problems If the Power indicator does not turn on when the power cord is plugged in, you may have a problem with the power outlet, power cord, or internal power supply as explained in the previous section. However, if the unit powers off after running for a while, check for loose power connections, power losses or surges at the power outlet, and verify that the fan on back of the unit is unobstructed and running prior to shutdown.
CheetaHub Power-3008P/3016P Assignment (Station Ports) 1 Inp ut Re ce ive Data + 2 Inp ut Re ce ive Data 3 Outp ut Transmit Data + 6 Outp ut Transmit Data 4,5,7,8 No t Use d Pi n Assignment (Daisy-Chain Port) Outp ut Transmit Data + Outp ut Transmit Data Inp ut Re ce ive Data + Inp ut Re ce ive Data No t Use d Schematics for both straight and crossover twisted-pair cable are shown below.
Quick Installation Guide VCCI Class A Compliance (Japan) BCIQ Class A Compliance (Taiwan) CE Mark Declaration of Conformance (for EMI and Safety - Europe) This is to certify that this product complies with ISO/IEC Guide 22 and EN45014. It conforms to the following specifications: EMC: EN55022(1988)/CISPR-22(1985) IEC1000-4-2(1995) IEC1000-4-3(1995) IEC1000-4-4(1995) IEC 1000-4-6(1995) Class A 4kV CD, 8kV AD 3V/m 1kV - (power line), 3Vrms 0.
CheetaHub Power-3008P/3016P Voltage 120 Vo lts 240 Vo lts (No rth Ame rica) 240 Vo lts (Euro p e o nly) Cord Set Specifications UL Liste d /CSA Ce rtifie d Co rd Se t Minimum 18 AWG; typ e SVT o r SJT thre e co nd ucto r co rd Maximum le ng th o f 15 fe e t Paralle l b lad e , g ro und ing typ e attachme nt p lug rate d 15A, 125V UL Liste d /CSA Ce rtifie d Co rd Se t Minimum 18 AWG; typ e SVT o r SJT thre e co nd ucto r co rd Maximum le ng th o f 15 fe e t Tand e m b lad e , g ro und ing typ e attachme
Quick Installation Guide 15. Zum Netzanschluß dieses Gerätes ist eine geprüfte Leitung zu verwenden. Für einen Nennstrom bis 6A und einem Gerätegewicht größer 3kg ist eine Leitung nicht leichter als H05VV-F, 3G, 0.75mm2 einzusetzen. Warranty Accton warrants to the original owner that the product delivered in this package will be free from defects in material and workmanship for a period of three years from the date of purchase from Accton or it’s Authorized reseller.
EH3008P EH3016P E0999-R02 150052-102