
User's Manual

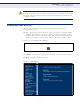
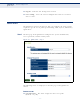
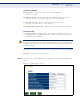
Table Of Contents
- Compliances
- About This Guide
- Contents
- Figures
- Tables
- Index of CLI Commands
- Getting Started
- Introduction
- Network Topologies
- Installing the access point
- Initial Configuration
- Web Configuration
- System Settings
- Management Settings
- Advanced Settings
- Wireless Settings
- Maintenance Settings
- Status Information
- Command Line Interface
- Using the Command Line Interface
- General Commands
- System Management Commands
- System Logging Commands
- System Clock Commands
- DHCP Relay Commands
- SNMP Commands
- Flash/File Commands
- RADIUS Client Commands
- 802.1X Authentication Commands
- MAC Address Authentication Commands
- Filtering Commands
- Spanning Tree Commands
- WDS Bridge Commands
- Ethernet Interface Commands
- Wireless Interface Commands
- Wireless Security Commands
- Link Layer Discovery Commands
- VLAN Commands
- WMM Commands
- Appendices
- Troubleshooting
- Hardware Specifications
- Cables and Pinouts
- Glossary
- Index

– 43 –
4 INITIAL CONFIGURATION
The SMCE21011 offers a user-friendly web-based management interface
for the configuration of all the unit’s features. Any PC directly attached to
the unit can access the management interface using a web browser, such
as Internet Explorer (version 6.0 or above).
CONNECTING TO THE LOGIN PAGE
It is recommended to make initial configuration changes by connecting a
PC directly to the SMCE21011’s LAN port. The SMCE21011 has a default IP
address of 192.168.1.1 and a subnet mask of 255.255.255.0. You must set
your PC IP address to be on the same subnet as the SMCE21011 (that is,
the PC and SMCE21011 addresses must both start 192.168.1.x).
To access the access point management interface, follow these steps:
1. Use your web browser to connect to the management interface using
the default IP address of 192.168.1.1.
2. Log into the interface by entering the default username “accton” and
password also “accton,” then click Login.
N
OTE
:
It is strongly recommended to change the default user name and
password the first time you access the web interface. For information on
changing user names and passwords, See “Administration Settings” on
page 52.
Figure 12: Login Page