
Quick Start Guide

Quick Start Guide
– 2 –
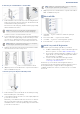
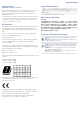
b. Mounting on a Wall Without a Junction Box
1. At the installation location on the wall, use the mounting bracket to
mark four holes for the wall plugs and screws. The bracket must be
installed with the marking “UP” at the top.
Drill four holes for the wall plugs, and then insert the plugs and tap
them flush with the wall surface.
Use the four screws to secure the bracket to the wall.
2. To power the AP from a PoE source, use the included short Ethernet
cable to connect the Uplink (PoE) port to the Pass-Thru port on the
rear of the device. When the Pass-Thru port on the bottom of the
device is connected to a PoE source, it provides power to the unit.
3. With its ports facing down, place the AP over the bracket and then
slide it down until it is in its secured position.
4. Use the included security screw to secure the bracket to the AP.
5. (Optional) Connect a local LAN switch or computers to the LAN1 to
LAN4 1000BASE-T RJ-45 ports.
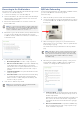
c. Mounting Using the Optional Desktop Stand
1. At the installation location, slide the AP onto the desktop mounting
bracket and then place on the desktop.
2. Connect Ethernet cable from a PoE source to the Uplink (PoE) RJ-45
port on the rear of the AP.
Alternatively, connect Ethernet cable from a PoE source to
the Pass-
T
hru port on the bottom of the device and then use the included
short Ethernet cable to connect the Uplink (PoE) port to the Pass-Thru
port on the rear of the device.
3. (Optional) Connect a local LAN switch or computers to the LAN1 to
LAN4 1000BASE-T RJ-45 ports.
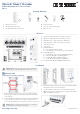
Check AP LEDs
1. Uplink LED — on green or amber for valid RJ-45 Uplink port
connection.
2. 2.4G and 5G LEDs — on green for radio enabled.
3. Cloud LED — on green for cloud management operation.
4. Power/Status LED — on green for normal operation.
Initial Setup and AP Registration
There are three options for setting up the AP for your network:
Use QR-Code Onboarding to connect to the AP through a web
browser on a phone. See section “QR Code Onboarding”.
If your network is already managed by ecCLOUD, you can just
register the AP on your network by entering the MAC address
and serial number on ecCLOUD.
Connect to the AP’s web interface through a network
connection to one of the AP’s LAN ports. See section
“Connecting to the Web Interface”.
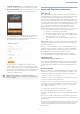
The first-time you access the AP’s web management interface, it
automatically runs the Setup Wizard for initial AP configuration. Follow
the Setup Wizard steps to configure the AP for management by
e
cCLOUD, an EWS-Series controller, a uCentral cloud, or in a stand-
alone mode.
Note:
Drill 2.5 mm (±0.2 mm) holes for M3 self-tapping
screws, or 4.5 mm (±0.2 mm) holes for nylon wall plugs.
Note:
When not connected to a PoE source, you can power
the AP using the optional AC power adapter.
1
2
4
1
Note:
When not connected to a PoE source, you can power
the AP using the optional AC power adapter.
2
4
3
2
1
3