CheetahSwitch 3008/3016B Quick Installation Guide
Quick Installation Guide CheetahSwitch 3008/3016B Fast Ethernet Switch with 8/16 10BASE-T / 100BASE-TX (RJ-45) Ports
Copyright © 2002 by Accton Technology Corporation. All rights reserved. .Accton makes no warranties with respect to this documentation and disclaims any implied warranties of merchantability, quality, or fitness for any particular purpose. The information in this document is subject to change without notice. Accton reserves the right to make revisions to this publication without obligation to notify any person or entity of any such changes.
Accton Technology Corporation Limited Warranty: Accton warrants all is products to be free of manufacturing defects in workmanship and materials, under normal use and service, for the applicable warranty term. All Accton products carry a standard 90-day limited warranty from the date of purchase from Accton or its Authorized Reseller.
Limited Warranty WARRANTIES EXCLUSIVE: IF AN ACCTON PRODUCT DOES NOT OPERATE AS WARRANTED ABOVE, CUSTOMER'S SOLE REMEDY SHALL BE REPAIR OR REPLACEMENT OF THE PRODUCT IN QUESTION, AT ACCTON’S OPTION. THE FOREGOING WARRANTIES AND REMEDIES ARE EXCLUSIVE AND ARE IN LIEU OF ALL OTHER. WARRANTIES OR CONDITIONS, EXPRESS OR IMPLIED, EITHER IN FACT OR BY OPERATION OF LAW, STATUTORY OR OTHERWISE, INCLUDING WARRANTIES OR CONDITIONS OF MERCHANTABILITY AND FITNESS FOR A PARTICULAR PURPOSE.
Contents Introduction 1 Installing the Switch Package Contents Description of Hardware Mounting the Switch Stacking Switches on a Flat Surface Mounting Switches in a Rack Connecting the Switch System Making a Connection to an RJ-45 Port Powering On the Switch Verifying Port Status Verifying System Operation Applications 1 1 1 2 3 3 3 3 4 5 5 6 Product Specifications Physical Characteristics Switching Criteria 7 7 8 Troubleshooting Diagnosing Switch Indicators Power and Cooling Problems Installation 8
Contents iv
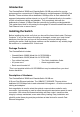
Introduction The CheetahSwitch 3008B and CheetahSwitch 3016B are perfect for moving workgroups from conventional 10 Mbps Ethernet to multiple-segment 100 Mbps Fast Ethernet. These switches deliver dedicated 100 Mbps links to each attached LAN segment (independent collision domain) or to any PC attached directly to the switch – all with conventional cabling and adapters. They completely eliminate the bottlenecks of shared 10 Mbps Ethernet networks by providing a wide bandwidth.
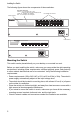
Installing the Switch The following figure shows the components of these switches: Port Status Indicators Link/Act - On: link/enable; Off: no link; Flashing: data being transmitted/received 100M - On: 100 Mbps: Off: 10 Mbps FDX - On: full duplex: Off: half duplex Power Indicator 10/100 Mbps RJ-45 Ports 1 2 3 4 5 6 7 8 9 10 11 12 13 14 15 16 CheetaSwitch AC-ES3016B Power Link/Act 100M FDX 1 2 3 4 5 6 7 8 9 10 11 12 13 14 15 16 100-240V~50-60Hz 0.
Connecting the Switch System Stacking Switches on a Flat Surface The CheetahSwitch can be placed anywhere there is enough flat space, such as on a table or desktop. Chee 1. taSw Link/A itch AC-E S301 Power 6B ct 100M 1 FDX 2 1 Chee taSw 2 3 itch AC-E 3 4 S301 5 6 4 7 8 9 10 11 12 5 6 13 14 15 16 7 8 9 6B Stick the self-adhesive rubber foot pads (that come with this package) on each of the 4 concave spaces located on the bottom of the first switch.
Installing the Switch 2. 3. Prepare straight-through shielded or unshielded twisted-pair cables with RJ-45 plugs at both ends. Use 100-ohm Category 3, 4 or 5 cable for standard 10 Mbps Ethernet connections, or 100-ohm Category 5 cable for 100 Mbps Fast Ethernet connections. Connect one end of the cable to the RJ-45 port of the network interface card, and the other end to any available RJ-45 port on the switch. All RJ-45 ports support 10 Mbps and 100 Mbps Ethernet connections.
Verifying Port Status Verifying Port Status The front panel of the switch provides status LEDs for “at-a-glance” system monitoring. The following table details the functions of the various indicators: CheetaSwitch AC-ES3016B Power Link/Act 100M FDX 1 2 3 4 5 6 7 8 9 10 11 12 13 14 15 16 CheetaSwitch AC-ES3008B Power 100M Link/Act FDX 1 2 3 4 5 6 7 8 1 2 Port and System Status LEDs LED Power Condition Status On The switch is receiving power.
Installing the Switch Applications This switch segments your network, significantly increasing both bandwidth and throughput. Any port on the switch can be attached to a hub (a shared collision domain) or provide a dedicated link to a single network device (such as a workstation or server). When a port on the switch is connected to a hub (a 10 or 100 Mbps repeater), the bandwidth provided by that port is shared by all the devices connected to the attached hub.
Applications High-Speed Switch Links – In this application a 200 Mbps full-duplex link is made to a second CheetahSwitch 3016B.
Product Specifications Physical Characteristics Standards Conformance Communication Rate Communication Mode Media Supported Number of Ports Indicator Panel Dimensions Weight Input Power Maximum Current Power Consumption Heat Dissipation Temperature IEEE 802.3, IEEE 802.3u, IEEE 802.
Troubleshooting Diagnosing Switch Indicators Symptom Power LED does not light after power on. Probable Causes Power outlet or power cord may be defective. Possible Solutions • Check for loose connections. • Check the power outlet by using it for another device. • Replace the power cord. Symptom Link LED does not light after connection is made. Probable Causes Switch port, network card or cable may be defective. Possible Solutions • Check that the switch and attached device are both powered on.
Cables Cable Specifications Cable Types and Specifications Cable Type Max. Length Connector 10BASE-T Cat. 3, 4, 5 100-ohm UTP 100 m (328 ft) RJ-45 100BASE-TX Cat. 5 100-ohm UTP 100 m (328 ft) RJ-45 Port and Cable Assignments Caution: DO NOT plug a phone jack connector into any RJ-45 port. Use only twisted-pair cables with RJ-45 connectors that conform with FCC standards.
Compliances EMI Certification FCC Class A Certification (USA) Warning: This equipment generates, uses, and can radiate radio frequency energy and, if not installed and used in accordance with the instruction manual, may cause interference to radio communications.
Compliances CE Mark Declaration of Conformance for EMI and Safety (EEC) This information technology equipment complies with the requirements of the Council Directive 89/336/EEC on the Approximation of the laws of the Member States relating to Electromagnetic Compatibility and 73/23/EEC for electrical equipment used within certain voltage limits and the Amendment Directive 93/68/ EEC.
Compliances Underwriters Laboratories Inc. (USA) Important! Before making connections, make sure you have the correct Cord Set. Check it (read the label on the cable) against the following specification list.
AC-ES3008B AC-ES3016B E042002-R01 150000016700A 650.