
User's Manual
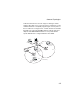

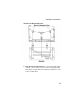
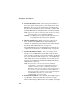
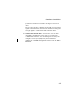


Table Of Contents
- Chapter 1 Introduction
- Chapter 2 Network Configuration
- Chapter 3 Hardware Installation
- Chapter 4 Initial Configuration
- Chapter 5 System Configuration
- Chapter 6 Command Line Interface
- Using the Command Line Interface
- Entering Commands
- Command Groups
- General Commands
- System Management Commands
- SNMP Commands
- Flash/File Commands
- RADIUS Client
- 802.1x Port Authentication
- Filtering Commands
- Interface Commands
- interface
- dns server
- ip address
- ip dhcp
- shutdown
- speed-duplex
- show interface ethernet
- radio-mode
- select-antenna-mode
- description
- ssid-broadcast
- closed-system
- speed
- channel
- ssid
- beacon-interval
- dtim-period
- fragmentation-length
- rts-threshold
- authentication
- encryption
- key
- transmit-key
- transmit-power
- max-association
- multicast-cipher
- wpa-clients
- wpa-mode
- wpa-preshared-key
- wpa-psk-type
- shutdown
- show interface wireless
- show station
- IAPP Commands
- VLAN Commands
- Appendix A Troubleshooting
- Appendix B Specifications
- Appendix C Cables and Pinouts
- Glossary
- Index

Hardware Installation
3-5
position the antennas around 45 to 90 degrees from each
other.
The access point also compares the strength of an incoming
signal on both antennas, and uses the antenna receiving the
stronger signal to communicate with a wireless client.
9. Connect the Console Port – Connect the console cable
(included) to the RS-232 console port for accessing the
command-line interface. You can manage the access point
using the console port (Chapter 6), the web interface
(Chapter 5), or SNMP management software such as SMC’s
EliteView.