Draft 11n Wireless 4-Port Broadband Router SMCWBR14S-NL Rev 0.
Federal Communication Commission Interference Statement This equipment has been tested and found to comply with the limits for a Class B digital device, pursuant to Part 15 of the FCC Rules. These limits are designed to provide reasonable protection against harmful interference in a residential installation. This equipment generates, uses and can radiate radio frequency energy and, if not installed and used in accordance with the instructions, may cause harmful interference to radio communications.
Table of Contents Getting Started with the SMCWBR14S-NL ----------------------------- 3 Package Contents ------------------------------------------------------- 4 Minimum System Requirements ------------------------------------ 4 Wireless LAN Networking -------------------------------------------------- 5 Introduction -------------------------------------------------------------- 9 Features ------------------------------------------------------------------- 9 Hardware Overview ------------------------------
Getting Started with the SMCWBR14S-NL Congratulations on purchasing the SMCWBR14S-NL! This manual provides information for setting up and configuring the SMCWBR14S-NL. This manual is intended for both home users and professionals. The following conventions are used in this manual: THE NOTE SYMBOL INDICATES ADDITIONAL INFORMATION ON THE TOPIC AT HAND. THE TIP SYMBOL INDICATES HELPFULL INFORMATION AND TIPS TO IMPROVE YOUR NETWORK EXPERIENCE.
Package Contents z SMCWBR14S-NL Draft 11n Wireless 4- port Broadband Router z CAT-5 Ethernet Cable z Power Adapter (12VDC) z CD-ROM with Manual z Quick Installation Guide Using a power supply with a different voltage than the one included with your product will cause damage and void the warranty for this product.
Wireless LAN Networking This section provides background information on wireless LAN networking technology. Consult the Glossary for definitions of the terminology used in this section. THE INFORMATION IN THIS SECTION IS FOR YOUR REFERENCE. CHANGING NETWORK SETTINGS AND PARTICULARLY SECURITY SETTTINGS SHOULD ONLY BE DONE BY AN AUTHORIZED ADMINISTRATOR. Transmission Rate (Transfer Rate) The SMCWBR14S-NL provides various transmission (data) rate options for you to select.
6
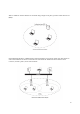
When a number of wireless stations are connected using a single access point, you have a Basic Service Set (BSS). In the ESS diagram below, communication is done through the access points, which relay data packets to other wireless stations or devices connected to the wired network. Wireless stations can then access resources, such as a printer, on the wired network.
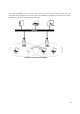
In an ESS environment, users are able to move from one access point to another without losing the connection. In the diagram below, when the user moves from BSS (1) to BSS (2) the WLAN client devices automatically switches to the channel used in BSS (2).
Introduction The SMCWBR14S-NL Draft 11n Wireless 4- port Broadband Router is an high-performance, wireless router that supports high-speed wireless networking at home, at work or in public places. Unlike most routers, the SMCWBR14S-NL provides data transfers at up to 300Mbps when using 11n (Draft) connection. This router is also back compatible with 802.11g or 11b devices. This means that you do not need to change your entire network to maintain connectivity.
Hardware Overview LED Indications: (from bottom to top) PWR WAN LAN1 LAN2 LAN3 LAN4 Wireless WPS Rear panel: (from bottom to top) DC-IN RESET WAN LAN1 LAN2 LAN3 LAN4 10
Installation Considerations The SMCWBR14S-NL Draft 11n Wireless 4- port Broadband Router lets you access your network, using a wireless connection, from virtually anywhere within its operating range. Keep in mind, however, that the number, thickness and location of walls, ceilings, or other objects that the wireless signals must pass through, may limit the range. Typical ranges vary depending on the types of materials and background RF (radio frequency) noise in your home or business.
Using the Configuration Menu Whenever you want to configure your SMCWBR14S-NL , you can access the Configuration Menu through your PC by opening the Web-browser and typing in the IP Address of the SMCWBR14S-NL . The SMCWBR14S-NL’s default IP Address is http://192.168.2.1 ¾ ¾ Open the Web browser. Type in the IP Address of the Router (http://192.168.2.1). If you have changed the default IP Address assigned to the SMCWBR14S-NL, make sure to enter the correct IP Address.
Network Network: Wan Setting WAN Connection Type There are several connection types to choose from: Static IP, DHCP, PPPoE, PPTP, L2TP. If you are unsure of your connection method, please contact your Internet Service Provider. Static Used when your ISP provides you a set IP address that does not change. The IP information is manually entered in your IP configuration settings. You must enter the IP address, Subnet Mask, Gateway, Primary DNS Server, and Secondary DNS Server.
Select this option if your ISP requires you to use a PPPoE (Point to Point Protocol over Ethernet) connection. DSL providers typically use this option. This method of connection requires you to enter a Username and Password (provided by your Internet Service Provider) to gain access to the Internet. Reconnect Mode: Typically PPPoE connections are not always on. The router allows you to set the reconnection mode. The settings are: Always on: A connection to the Internet is always maintained.
Always on: A connection to the Internet is always maintained. On demand: A connection to the Internet is made as needed. Manual: You have to open up the Web-based management interface and click the Connect button manually any time that you wish to connect to the Internet. Maximum Idle Time: Time interval the machine can be idle before the PPPoE connection is disconnected. The Maximum Idle Time value is only used for the "On demand" and "Manual" reconnect modes.
Network: Lan Setting LAN Interface Setting IP Address The IP address of the this device on the local area network. Assign any unused IP address in the range of IP addresses available for the LAN. For example, 192.168.2.101. Subnet Mask The subnet mask of the local area network.
DHCP Server Settings DHCP stands for Dynamic Host Configuration Protocol. The DHCP section is where you configure the built-in DHCP Server to assign IP addresses to the computers and other devices on your local area network (LAN). Enable DHCP Server Once your router is properly configured and this option is enabled, the DHCP Server will manage the IP addresses and other network configuration information for computers and other devices connected to your Local Area Network.
The LAN address that you want to reserve. MAC Address To input the MAC address of your system, enter it in manually or connect to the router's Web-Management interface from the system and click the Copy Your PC's MAC Address button. A MAC address is usually located on a sticker on the bottom of a network device. The MAC address is comprised of twelve digits. Each pair of hexadecimal digits are usually separated by dashes or colons such as 00-0D-88-11-22-33 or 00:0D:88:11:22:33.
Network: DHCP Client List DHCP Client List In this section you can see what LAN devices are currently leasing IP addresses.
Wireless Wireless: Basic Radio On/Off This indicates the wireless operating status. The wireless can be turned on or off by the slide switch. When the radio is on, the following parameters are in effect. Wireless Mode If all of the wireless devices you want to connect with this router can connect in the same transmission mode, you can improve performance slightly by choosing the appropriate "Only" mode. If you have some devices that use a different transmission mode, choose the appropriate "Mixed" mode.
Wireless Network Name (SSID) When you are browsing for available wireless networks, this is the name that will appear in the list (unless Visibility Status is set to Invisible, see below). This name is also referred to as the SSID. For security purposes, it is highly recommended to change from the pre-configured network name. Frequency (Channel) A wireless network uses specific channels in the wireless spectrum to handle communication between clients.
Wireless: Advanced Beacon Interval Beacons are packets sent by a wireless router to synchronize wireless devices. Specify a Beacon Period value between 20 and 1000. The default value is set to 100 milliseconds. DTIM A DTIM is a countdown informing clients of the next window for listening to broadcast and multicast messages. When the wireless router has buffered broadcast or multicast messages for associated clients, it sends the next DTIM with a DTIM Interval value.
23
Wireless: Security Security Mode Unless one of these encryption modes is selected, wireless transmissions to and from your wireless network can be easily intercepted and interpreted by unauthorized users. WEP A method of encrypting data for wireless communication intended to provide the same level of privacy as a wired network. WEP is not as secure as WPA encryption. To gain access to a WEP network, you must know the key. The key is a string of characters that you create.
client only supports WPA. With the "WPA2 Only" option, the router associates only with clients that also support WPA2 security. Cipher Type: The encryption algorithm used to secure the data communication. TKIP (Temporal Key Integrity Protocol) provides per-packet key generation and is based on WEP. AES (Advanced Encryption Standard) is a very secure block based encryption. With the "TKIP and AES" option, the router negotiates the cipher type with the client, and uses AES when available.
Wireless: WPS WPS Enable Enable the WPS feature. Lock Wireless Security Settings Locking the wireless security settings prevents the settings from being changed by any new external registrar using its PIN. Devices can still be added to the wireless network using WPS. PIN Settings A PIN is a unique number that can be used to add the router to an existing network or to create a new network. The default PIN may be printed on the bottom of the router. For extra security, a new PIN can be generated.
Shows the current value of the router's PIN. Reset To WPS Default Restore the default PIN of the router. Generate New PIN Create a random number that is a valid PIN. This becomes the router's PIN. You can then copy this PIN to the user interface of the registrar.
Wireless: Station List 28
Advanced Advanced: DMZ DMZ Setting DMZ means "Demilitarized Zone." If an application has trouble working from behind the router, you can expose one computer to the Internet and run the application on that computer. When a LAN host is configured as a DMZ host, it becomes the destination for all incoming packets that do not match some other incoming session or rule.
Few applications truly require the use of the DMZ host. Following are examples of when a DMZ host might be required: • A host needs to support several applications that might use overlapping ingress ports such that two port forwarding rules cannot be used because they would potentially be in conflict. • To handle incoming connections that use a protocol other than ICMP, TCP, UDP, and IGMP (also GRE and ESP, when these protocols are enabled by the PPTP and IPSec ALGs ).
Advanced: Virtual Server Add/Edit Virtual Server Enable Specifies whether the entry will be active or inactive. Name Assign a meaningful name to the virtual server, for example Web Server. Several well-known types of virtual server are available from the "Application Name" drop-down list. Selecting one of these entries fills some of the remaining parameters with standard values for that type of server.
Public Port The port that will be accessed from the Internet. Schedule Select a schedule for when the service will be enabled. If you do not see the schedule you need in the list of schedules. Clear Re-initialize this area of the screen, discarding any changes you have made.
Advanced: Access Control Enable By default, the Access Control feature is disabled. If you need Access Control, check this option. Note: When Access Control is disabled, every device on the LAN has unrestricted access to the Internet. However, if you enable Access Control, Internet access is restricted for those devices that have an Access Control Policy configured for them. All other devices have unrestricted access to the Internet.
Advanced: Special Applications Add/Edit Port Trigger Rule Enable Specifies whether the entry will be active or inactive. Name Enter a name for the Special Application Rule, for example Game App, which will help you identify the rule in the future. Alternatively, you can select from the Application list of common applications. Protocol Select the protocol used by the service. The common choices -- UDP, TCP, and both UDP and TCP -can be selected from the drop-down menu.
Enter the outgoing port range used by your application (for example 6500-6700). Schedule Select a schedule for when this rule is in effect. Clear Re-initialize this area of the screen, discarding any changes you have made. Port Trigger Rule List This is a list of the defined application rules. Click the Enable checkbox at the left to directly activate or de-activate the entry. An entry can be changed by clicking the Edit icon or can be deleted by clicking the Delete icon.
Advanced: Gaming Add/Edit Port Range Rule Use this section to add a Port Range Rule to the following list or to edit a rule already in the list. Rule Enable Specifies whether the entry will be active or inactive. Rule Name Give the rule a name that is meaningful to you, for example Game Server. You can also select from a list of popular games, and many of the remaining configuration values will be filled in accordingly.
Inbound Filter Select a filter that controls access as needed for this rule. Schedule Select a schedule for the times when this rule is in effect. Clear Re-initialize this area of the screen, discarding any changes you have made. Port Range Rule List This is a list of the defined Port Range Rules. Click the Enable checkbox at the left to directly activate or de-activate the entry. An entry can be changed by clicking the Edit icon or can be deleted by clicking the Delete icon.
Advanced: Inbound Filter Add/Edit Inbound Filter Rule Here you can add entries to the Inbound Filter Rules List below, or edit existing entries. Name Enter a name for the rule that is meaningful to you. Action The rule can either Allow or Deny messages. Remote IP Range Define the ranges of Internet addresses this rule applies to. For a single IP address, enter the same address in both the Start and End boxes. Up to eight ranges can be entered.
Permit any WAN user to access the related capability. Deny All Prevent all WAN users from accessing the related capability. (LAN users are not affected by Inbound Filter Rules.
Advanced: Schedule Add/Edit Schedule Rule In this section you can add entries to the Schedule Rules List below or edit existing entries. Name Give the schedule a name that is meaningful to you, such as "Weekday rule". Day(s) Place a checkmark in the boxes for the desired days or select the All Week radio button to select all seven days of the week. All Day - 24 hrs Select this option if you want this schedule in effect all day for the selected day(s).
Schedule Rules List This section shows the currently defined Schedule Rules. An entry can be changed by clicking the Edit icon or can be deleted by clicking the Delete icon. When you click the Edit icon, the item is highlighted, and the "Edit Schedule Rule" section is activated for editing.
Admin Admin: Management Admin Password Enter a password for the user "admin", who will have full access to the Web-based management interface. Device Name The name of the router can be changed here. Enable Dynamic DNS Enable this option only if you have purchased your own domain name and registered with a dynamic DNS service provider. The following paramters are displayed when the option is enabled.
Dynamic DNS Provider Select a dynamic DNS service provider from the pull-down list. Host Name Enter your host name, fully qualified; for example: myhost.mydomain.net. Account Enter the account provided by your service provider. If the Dynamic DNS provider supplies only a key, enter that key in all three fields. Password Enter the password provided by your service provider. If the Dynamic DNS provider supplies only a key, enter that key in all three fields.
Admin: Upload Firmware Upload Firmware Upload Firmware Once you have a firmware update on your computer, use this option to browse for the file and then upload the information into the router.
Admin: Setting Management Export Settings This option allows you to export and then save the router's configuration to a file on your computer. Be sure to save the configuration before performing a firmware upgrade. Import Settings Use this option to restore previously saved router configuration settings. Load Factory Defaults This option restores all configuration settings back to the settings that were in effect at the time the router was shipped from the factory.
Admin: Time Time Configuration Current Router Time Displays the time currently maintained by the router. If this is not correct, use the following options to configure the time correctly. Time Zone Select your local time zone from pull down menu. Automatic Time Configuration Enable NTP Server Select this option if you want to synchronize the router's clock to a Network Time Server over the Internet.
If you do not have the NTP Server option in effect, you can either manually set the time for your router here.
Admin: Status 48