
User's Manual


4/3/03 Accton Draft—CONFIDENTIAL
10 Aruba 50 Part 0500007A
Installation Guide May 2003
Perform Initial Setup
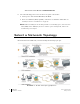
The Aruba 50 requires some initial configuration before it will operate. The method used for
connecting to the Aruba 50 for initial setup depends on your intended network topology (see
Figure 2-1 on page 8).
Direct SPOE to the Aruba WLAN Switch
Use this procedure when connecting the Aruba 50 directly to an SPOE-compatible network
port on the Aruba WLAN Switch (see
“Power Over Ethernet” on page 2). SPOE provides
10/100 Mbps Ethernet, serial connection, and power over one cable.
NOTE—
If connecting the Aruba 50 through the LAN or to a non-SPOE network port on
the Aruba WLAN Switch, see the instructions on
page 11.
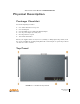
Connect the included SPOE adapter to the Aruba 50.
Connect the adapter’s 9-pin serial connector to the Console port on the back of the
Aruba 50.
Connect the adapter’s male RJ-45 plug to the FE port on the back of the Aruba 50.
Connect the Aruba 50 to the Aruba WLAN Switch.
The connection between the Aruba 50 and the Aruba WLAN Switch requires an 8-conduc-
tor, Category 5 UTP, straight-through FE cable with RJ-45 connectors (see
Appendix B for
port specifications).
Connect one end of the FE cable directly to the RJ-45 socket on the SPOE adapter that
was attached to the Aruba 50 in the previous step.
Connect the other end of the FE cable directly to an available SPOE network port on the
Aruba WLAN Switch.
N
OTE—
The Aruba 50 must be connected to the Aruba WLAN Switch without any inter-
vening hubs, routers, or other networking equipment.
Telnet to the Aruba WLAN Switch Serial-Over-Ethernet (SOE) interface.
Run the Telnet client on your management workstation and connect to theAruba WLAN
Switch management IP address using logical port 2300. The connection command may vary
depending on the specific software used, but commonly appears as follows:
telnet <switch management IP address> 2300
1
A
B
2
A
B
3