COUNTER-HEIGHT MEDICAL REFRIGERATOR/FREEZERS Models: CCT66 series M405 CM411L Instruction Manual BEFORE USE, PLEASE READ AND FOLLOW ALL SAFETY RULES AND OPERATING INSTRUCTIONS Write the Serial Number here: _________________________ FELIX STORCH, INC. 770 Garrison Avenue Bronx, NY 10474 www.summitappliance.
IMPORTANT SAFEGUARDS Your safety and the safety of others are very important. We have provided many important safety messages in this manual and on your appliance. Always read and obey all safety messages. This is the Safety Alert Symbol. This symbol alerts you to potential hazards that can kill or injure you and others. All safety messages will follow the Safety Alert Symbol and either the words ”DANGER” or “WARNING”.
• Use two or more people to move and install the appliance. Failure to do so can result in back or other injury. • To ensure proper ventilation for your appliance, the front of the unit must be completely ° ° unobstructed. Choose a well-ventilated area with temperatures above 60 F (16 C) and below ° ° 90 F (32 C). This unit must be installed in an area protected from the elements, such as wind, rain, water spray or drips.
Table of Contents Important Safeguards .................................................................................................... 1 - 2 Location of Parts ................................................................................................................. 3 Technical Information ......................................................................................................... 4 Installation Instructions ............................................................................
Technical Information Model Numbers CT66J (white with wire shelves and no lock) CT66L (white with wire shelves and lock) CT66B (black with glass shelves and no lock) Capacity 5.1 cu. ft. Electrical Input 115V AC/60Hz Rated Current 1.3A Temperature of Freezer 0°F Refrigerant R134a, 2.6 oz. Installation Free-standing Ship Weight 102 lbs. Unit Dimensions (W x D x H) 23.63" x 23.5" x 33.25" NOTES: 1.
• Avoid locating the unit in moist areas. Too much moisture in the air will cause frost to form quickly on the evaporator, requiring more frequent defrosting of the freezer compartment. • Plug the unit into an exclusive, properly installed and grounded wall outlet. Do not under any circumstances cut or remove the third (ground) prong from the power cord. Any questions concerning power and/or grounding should be directed toward a certified electrician or authorized service center.
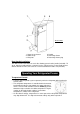
Reversing the Door Swing: If you find the direction of opening the door of the appliance inconvenient, you can change it. Holes on the opposite side have already been prepared at the factory. This appliance can be opened from either the right side or the left. By default, the door hinge is on the right side. If you prefer it on the left, please follow the appropriate instructions: For models CT66J and CT66B: 1. Take off the upper hinge cover from the door and remove the screws that hold the top hinge. 2.
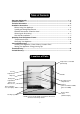
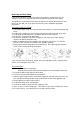
Model CT66L 1. Upper hinge fastener 2. Lower hinge 3. Kick plate 4. Handle 5. Door hinge fixture 6. Door hinge fixture plug Door Handle Installation: The door has two screw holes on each side, allowing you to install a handle (included). To do so, align the handle with the screw holes on the side you prefer. Fix the handle in place with the included screws, then cover the screw heads with the handle seal (included).
• • • • recommended. When the ambient temperature is normal, we recommend a medium setting. Changes in the ambient temperature affect temperature in the refrigerator compartment so choose an appropriate setting of the thermostat knob, depending on ambient conditions. In the STOP (0) position, the appliance does not operate (the cooling system is switched off), yet the power supply is not interrupted (the light goes on when you open the refrigerator door).
Care and Maintenance Cleaning Your Appliance: 1. Unplug the appliance, turn the thermostat to STOP (0) and remove all contents, including shelves, drip tray and crisper. 2. Wash the inside surfaces with a solution of lukewarm water and vinegar. Wipe dry with a clean, soft cloth. 3. Wash the shelves, drip tray and crisper with a mild detergent solution, then rinse and dry thoroughly. 4. Wash the outside cabinet with warm water and mild liquid detergent. Rinse well and wipe dry with a clean soft cloth. 5.
Troubleshooting When using this appliance, you may come across some problems that in many cases result from improper handling and can easily be eliminated. TROUBLESHOOTING GUIDE The appliance fails to operate after being connected to the power source. • Check whether the power supply is active and that the thermostat is not set to the STOP (0) position. The compressor is running continuously. • The door was opened frequently or it was left open too long.
Limited Warranty ONE-YEAR LIMITED WARRANTY Within the 48 contiguous United States, for one year from the date of purchase, when this appliance is operated and maintained according to instructions attached to or furnished with the product, warrantor will pay for factory-specified parts and repair labor to correct defects in materials or workmanship. Service must be provided by a designated service company. Outside the 48 states, all parts are warranted for one year from manufacturing defects.