USE & CARE GUIDE MED2 Series REFRIGERATORS & FREEZERS FOR MEDICAL & LABORATORY STORAGE If you need service or call with a question, please have this information ready. We advise you to keep this Use & Care Guide in your possession. Model: ______________Serial number: _________________ Options added: Date of purchase: Dealer: NOTE: The alarm/thermometer included in this unit has a NIST calibrated probe that requires re-calibration every two years.
Model Numbers MODELS All-Refrigerators • FFAR24LMED2 Compact all-refrigerator with automatic defrost operation • FF28LWHMED2 Countertop all-refrigerator with automatic defrost operation • FF511LBIMED2 / FF511LBIMED2ADA Undercounter all-refrigerator with automatic defrost operation • FF511LBI7MED2 / FF511LBI7MED2ADA Commercially listed undercounter all-refrigerator with automatic defrost operation • FF7LBIMED2 / FF7LBIMED2ADA Undercounter all-refrigerator with automatic defrost operation • FFAR10MED2 M
Table of Contents Model Numbers ......................................................................... 1 Appliance Safety ....................................................................... 3 Proper disposal of an old appliance ..................................... 3 Installation Instructions ........................................................... 4 Key Eject lock ....................................................................... 4 Location Requirements ......................................
Appliance Safety Your safety and the safety of others are very important to us. We have provided many important safety messages in this manual and on your appliance. Always read and obey all safety messages. You can be seriously injured or even killed if you don’t follow instructions. Safety messages will tell you what the potential hazard is, how to reduce the chance of injury, and what can happen if the instructions structions are not followed.
Installation Instructions Excessive Weight Hazard ! Use two or more people to move and install your appliance. Failure to do so can result in back or other injury. ALLOW APPLIANCE TO SIT UPRIGHT FOR 24 HOURS BEFORE TURNING ON, TO ALLOW THE COMPRESSOR LUBRICANT TO DRAIN. 1. Remove packaging materials. 2. Remove tape and glue residue from surfaces before turning on the appliance. Rub a small amount of liquid dish soap over the adhesive with your fingers. ingers. Rinse with warm water and dry. 3.
Location Requirements Keep flammable materials and vapors, such as gasoline, away from appliances. Failure to do so can result in fire, explosion or death. Location: IMPORTANT: Do not install the appliance near an oven, radiator, or other heat source, nor in a location where the temperature will ill fall below 40°F (5°C). Do not place in direct sunlight. Check the strength of the floor before installing your appliance. It should hold the weight of a fully loaded appliance.
Leveling your appliance (some models): Locate the two front leveling legs that may be taped among the packing materials. (In many models these legs are already mounted into the underside of the appliance.) 1. Screw these legs into the front holes on the bottom of the appliance. The back of the appliance rests on two fixed supports. (Built-in models also have rear level legs that can provide more precise leveling). 2. Adjust the front legs just enough to lift the cabinet up off the floor.
Appliance Care Defrosting: Refrigerator models listed in this manual defrost automatically. However, freezer models require manual defrosting. Before defrosting the unit, remove the contents of the freezer, then set the thermostat to OFF (the compressor will stop working). Leave the door open until ice and frost are completely melted. To speed up defrosting, you can place a container of warm water (about 125°F) into the cabinet.
Changing the light bulb (some models only): NOTE: Not all appliance bulbs will fit your appliance. Be sure to replace the bulb with one of the same size, shape, base size and wattage. You can purchase bulbs from www.summitappliance.com/support 1. Unplug appliance or disconnect power. 2. Remove the light shield. Most models do not require tools. 3. Replace the light bulb with an appliance bulb of the same wattage. Replacement LED bulbs are available from our parts department. 4. Replace the light shield. 5.
Temperature Selection & Monitoring Note: details may vary from image Digital Thermostat Temperature Parameters: MED2 all-refrigerators come with digital thermostats that are preset at 4ºC, with a range of 2º to 8ºC. VT65MLBIMED2 and VT65MLBIMED2ADA all-freezers are preset to -20º, with a range of -25º to -10ºC. All other MED2 all-freezers are preset to -18ºC, with a range of -20º to -10ºC.
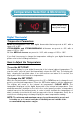
Thermometer/Alarm Note: Details may vary from image Every MED2 unit is equipped with a NIST calibrated Thermometer/Alarm that simultaneously displays minimum, maximum, and current interior temperatures and provides a visual and audible signal when the temperature inside the unit falls outside the set temperature range. NOTE ABOUT CALIBRATION: All MED2 units ship with a two-year certificate of calibration in the alarm/thermometer box that comes inside your unit.
Thermometer/alarm instructions (cont’d): Function of Controls: MODE/RESET Key: Press ONCE to reset Max/Min temperature record. When the unit is sounding an alarm, press ONCE to turn off the beeping sound. HI/LO Key: Press ONCE to display high alarm setting. Press TWICE to display low alarm setting. Press THREE TIMES to display current temperature reading. ºF/ºC Key: Press this button to change the temperature display scale from Fahrenheit (ºF) to Celsius (ºC).
Keypad Lock (optional on most models) Factory-set default password: The factory-set default password is 0123. If the default password is lost, press the key (located inside the battery box) for 30 seconds, then wait for the warning sound which signifies the factory-set default password has been restored. To set the password: While door is open, press the key (located inside the battery box) until it jingles, enter the 0123 password, then # within 10 seconds to confirm.
Operation of Specific Models All-Refrigerators: FF24LMED2, FF28LWHMED2, FF511LBIMED2, FF511LBI7MED2, FF511LBIMED2ADA, FF511LBI7MED2ADA, FF7LBIMED2, FF7LBIMED2ADA, FFAR10MED2, SCR600LBIMED2, SCR600LBIMED2ADA These models are all-refrigerators (no freezer compartment) with automatic defrost. All have cold plates on the rear wall, and the coldest spots in the refrigerator will be in the rear and toward the bottom. All have interior fans to promote even cooling.
Troubleshooting Try these solutions first to avoid the cost of an unnecessary service call. PROBLEM: The appliance is not operating. • • • Is the power supply cord unplugged? Plug into a grounded 3-prong outlet. Has a fuse blown or a circuit breaker been tripped? Replace the fuse or reset the circuit. Is the thermostat incorrectly set? See How to Adjust the Temperature on page 9.
Limited Warranty 2-YEAR LIMITED WARRANTY FOR APPLIANCE Within the 48 contiguous United States, for two years from the date of purchase, when this appliance is operated and maintained according to instructions attached to or furnished with the product, warrantor will pay for factory-specified parts and repair labor abor to correct defects in materials or workmanship. Service must be provided by a designated service company.
MODE D’EMPLOI Série MED2 RÉFRIGÉRATEURS ET CONGÉLATEURS DE STOCKAGE MÉDICAL ET DE LABORATOIRE Si vous avez besoin de service ou appelez avec une question, veuillez avoir cette information prête. Conservez ce Mode d'emploi en votre possession. Modèle : _______________ Nᵒ de série : _________________ Options ajoutées : ____________________________ Date d'achat : ______________________ Marchand : ________ Pour les pièces: visitez notre site Web www.summitappliance.com/support FELIX STORCH, INC.
Numéros de modèles Tous-réfrigérateurs • FFAR24LMED2 Tout-réfrigérateur compact avec fonction de dégivrage automatique • FF28LWHMED2 Tout-réfrigérateur pour haut de comptoir avec dégivrage automatique • FF511LBIMED2 / FF511LBIMED2ADA Tout-réfrigérateur sous-comptoir avec opération de dégivrage automatique • FF511LBI7MED2 / FF511LBI7MED2ADA Tout réfrigérateur sous-comptoir commercial avec fonction de dégivrage automatique • FF7LBIMED2 / FF7LBIMED2ADA Tout-réfrigérateur sous-comptoir avec opération de dég
Table des matières Numéros de modèles .............................................................. 17 Sécurité de l'appareil ............................................................... 19 Mise au rebut appropriée d'un ancien appareil ................... 19 Instructions d’installation ...................................................... 20 Verrou d'éjection de clé ....................................................... 20 Conditions d'emplacement .............................................
Sécurité de l'appareil Votre sécurité et la sécurité des autres sont très importantes pour nous. Nous avons fourni de nombreux messages de sécurité importants dans ce manuel et sur votre appareil. Toujours lire et obéir à tous les messages de sécurité. Vous pouvez être sérieusement blessé ou même tué si vous ne suivez pas les instructions.
Instructions d’installation Danger de poids excessif! Utilisez deux personnes ou plus pour déplacer et installer votre appareil. Ne pas le faire peut entraîner des blessures au dos ou d'autres blessures. PERMETTRE À L'APPAREIL DE RESTER DEBOUT PENDANT 24 HEURES AVANT DE L'ALLUMER POUR PERMETTRE AU LUBRIFIANT DU COMPRESSEUR DE VIDANGER. 1. Enlevez les matériaux d'emballage. 2. Enlevez les résidus de ruban adhésif et de colle des surfaces avant d'allumer l'appareil.
Conditions d'emplacement Gardez les matériaux et les vapeurs inflammables, tels que l'essence, loin des appareils ménagers. Ne pas le faire peut provoquer un incendie, une explosion ou la mort. Emplacement: IMPORTANT: N'installez pas l'appareil à proximité d'un four, d'un radiateur ou de toute autre source de chaleur, ni à un endroit où la température descendra en dessous de 5 ° C (40 ° F). Ne pas placer à la lumière directe du soleil. Vérifiez la résistance du sol avant d'installer votre appareil.
Mise à niveau de votre appareil (certains modèles): Repérez les deux pieds de nivellement avant qui peuvent être inclus parmi les matériaux d'emballage. (Dans de nombreux modèles, ces pieds sont déjà montés dans la partie inférieure de l'appareil.) 1. Vissez ces pattes dans les trous avant sur le fond de l'appareil. L'arrière de l'appareil repose sur deux supports fixes. (Les modèles intégrés ont également des pieds de niveau arrière qui peuvent fournir un nivellement plus précis). 2.
Entretien de l'appareil Dégivrage: Les modèles de réfrigérateurs énumérés dans ce manuel se dégivrent automatiquement. Cependant, les modèles de congélateur nécessitent un dégivrage manuel. Avant de dégivrer l'appareil, retirez le contenu du congélateur, puis réglez le thermostat sur OFF (le compresseur cessera de fonctionner). Laissez la porte ouverte jusqu'à ce que la glace et le givre soient complètement fondus.
Changer l'ampoule (certains modèles seulement): NOTE: Toutes les ampoules d'appareil ne conviennent pas à votre appareil. Assurez-vous de remplacer l'ampoule par une de la même taille, de la même forme, de la même taille de base et de la même puissance en watts. Vous pouvez acheter des ampoules de www.summitappliance.com/support 1. Débrancher l'appareil ou couper l'alimentation. 2. Retirez le pare-lumière. La plupart des modèles ne nécessitent pas d'outils. 3.
Sélection de la température et surveillance Thermostat numérique Paramètres de température: Les tout-réfrigérateurs MED2 sont équipés de thermostats numériques préréglés à 4ºC, avec une plage de 2º à 8ºC. Les tout-congélateurs VT65MLBIMED2 and VT65MLBIMED2ADA sont préréglés à -20º, avec une plage de -25º à -10ºC. Tous les autres tout-congélateurs MED2 sont préréglés à -18ºC, avec une plage de -20º à -10ºC.
Thermomètre / alarme: Chaque unité MED2 est équipée d'un thermomètre / alarme qui affiche simultanément les températures intérieures minimale, maximale et actuelle et fournit un signal visuel et sonore lorsque la température à l'intérieur de l'unité tombe en dehors de la plage de température définie. Le capteur de température, ou sonde, est enfermé dans une bouteille remplie de glycol qui est stockée à l'intérieur de votre appareil dans un compartiment spécial.
Instructions de thermomètre / alarme (suite): Fonction des commandes: Touche MODE / RESET: Appuyez UNE FOIS pour réinitialiser l'enregistrement de température Max / Min. Lorsque l'unité émet une alarme, appuyez UNE FOIS pour désactiver le bip sonore. Touche HI/LO: Appuyez UNE FOIS pour afficher le réglage de l'alarme haute. Appuyez DEUX FOIS sur pour afficher le réglage de l'alarme basse. Appuyez TROIS FOIS pour afficher la température actuelle.
Verrouillage du clavier (optionnel sur la plupart des modèles) Mot de passe par défaut défini en usine: Le mot de passe par défaut réglé en usine est 0123. Si le mot de passe par défaut est perdu, appuyez sur la touche (située à l'intérieur du compartiment de la batterie) pendant 30 secondes, puis attendez le son d'avertissement qui indique le mot de passe par défaut a été restauré.
Fonctionnement de modèles spécifiques Tout-réfrigérateurs : FF24LMED2, FF28LWHMED2, FF511LBIMED2, FF511LBI7MED2, FF511LBIMED2ADA, FF511LBI7MED2ADA, FF7LBIMED2, FF7LBIMED2ADA, FFAR10MED2, SCR600LBIMED2, SCR600LBIMED2ADA Ces modèles sont tout-réfrigérateurs (pas de compartiment congélateur) avec dégivrage automatique. Tous ont des plaques froides sur le mur arrière, et les endroits les plus froids dans le réfrigérateur seront à l'arrière et vers le bas.
Dépannage Essayez d'abord ces solutions pour éviter le coût d'un appel de service inutile. PROBLÈME: L'appareil ne fonctionne pas. • • • Le cordon d'alimentation est-il débranché? Branchez dans une prise à trois broches reliée à la terre. Un fusible a-t-il sauté ou un disjoncteur s'est-il déclenché? Remplacer le fusible ou réinitialiser le circuit. Le thermostat est-il mal réglé? Voir Comment ajuster la température sur la page 25.
Garantie limitée GARANTIE LIMITÉE DE DEUX ANS POUR L'APPAREIL Dans les 48 États américains contigus, pendant deux ans à partir de la date d'achat, lorsque cet appareil est utilisé et entretenu conformément aux instructions jointes à / ou fournies avec le produit, le garant paiera pour les pièces d'usine spécifiées et la main-d'œuvre d'œuvre pour corriger les vices de matériaux ou de fabrication. Le service doit être fourni par une compagnie de service désignée.