ALL FREEZER Models: FS407L FS408BL BEFORE USE, PLEASE READ AND FOLLOW ALL SAFETY RULED AND OPERATING INSTRUCTIONS Write Model and Serial Numbers here: Model: Serial No.: FELIX STORCH, INC. An ISO 9001:2015 registered company 770 Garrison Avenue Bronx, NY 10474 www.accucold.
TABLE OF CONTENTS Equipment Safety 3 Important Safeguards 3-4 Location of Parts 5 Technical Information 5 Operating your Appliance 6-8 Before Using your Freezer 6 Installing your Freezer 6 Electrical Connection 6-7 Reversing the Door Swing 8 Door Handle Installation 8 Operating your Freezer 9 Temperature Control 9 Defrosting 9 Storing Frozen Items 9 Care and Maintenance 10 Cleaning the Freezer 10 Vacation Time 10 Moving the Freezer 10 Locking the Freezer 10 Energy-Savin
EQUIPMENT SAFETY Your safety and the safety of others are very important. We have provided many important safety messages in this manual and on your unit. Always read and obey all safety messages. This is the Safety Alert Symbol. The symbol alerts you to potential hazards that can kill or injure you and others. All safety messages will follow the Safety Alert Symbol and either the words "DANGER" or "WARNING".
• • • • • • • • • • • • • • • • • • In the event of any damage: o Avoid open flames and anything that creates a spark, o Disconnect from the electrical power line, o Air the room in which the unit isolated for several minutes, and o Contact the Service Department for advice. The more coolant there is in a unit, the larger the room it should be installed in. In the event of a leakage, if the unit is in a small room, there is the danger of combustible gases building up.
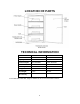
LOCATION OF PARTS TECHNICAL INFORMATION Model FS407L FS408BL Color White Black Capacity 2.8 cu. ft. 2.8 cu. ft. Electrical Input 115V AC/60Hz 115V AC/60Hz Rated Current 1.6A 1.6A Power Input 90W 90W Refrigerant R600a, 1.23 oz. R600a, 1.23 oz. Unit Weight 57 lbs. 57 lbs.
INSTALLATION INSTRUCTIONS Before Using the Freezer • • • • Remove the exterior and interior packing. Check to be sure you have all of the following parts: 4 drawers, 1 handle with screws and handle seal, and 2 keys. Before connecting the unit to the power source, let it stand for approximately 2 hours. This will reduce the possibility of a malfunction in the cooling system from handling during transportation.
To prevent accidental injury, the cord should be secured behind the unit and not left exposed or dangling. The unit should always be plugged into its own individual electrical outlet which has a voltage rating that matches the rating label on the appliance. This provides the best performance and also prevents overloading house wiring circuits that could cause a fire hazard from overheated wires. Never unplug the unit by pulling on the power cord.
Reversing the Door Swing Figure 1 (Default position) 1. Upper hinge cover 2. Screws 3. Upper hinge 4. Door 5. Lower door hinge Figure 2 (After door reversal) 6. Screws 7. Hole cover 8. Cabinet 9. Pin cap This freezer can be opened from either the right side or the left. By default, the door hinge is on the right side. If you prefer it on the left, please follow these instructions: NOTE: All of the parts that are removed must be kept for the reinstallation of the door. 1.
OPERATING YOUR FREEZER This freezer is designed to operate at temperatures suitable for stored pharmaceutical or medical products. It should be set to operate at -20 C (-5 F) which will normally be at thermostat position 3 – 4. Use the dial to adjust temperature to the exact setting that works best. A thermometer inside the freezer can help you choose the ideal setting. Temperature Control • • • The temperature control (thermostat) is located at the rear bottom corner of the freezer.
CARE AND MAINTENANCE CAUTION: Failure to unplug the unit could result in electrical shock or personal injury. Cleaning the Freezer 1. Unplug the freezer and remove the contents and drawers. 2. Wash the inside surfaces with a solution of warm water and baking soda. The solution should contain about 2 tablespoons of baking soda to a quart of water. 3. Wash the drawers with a mild detergent solution. 4. Wash the outside cabinet with warm water and mild liquid detergent.
TROUBLESHOOTING You can easily solve many problems common with a freezer, saving the cost of a possible service call. Try the suggestions below to see if you can correct the problem before calling the service provider. Problem Possible Cause Freezer does not operate. Not plugged in. The circuit breaker has tripped or the fuse has blown. Compressor turns on and off frequently. Room temperature is warmer than usual. A large amount of contents has been added to the freezer. The door is opened too often.
LIMITED WARRANTY ONE-YEAR LIMITED WARRANTY Within the 48 contiguous United States, for one year from the date of purchase, when this appliance is operated and maintained according to instructions attached to or furnished with the product, warrantor will pay for factoryspecified parts and repair labor to correct defects in materials or workmanship. Service must be provided by a designated service company. Outside the 48 states, all parts are warranted for one year from manufacturing defects.