
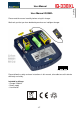
User manual


User Manual
6/7
Charge:
If you like to charge one or more batteries, it distinguishes between same type or different
cells:
Batteries of the same type
Firstly, insert the batteries into the charger. The charger registers the inserted batteries
and starts to identify the battery chemistry. By default, the charge process and a
charging current of 500 mA gets selected automatically. The same conditions will be
used for all inserted batteries and can be changed through pressing the mode button.
If you want to change the settings, you can do that as long as the font is flashing. The
desired program can be selected by pressing the MODE button as well as the
charging current can be selected with the CURRENT button. After the font stops
flashing, the program is activated and starts to charge/discharge the batteries.
TIP: Disconnect the charger from the power, insert the batteries in the channels,
connect the charger to the power again and select the wanted conditions through the
LC Display flashes, as mentioned above.
Individual setting:
If you want to charge different batteries with individual settings, it is recommended to
insert the batteries separately one by one. Only when all the settings via the
appropriate keys were selected for the first battery and the font on the LC display
stops flashing, the battery is taken from the charger. Now the next battery can be
inserted and selected as described before. If you like to change the selected program,
press the mode button for some seconds till the font starts to flash on the LC display
and then it is possible to change the function through pressing the mode button again.
If you like to change the current you can change it through pressing the CURRENT
button, that’s possible as long as the function flashes on the LC display, after some
seconds the charger accepts the now selected information and stops flashing.
If the charger started the selected program, it can only be interrupted through removing the
cells from the slots or pressing the mode button for some seconds. Short pressing of the
mode button cannot interrupt the running program. This is a protection against unintentional
cancel the program.
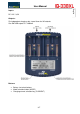
Because the charger shows important extensive information to each slot, the whole LC
Display will be used for the selected slot, if you like to see the information for another slot,
you have to press the selection button of the slot you like to check. Changing the selected
slot does not influence the charging program.
There is no information for the two 9V charging slots on the LC Display. Near to the 9V
channels you can see one LED for each channel. Through the charging process the LED is
flashing and changes to continues lightning after the charging process is finished.
English