Instruction Guide and 2 year Guarantee IA03
Service and Repairs Your ACCURIST watch is guaranteed against defects in materials and workmanship for a period of 2 years from the date of purchase. During this period, we will exchange or repair, at our discretion, any defective components free of charge. IMPORTANT - Not covered by Guarantee 1. Batteries, straps and bracelets. 2. Damage caused by accident, misuse or lack of care. 3. Water penetrations except in watches marked as “Water Resistant”.
Water Resistance If your watch is water resistant, it will clearly state “Water Resistant” or have a static water pressure indication (e.g. “30/50/100/200 metres”) on the dial and/or case back. If it is not marked as water resistant, it should not be allowed to come into contact with water or be worn in conditions that could expose it to moisture (e.g. washing, heavy rain etc.). Certain chemicals in water may damage the watch seals.
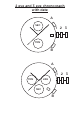
2 eye and 3 eye chronograph with date A SEC 1 2 3 MIN B A 1 2 3 24H MIN SEC B
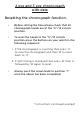
2 eye and 3 eye chronograph with date Resetting the chronograph function: • Before setting the time please check that all chronograph hands are at the “0”/12 o’clock position. • To reset the hands to the “0”/12 o’clock position press the buttons on your watch in the following sequence: 1. If the chronograph is counting then press ‘A’ to stop the chronograph and then ‘B’ to reset back to “0”. 2. If split timing is displayed then press ‘B’ then ‘A’ followed by ‘B’ again to reset.
GUARANTEE PLEASE USE BLOCK CAPITALS NAME ADDRESS POST CODE DAYTIME TELEPHONE NUMBER IMPORTANT This guarantee slip should be retained by the owner of the product and should be sent to Timeproducts (UK) Ltd. together with the product and £4.50 to cover the handling and postage when service under Guarantee is required.
GUARANTEE DATE OF PURCHASE: Retailers stamp if required or full name and address: Please attach the receipt or proof of purchase; failure to attach these may invalidate this Guarantee. This Guarantee does not affect your statutory rights.
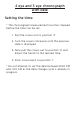
2 eye and 3 eye chronograph with date Setting the time: * The chronograph measurement must be stopped before the time can be set. 1. Pull the crown out to position ‘2’. 2. Turn the crown clockwise until the previous date is displayed. 3. Now pull the crown out to position ‘3’ and adjust the hands to the desired time. 4. Push crown back to position ‘1’. * Do not attempt to set the date between 9:00 PM and 1:00 AM as the date change cycle is already in progress.
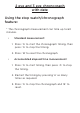
2 eye and 3 eye chronograph with date Using the stop watch/chronograph feature: * The chronograph measurement can time up to 60 minutes. • Standard measurement: 1. Press ‘A’ to start the chronograph timing, then press ‘A’ to stop the timing. 2. Press ‘B’ to reset the chronograph. • Accumulated elapsed time measurement: 1. Press ‘A’ to start timing, then press ‘A’ to stop the timing. 2. Restart the timing by pressing ‘A’ as many times as required. 3. Press ‘A’ to stop the chronograph and ‘B’ to reset.
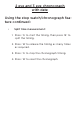
2 eye and 3 eye chronograph with date Using the stop watch/chronograph feature continued: • Split time measurement: 1. Press ‘A’ to start the timing, then press ‘B’ to split the timing. 2. Press ‘B’ to release the timing as many times as required. 3. Press ‘A’ to stop the chronograph timing. 4. Press ‘B’ to reset the chronograph.
3 eye chronograph with day and date A MIN 1 2 3 HOUR REMOTE SEC CHRONOGRAPH SECONDS B * Do not attempt to set the day between 11.15 PM and 6.00 AM as the day/date change cycle is already in progress. * The chronograph measurement can time up to 4 hours, 59 minutes and 59 seconds. Please refer to the previous chronograph sections for function. Note that the ‘split time measurement’ function is not included for the ‘3 eye chronograph with day and date’.
3 eye chronograph with day and date Setting the time: 1. Pull the crown out to position ‘3’ and adjust the hands to the desired time. 2. Push crown back to position ‘1’. Setting the date: 1. Pull the crown out to position ‘2’. 2. Turn the crown anti-clockwise to set the date. 3. After the date has been set push the crown back to position ‘1’. * Do not attempt to set the date between 9:00 PM and 1:00 AM as the date change cycle is already in progress. Setting the day: 1.