
User Manual
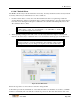


Table Of Contents
- Notice
- About This Guide
- Guide to Conventions
- Trademarks
- Table of content
- Table of Figures
- 1. Introducing ExaSAN PCIe2.0 Storage Systems
- 2. Preparing to Install ExaSAN B08S2-PS
- 3. Installing the ExaSAN B08S2-PS
- 4. Using RAIDGuardX GUI
- 4.1 Accessing the RAIDGuardX GUI
- 4.1.1 RAIDGuard X Client and Server
- 4.1.2 RAIDGuard X Menu Bar
- 4.1.3 Updating the ExaSAN RAID system Firmware
- 4.1 Accessing the RAIDGuardX GUI
- 5. RAID Overview
- 6. Appendices

4. How to Use
User Guide Page 4-41
locked drives are preserved for online/offline recovery. If users don’t need the data or the locked drive
anymore, the locked drive can be changed into a spare drive by the command of Unlock Drive.
1. Select the drive with the
icon. It will change to the icon.
Figure 85: GUI “HDD locked”
2. Check the Confirm box and click Unlock Drive.
Figure 86: GUI “Unlock HDDs”