
Use and Care Manual


1English1
English -11
LED INDICATING LAMP SIGNAL & MESSAGE ON LCD DURING
OPERATION:
1. During Operation: LCD will show the setting stage of digital clutch.
2. Designated Torque Reached: LED indicating lamp will stay on in green and LCD
will show the setting stage of digital clutch.
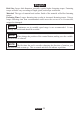
3. When the battery voltage is under 14.4 V, the power will be cut-off. At the same
time, LED indicating lamp will be on in red and LCD panel will show “LV”.
4. When the temperature over 140ƱF (60ƱC), the power will be cut-off. At the same
time, LED indicating lamp will be on in red and LCD panel will show “OT”.
MEMORY FUNCTIONS:
Certain work environments requires a constant working torque range. The memory
function will hold the selected torque setting until it has been adjusted.
Always check the direction of the rotation before use.
Due to the auto shut-off function, if tool is repeatedly operated on
and off in a short time frame, the MCU will determine it as being over current
resulting in tool shut down. This phenomenon occurs most frequently in the first
torque stage.
1. After continuous use, allow the impact wrench to sit idle for 15 minutes before
replacing the battery. The temperature of the motor, switch, etc., will rise if the
work is started again immediately after the battery has been changed, eventually
resulting in burned-out.
2. Place the point of the bolt in the socket. Keep the tool pointed straight at the bolt.
3. Apply forward pressure to the tool to prevent the socket from slipping off the bolt.
4. To start, turn impact wrench/driver on. Always check torque with a torque wrench.
The fastening torque can be affected by many factors including the following:
Voltage: Low voltage due to a nearly discharged battery will reduce the fastening
torque.
Socket Size: Failure to use the correct socket size will cause a reduction in fastening
torque.
Variable Speed Trigger Switch: Operating the tool at a reduced speed will reduce the
fastening torque.
NOTE
NOTE
Low Voltage
Over Temperature