
User guide

ACDSee Pro 6 User Guide
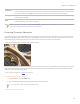
1. Type the desired crop window proportions into the Width and Height spin boxes.
2. In the Units drop-down list, select a unit of measurement.
3. Use the Dots per inch spin box to specify a resolution.
To constrain the crop window to a ratio:
1. Select the Constrain proportion check box.
2. Select a ratio from the drop-down list.
3. Position your cursor over the edge of the crop window until it changes into a double-pointed arrow, and then drag the edge
of the crop window to the desired size.
To delete a proportion:
1. Select a proportion from the Constrain proportion drop-down list.
2. Click the down arrow button beside the drop-down list, and select Delete.
3. Click Yes.
To set a proportion as default:
1. Select the Constrain proportion check box.
2. Select a ratio from the drop-down list.
3. Click the down arrow button beside the drop-down list, and select Set as Default.
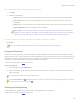
Crop options
Constrain
proportion
Select this option to constrain the crop area to a specified proportion. Select the proportion from the
drop-down list.
Maximize crop area
Click to expand the crop area to the entire image, and then click and drag the crop borders. To redo
your crop selection, click on the Maximize crop area button to expand the selection to the entire
image again, and make your crop adjustments.
Rotate crop area
Click to rotate the crop area.
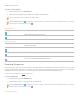
Fixing Lens Vignetting
Vignetting, an unusual darkness in the corners of images, is the result of the inability of the lens to distribute light into the corners
of the image. You can fix lens vignetting in Develop mode by brightening the corners of the image.
You can save your settings as a preset for future use.
To fix vignetting:
1. In Develop mode, select the Geometry tab.
2. In the Vignette Correction group, adjust your image as described below.
You can right-click a slider to reset to the default value.
Vignette Correction options