
User guide


Chapter 6: Edit Mode
6. Do one of the following:
Click Done to apply your changes and close the tool.
Click Cancel to discard all changes and close the tool.
Click Reset to clear your changes and reset to default settings. If you saved your changes, you cannot reset your settings.
If you want to discard only the Edit settings, select File | Restore to Developed.
Scroll with your mouse to adjust the brush size on the fly, or press the SHIFT key while you scroll to adjust feathering.
Repair Tool options
Nib Width
Sets the width of the brush. The maximum brush width is relative to the size of your image.
Feathering
Sets the amount to feather on the edge of the brush to prevent sharp transitions between the original and
healed part of the photo.
Feathering is set as a percentage of the nib width, not as a specific number of pixels. This means that you
do not have to adjust the feathering when you reset the Nib Width, as it automatically adjusts to a
percentage of the new nib width.
You can right-click a slider to reset to the default value.
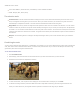
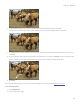
Adding Text to an Image
You can use the Add Text tool in Edit to add formatted text to a photo, or add talk and thought bubbles to create a comic-book effect.
You can also adjust the opacity of the text to create a watermark effect, which is useful for putting copyright information onto your
photos.
You can save your settings as a preset for future use.
To add text to an image:
1. In Edit mode, in the Add group, click Text.
2. Type the text you want to add in the Text field.
3. In the Font area, specify the font you want to use, the formatting options such as italics or justification, and the color of the
text. Drag the Size slider to specify a point size, and then drag the Opacity slider to specify the transparency of the text.
4. Click and drag the text marquee to reposition it anywhere on your image, or drag the marquee's handles to resize it.
5. Select an option from the Blend Mode drop-down list to specify how you want the text to blend into the underlying image.
6. Do one of the following:
Select the Bubble Text check box, and set the Bubble Text settings as explained in the table below. Note that other
text effects cannot be applied to bubble text.
Select one or more of the Effects, Drop Shadow, and Bevel check boxes to customize your text. Click the
Settings button to adjust the settings for each of these options as explained in the table below.
220