
User guide


Chapter 6: Edit Mode
You can use the Edit Brush to paint this effect onto specific areas of your image.
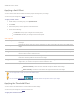
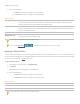
Applying a Wind Effect
You can use the Wind effect to add wind lines that make stationary objects in your image look like they are moving. Select or change
the settings to control the effect of the wind added to your image.
You can save your settings as a preset for future use.
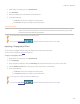
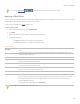
To apply a Wind effect:
1. In Edit mode, in the Add group, click Special Effect.
2. Click Wind.
3. On the Wind panel, select or change the options as described below.
4. Do one of the following:
Click Done to accept your changes and close the panel.
Click Cancel to discard your changes and close the panel.
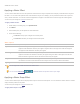
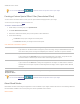
Wind options
Strength
Determines how strong the wind lines are in the image. The higher the value, the stronger the wind
lines.
Threshold
Determines how sharp an edge must be before the filter will apply wind. The higher the value, the
sharper the edge needs to be.
Chance of wind
Determines the amount of wind lines to place in the image.
Edge detection
Specifies the edge detection algorithm. The algorithm controls the formula used to detect the edges
and the direction of the edge indicators.
Background color
Specifies the background color. Select the Image check box to use the original image colors, or click
the color picker to select a different color.
Wind color
Specifies the color of the wind lines. Select the Image check box to use the original image colors, or
click the color picker to select a different color.
Wind angle
Specifies the angle of the wind lines.
Randomize
Indicates the random placement of the wind lines.
When you apply the Wind effect to an image, ACDSee Pro places the wind lines randomly. This makes
the wind lines different every time you apply the filter. You can define a specific random seed to
generate identical wind lines.
To generate a new random seed, click Randomize.
You can right-click a slider to reset to the default value.
260