
User guide

Chapter 6: Edit Mode
Advanced tab: Gives you ultimate control of the brightness and contrast in an image. Basic adjustment curves can be
constructed using four sliders, and you can manually adjust the curves by clicking and dragging within the graph area or
on the image itself.
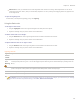
To open the Lighting tool:
In Edit mode, in the Exposure/Lighting group, click Lighting.
Using the Basics tab
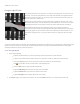
To add light to dark areas:
1. Drag the Highlights slider to the right to add light to the dark parts of the photo.
2. Adjust the settings using any of the controls in the table below.
To darken areas that are too bright:
1. Drag the Shadows slider to the right to lighten and return detail to areas that are too dark.
2. Adjust the settings using any of the controls in the table below.
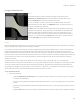
To adjust midtones that are too light or dark:
1. Drag the Midtones slider to the right to lighten and return detail to areas that are too dark.
2. Adjust the settings using any of the controls in the table below.
Lighting controls
Right-
click on
a slider
Right-click on a slider to reset it.
Expo-
sure
Warning
Click the Exposure Warning to make any overexposed or underexposed areas visible. Overexposed pixels turn red,
underexposed pixels turn green. You can also toggle Exposure Warning on and off momentarily by holding down the
E key.
Auto
Click to allow the software to analyze the photo and apply optimal settings based on the amount of light and dark
pixels in the photo. Darker photos are brightened more than photos that are already bright.
Done
Click to apply your changes and close the tool.
Cancel
Click to discard all changes and close the tool.
Click Reset to clear your changes and reset to default settings. If you saved your changes, you cannot reset your settings.
If you want to discard only the Edit settings, select File | Restore to Developed.
274