
Product Manual

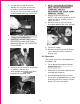

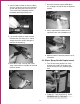


Table Of Contents

4. Wearing proper safety gloves, hold the stop the flow of media to the nozzle and
nozzle/hose assembly at a 45-degree water spray. TURN THE SAFETY LOCK
angle, within 6-18”inches of the surface OUT VALVE TO THE OFF POSITION
to be cleaned. Grasp the water ball BEFORE SETTING THE BLAST
valve and hose with the other hand. NOZZLE HANDLE ON TO THE
ALWAYS KEEP TWO HANDS ON THE PORTABLE SODA BLASTER.
BLASTING HOSE.
8. DO NOT DROP THE NOZZLE HANDLE
END OF THE BLASTER, AS DAMAGE
TO THE NOZZLE TIP MAY RESULT.
5.0 Maintenance and Troubleshooting
Guide
It is recommended that you spray all
pipefittings on the unit with a rust
preventative before and after each use of
the Model 2-PS.
5.1 Blast Nozzle Replacement
5. Activate the cleaning nozzle by
squeezing the hand lever. If desired,
1. Turn off the safety lockout air valve
turn on the water spray with the other
located at the front of the pressure
hand by rotating the ball valve 90
vessel and lock it out. (sideway
degrees.
position)
6. Adjust the pressure (using the air
regulator) to the desired settings of
media flow for the specific application.
Match the amount of pressure, control
unit restrictor, and nozzle, to the size
and type of surface to be cleaned.
Doing so will ensure the best possible
finish, cleaning speed and cost
efficiency.
•For rich media flow (corresponding to
gross type cleaning) use large nozzle.
Consult estimated CFM requirements
chart. (Optional nozzles are available
in several sizes)
2. TURN OFF THE SOURCE OF
•For leaner media flow (corresponding
COMPRESSED AIR TO THE UNIT.
to finer, precision type cleaning) use
3. Disconnect unit from compressed air
smaller nozzle. Consult estimated
source.
CFM requirements chart. (Optional
nozzles are available in several sizes)
7. Continue cleaning, as required. To stop
cleaning, release hand lever and turn off
water BALL VALVE, if in use. This will
11