CONTENTS 3 9 INTRODUCTION 2 2 Overview Package Contents GETTING TO KNOW THE CAMERA 3 4 6 7 Front View Rear View Status LED Indicator LCD Monitor Icons GETTING STARTED 9 10 12 13 14 15 16 Inserting and Removing the Battery (Optional Accessory) Charging the Battery Inserting and Removing the SD Card (Optional Accessory) Setting the Date and Time Choosing the Language Formatting the SD Card Setting Image Resolution and Quality User’s Manual >> 2 17 PHOTOGRAPHY MODE 17 18 19 20 22 23 24 25 26 [ 26
Digital Camera >> INTRODUCTION Overview Congratulations on your purchase of the new digital camera. Capturing high-quality digital pictures is fast and easy with this state-of-the-art smart camera. Equipped with a 6.20 Mega pixels CCD, this camera is capable of capturing pictures with a resolution of up to 2816 x 2112 pixels. Package Contents Carefully unpack your camera and ensure that you have the following items.
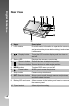
Front View # Name 1. Shutter button 2. POWER button 3. Flash 4. Mode switch User’s Manual >> GETTING TO KNOW THE CAMERA Description Focuses and locks the exposure of the camera when pressed halfway down, and takes the picture when pressed all the way down. Turns the camera power on and off. Provides flash illumination. Sets the camera mode. Selects this when taking still images. Selects this when recording video clips. Performs image playback and deletion.
Digital Camera >> Rear View # Name 1. LCD monitor 2. Display button 3. Status LED 4. Zoom in button Description Provides menu information to operate the camera, and previews the picture before taking it and review it afterwards. Turns the LCD monitor display and live view on and off. Displays the camera current state. Zooms the lens to telephoto position. Zoom out button Zooms the lens to wide-angle position. 5. MENU button Toggles OSD menu on and off. 6. Erase button 7. Strap holder 8.
2S # Name 1. button Description Scrolls upwards. Focus button Allows you to choose the appropriate focus setting. 2. button Flash button 3. button Scrolls right. Allows you to choose the appropriate flash setting. Scrolls downwards. 4. User’s Manual >> SET /Direction button Self-timer button Allows you to toggle the self-timer on and off, selects the desired self-timer mode. button Scrolls left.
Digital Camera >> Status LED Indicator This describes the color and state of the status LED. Color State During power off During photography During connection to a PC On The completion of battery charge. AE or AF is locked with the shutter button held halfway. - Flashing Battery charging in progress. - - On Battery charging error. Writing to SD card in progress. In communication to PC. (SD card is inserted.
Photography mode [ User’s Manual >> LCD Monitor Icons ] 1. Zoom status 2. Voice memo 3. Remaining battery status ] Full battery power [ [ ] Medium battery power ] Low battery power [ ] No battery power [ 4. Flash icon [Blank] Auto ] Red-eye Reduction [ [ ] Forced Flash ] Suppressed Flash [ ] Night Scene [ ] Histogram 5. [ 6. Focus area (When the shutter button is pressed halfway) 7. Capture mode icon [Blank] Single ] Continuous [ [ AEB ] Auto Exp. 8.
Digital Camera >> Photography mode [ 1. 2. 3. 4. 5. 6. 7. 8. 9. [ ] Movie mode Zoom status Remaining battery status Image size Possible recording time / elapsed time Quality Recording indicator Self-timer icon Focus icon Playback mode [ 1. 2. 3. 4. 5. ] -Still image playback Mode icon File number Folder number Protect icon Voice memo Playback mode [ 1. 2. 3. 4. 5. 6. 7. 8.
Inserting and Removing the Battery (Optional Accessory) We highly recommend using specified rechargeable lithium-ion battery (3.7V) to fully demonstrate this camera’s function. Charge the battery before using the camera. Make sure that the power of the camera is off before inserting or removing the battery. User’s Manual >> GETTING STARTED Inserting the Battery 1. Open the battery/SD card cover. 2. Insert the battery in the correct orientation shown.
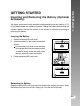
Digital Camera >> Charging the Battery Using the optional AC power adapter may charge the battery or operate the camera as power supply. Make sure that the power of the camera is off and then insert the battery before starting. 1. Insert the conversion adapter into the conversion adapter terminal of the camera as shown in the illustration. 2. Insert one end of the AC power adapter into the DC IN terminal of the conversion adapter. 3. Insert the other end of the AC power adapter into a wall outlet.
User’s Manual >> This camera must be used with specified AC power adapter. Damage caused by the use of an incorrect adapter is not covered under the warranty. When the charging is not started even if following the above procedure, turn the power on at any mode after LCD monitor turns on, and then turn the power off. The battery may feel warm after it has been charged or immediately after being used. This is normal and not a malfunction.
Digital Camera >> Inserting and Removing the SD Card (Optional Accessory) Images photographed with this camera will be stored on the SD card. Without inserting the SD card, you cannot take photographs using the camera. Before inserting or removing the SD card, make sure that the power of the camera is off. Inserting the SD card 1. Open the battery/SD card cover. 2. Insert the SD card in the correct orientation shown.
The date/time needs to be set if/when: Camera is turned on for the first time. Camera is turned on after leaving the camera without the battery for an extended period of time. When the date and time information is not displayed on the LCD monitor, follow these steps to set the correct date and time. 1. Slide the mode switch to [ ] or [ User’s Manual >> Setting the Date and Time ]. 2. Press the MENU button and select [Setup] menu with the button 3. Select [Date/Time] with the and press the SET button.
Digital Camera >> Choosing the Language Specify in which language menus and messages are to be displayed on the LCD monitor. ] or [ ] or 1. Slide the mode switch to [ [ ]. 2. Press the MENU button and select [Setup] menu with the button. If no images/video clips are recorded on the SD card, press the MENU button and then [Setup] menu is displayed. 3. Select [Language] with the / buttons and press the SET button. The Language setting screen will be displayed. 4.
This erases all of the images and folders that have been recorded on the SD card. Formatting is not possible when the SD card in the locked condition. 1. Slide the mode switch to [ ]. 2. Press the MENU button. [Setup] menu is displayed. If images/video clips are recorded on the SD card, press the button after the MENU button is pressed. 3. Select [Format] with the / buttons, then press the SET button. 4. Select [Execute] with the / buttons, and press the SET button.
Digital Camera >> Setting Image Resolution and Quality Resolution and quality settings determine the pixel size (dimension), image file size, and compression ratio for your images. These settings affect the number of images that can be stored on a memory card. As you get to know the camera, it is recommended that you try each quality and resolution setting to get an appreciation for the effects that these settings will have on your images.
[ ] Still Image Mode Auto photography is a typical method of photography. Photographs can be taken simply because the exposure (the combination of shutter speed and aperture setting) is controlled automatically to suit the photographic conditions. You can use the 2.5" LCD monitor to compose the images. Make sure that the battery and SD card are inserted before taking photographs. User’s Manual >> PHOTOGRAPHY MODE 1. Press the POWER button to turn the power on. 2. Slide the mode switch to [ ].
Digital Camera >> Recording Voice Memos A voice memo can be recorded once for 30 seconds at still image mode immediately following a still image captured or at playback mode while viewing the picture. 1. Slide the mode switch to [ ]. 2. Press the MENU button, and select the [Function] menu with the button. [Function] of the still image menu is displayed. 3. Select [Voice Memo] with the / Adjust buttons, and press the SET button. 4. Select [ON] with the / buttons, and press the SET button. 5.
Using a combination of 3 times optical zoom and 4.4 times digital zoom permits zoom photography of up to 12 times to suit the subject and the distance. The digital zoom is a compelling feature, the more an image is enlarged (zoomed), the more pixilated (grainer) the image will appear. 1. Slide the mode switch to [ ] or [ ]. 2. Turn on the LCD monitor by pressing the 3. To enable the digital zoom: a. Press the MENU button. User’s Manual >> Using the Digital Zoom button. b.
Digital Camera >> Setting the Flash Set the flash for taking photographs. The flash firing mode can be set to suit for the photographic conditions. 1. Slide the mode switch to [ ]. button to select the desired 2. Toggle the flash mode. Each press of the button moves the icon one step through the sequence and displays it on the screen.
User’s Manual >> The table below will help you choose the appropriate flash mode: Flash mode Description [ Blank] Auto The flash fires automatically to suit the photographic conditions. [ ] Red-eye Reduction Use this mode to reduce the red-eye phenomenon when you want to take naturallooking photographs of people and animals in low-light conditions. When taking photographs, the red-eye phenomenon can be reduced by asking the subject (person) to look at the camera or get as close to the camera as possible.
Digital Camera >> Setting the Focus Photographs can be taken with the distance to the subject set by auto focus, ] infinity. [ ] macro or [ The settings will be maintained even when the power is turned off or when Auto OFF is activated. ] or [ ]. 1. Slide the mode switch to [ button to select the desired 2. Toggle the focus mode. Each press of the button moves the icon one step through the sequence and displays it on the screen.
This setting allows photographs to be taken with the self-timer. 1. Slide the mode switch to [ 2. Toggle the ] or [ ]. button to select the setting. Each press of the button moves the icon one step through the sequence and displays it on the screen. OFF [ 10s] 10 sec. [ 2s ] 2 sec. [ 10+2s ] 10+2 sec. For the [ ] mode and capture mode ([Continuous] and [Auto Exp.]) OFF [ 10s ] 10 sec. [ 2s ] 2 sec. 2S User’s Manual >> Setting the Self-timer 3.
Digital Camera >> Exposure Compensation/Backlight Correction Photographs can be taken with the overall screen intentionally made brighter or darker. These settings are used when a suitable brightness (exposure) cannot otherwise be obtained in circumstance where the difference in brightness between the subject and the background (the contrast) is large, or when the subject that you want to photograph is very small within the screen. Exposure can be set in 0.3 EV units. 1.
] Movie Mode This mode allows you to record video clips at a resolution of 320 x 240 / 640 x 480 pixels. Voice can also be recorded. ]. 1. Slide the mode switch to [ 2. Compose the picture with the zoom button. 3. Press the shutter button. The recording of the video clip will start. Pressing the shutter button one more time will end the recording of the video clip, and record the image into the SD card. The recording time depends on the storage size and the subject of the image to be recorded.
Digital Camera >> [ ] PLAYBACK MODE Playing Back Still Images You can play back the still images on an LCD monitor. Insert the SD card into the camera and turn on the power before starting. 1. Slide the mode switch to [ ]. The last image appears on the screen. 2. The images can be fed in reverse or fed forward with the / buttons. Image Display Information You can switch the state of the information button when playing display by pressing the button back images.
You can play back video clips recorded on the camera. You can also play back voice. 1. Slide the mode switch to [ ]. The last image appears on the screen. 2. Select the desired video clip with the / 3. Press the SET button. buttons. User’s Manual >> Playing Back Video Clips A press of the / buttons during playback allows fast forward play / fast reverse play. To stop video playback: Press the button. This stops playback and returns to the start of the video clip.
Digital Camera >> Button Operations During Playback Forward play button Each press of the button moves the operation one step in the sequence of 2 times fast forward play, 4 times fast forward play, and regular play. Reverse play button Each press of the button moves the operation one step in the sequence of 2 times fast reverse play, 4 times fast reverse play, and regular play. button button SET button During a Pause During a Stop 1-frame feed Reverse 1-frame feed The previous image is displayed.
A maximum of 30 seconds of audio can be recorded like a memo for photographed still images. The voice memo can be recorded only once. 1. Slide the mode switch to [ ]. The last image appears on the screen. 2. Select the image that you want to attach the voice memo with the / buttons. 3. Press the shutter button. [VOICE RECORDING] is displayed on the screen and recording starts. 4. To stop recording voice memo during recording, press the shutter button again.
Digital Camera >> Thumbnail Display This function allows you to view 9 thumbnail images on the LCD monitor at the same time, which can quickly search for the image that you want. 1. Slide the mode switch to [ ]. The last image appears on the screen. button. 2. Press the The images are displayed in the thumbnail display. Images that have been selected with the / / / buttons will be indicated by a green frame. When there are ten or more images, scroll the screen with the / buttons. 3.
Images that are being play back can be enlarged and displayed in 2 levels of 2 times and 4 times enlargement. This mode also allows you to enlarge your image on the selected portion of the image to check for small details. 1. Slide the mode switch to [ ]. 2. Press the / buttons to select the image you want to enlarge. You can also select the image you want to enlarge from the thumbnail display. 3. Adjust the zoom ratio with the User’s Manual >> Zoom Playback / buttons.
Digital Camera >> Slideshow Display The slideshow function enables you to playback your still images automatically in order one image at a time. 1. Slide the mode switch to [ ]. 2. Press the MENU button. The playback menu is displayed. 3. Select [Slide Show] with the / buttons, and press the SET button. The slideshow starts. 4. To stop the slide show during playback, press the SET button. The image is displayed on screen when you press the SET button.
Set the data to read-only to prevent images from being erased by mistake. Protecting Images 1. Slide the mode switch to [ ]. 2. Select the image that you want to protect with the / buttons. 3. Press the MENU button. The playback menu is displayed. 4. Select [Protect] with the / buttons, and press the SET button. 5. Select [Single] or [All] with the / buttons, and press the SET button. 6. Select [Set] with the / buttons, and press the SET button. Protect is executed and the camera returns to the play mode.
Digital Camera >> Canceling the Protection To cancel protection for only one image, display the image that you want to remove the image protection. 1. Select [Protect] with the / buttons from the playback menu, and press the SET button. 2. Select [Single] or [All] with the / buttons, and press the SET button. 3. Select [Cancel Protect] with the / buttons, and press the SET button. The removal of image protection is executed and the camera returns to the play mode.
DPOF is the abbreviation for Digital Print Order Format, which allows you to embed printing information on your memory card. You can select the images to be printed and how many prints to make with the DPOF menu in the camera and insert the memory card to the card compatible printer. When the printer starts printing, it will read the embedded information on the memory card and print the specified images. 1. Slide the mode switch to [ ]. 2. Select the image that you want to set DPOF with the / buttons. 3.
Digital Camera >> 9. Select date to [ON] or [OFF] with the / buttons, and press the SET button. ON: The date of the photograph will also be printed. OFF: The date of the photograph will not be printed. 10. Select [Print Enable] with the / buttons, and press the SET button. 11. Select [Execute] with the / buttons, and press the SET button. This creates a file containing the DPOF information, and when the operation is finished, the screen returns to the playback screen.
] Erasing Images Erasing at Photography Mode (Quick Delete Function) Quick delete function enables you to erase the image during photography. The quick delete menu provides you to directly erase the last image without further settings. 1. Slide the mode switch to [ ] or [ ]. User’s Manual >> [ 2. Press the button. The last image and quick delete menu appear on the screen. 3. Press the SET button to erase the image. To not erase, select [Cancel], and press the SET button.
Digital Camera >> 5. Select [Execute] with the / buttons, and press the SET button. To not erase, select [Cancel], and press the SET button. Even if you take photographs after erasing an image, the file number is assigned the next number of the very last one before the image was erased. Erasing selected images This erases a number of selected images. 1. Slide the mode switch to [ ]. 2. Press the button. The deletion menu will be displayed. 3. Select [Select] with the / buttons, and press the SET button.
Installing NTI Photo Suite PC users will find that NTI Photo Suite is a very user-friendly image-editing program. With NTI Photo Suite, you can retouch, compose, and organize your images. It includes a variety of templates, such as photo frames, birthday cards, calendars and more. Get your images ready and explore this amazing program. User’s Manual >> EDITING SOFTWARE INSTALLATION To install NTI Photo Suite: 1. Insert the CD-ROM that came with the camera into your CD-ROM drive.
Digital Camera >> MENU OPTIONS Still Image Menu (Picture) This menu is for the basic settings to be used when taking still images. ]. 1. Slide the mode switch to [ 2. Press the MENU button. [Picture] of the still image menu is displayed. 3. Select the desired [Picture] option item with the / buttons, and press the SET button to enter its respective menu. 4. Select the desired setting with the / buttons, and press the SET button. 5. To exit from the still image menu, press the MENU button.
This sets the size of the image that will be photographed. ] 2816 x 2112: 2816 x 2112 pixels [ [ ] 2272 x 1704: 2272 x 1704 pixels ] 1600 x 1200: 1600 x 1200 pixels [ ] 640 x 480: 640 x 480 pixels [ Quality This sets the quality (compression rate) at which the image is taken. [ ] Fine: Low compression rate ] Standard: Normal [ [ ] Economy: High compression rate User’s Manual >> Size Sharpness This sets the sharpness of the image that will be photographed.
Digital Camera >> White Balance This sets the white balance photographing under a variety of lighting conditions and permits photographs to be taken that approach the conditions that are seen by the human eye. [ Blank ] Auto: Automatic adjustment. ] Incandescent: Photography under incandescent lighting. [ [ 1 ] Fluorescent 1: Photography under a daylight fluorescent tube with a bluish cast. [ 2 ] Fluorescent 2: Photography under a daylight white fluorescent tube with a reddish cast.
1. Slide the mode switch to [ ]. 2. Press the MENU button, and select the [Function] menu with the button. [Function] of the still image menu is displayed. 3. Select the desired [Function] option item with the / buttons, and press the SET button to enter its respective menu. 4. Select the desired setting with the / buttons, and press the SET button. 5. To exit from the still image menu, press the MENU button.
Digital Camera >> Voice Memo A voice memo can be recorded for 30 seconds immediately following still single image photography. This feature is also available during playback mode. Refer to section in this manual titled "Recording Voice Memos" for further details. ON: Enable voice memo. OFF: Disable voice memo. When voice memo is set to on, the preview setting is also fixed to on. LCD Bright. Select a brightness level for the LCD monitor. The LCD becomes brighter with the button and darker with the button.
This sets whether or not to display the photographed image on the screen immediately after the picture is taken. ON: Displayed when images are being recorded on the SD card. OFF: Does not display. A photographed image is displayed on the LCD monitor for 2 seconds. Pressing the shutter button during preview cancels the operation. When preview is set to off, the voice memo setting is also fixed to off. User’s Manual >> Preview Date Print The date of recording can be printed directly on the still images.
Digital Camera >> Movie Menu (Picture) This menu is for the basic settings to be used when recording video clips. 1. Slide the mode switch to [ ]. 2. Press the MENU button. [Picture] of the movie menu is displayed. 3. Select the desired [Picture] option item with the / buttons, and press the SET button to enter its respective menu. 4. Select the desired setting with the / buttons, and press the SET button. 5. To exit from the movie menu, press the MENU button.
1. Slide the mode switch to [ ]. 2. Press the MENU button, and select the [Function] menu with the button. [Function] of the movie menu is displayed. 3. Select the desired [Function] option item with the / buttons, and press the SET button to enter its respective menu. 4. Select the desired setting with the / buttons, and press the SET button. 5. To exit from the movie menu, press the MENU button. Digital Zoom Adjust User’s Manual >> Movie Menu (Function) LCD Bright.
Digital Camera >> Playback Menu In the [ ] mode, set which settings are to be used for playback. 1. Slide the mode switch to [ ]. 2. Press the MENU button. The playback menu is displayed. 3. Select the desired option item with the / buttons, and press the SET button to enter its respective menu. 4. Select the desired setting with the / buttons, and press the SET button. 5. To exit from the playback menu, press the MENU button.
Set your camera’s operating environment. 1. Slide the mode switch to [ ] or [ ]. 2. Press the MENU button, and select the [Setup] menu with the button. [Setup] of the photography menu is displayed. 3. Select the desired [Setup] option item with the / buttons, and press the SET button to enter its respective menu. 4. Select the desired setting with the / buttons, and press the SET button. 5. To exit from the photography menu, press the MENU button.
Digital Camera >> Date/Time This sets the date and the time. Refer to section in this manual titled “Setting the Date and Time” for further details. Auto OFF If no operation is performed for a specific period of time, the power to the camera is automatically turned off. This feature is useful to reduce battery wear. 1 Min.: When the camera has not been operated, it turns the power off after 1 minute. 2 Min.: When the camera has not been operated, it turns the power off after 2 minutes. 3 Min.
1. Slide the mode switch to [ ]. 2. Press the MENU button. [Setup] of the playback menu is displayed. If images/video clips are recorded on the SD card, press the button after the MENU button is pressed. 3. Select the desired [Setup] option item with the / buttons, and press the SET button to enter its respective menu. 4. Select the desired setting with the / buttons, and press the SET button. 5. To exit from the playback menu, press the MENU button.
Digital Camera >> Fr. No. Reset This creates a new folder. The photographed images are recorded to the newly created folder from number 0001. Cancel: Does not reset the file number. Execute:Resets the file number and creates a new folder. Card Info. This allows a check of the free capacity of the SD card as well as other information. System Info. This displays the firmware version of the camera. Language This sets the language that is displayed on the LCD monitor.
If a printer that support PictBridge is available, images can be printed by connecting the camera directly to the PictBridge-compatible printer without using a computer. 1. Connect one end of the USB cable to the conversion adapter terminal of the camera. 2. Connect the other end of the USB cable to the USB port on the printer. 3. Turn on your camera. 4. The [USB] screen is displayed. Select [PRINTER] with the / buttons, and press the SET button. 5.
Digital Camera >> 6. If you select [Images] in the previous step, the figure shown on the right hand side will appear. Select [Single] or [All] with the / buttons, and press the SET button. Adjust 7. If you select [Single] in the previous step, the figure shown on the right hand side will appear. Select the image that you want to print with the / butons. Select the printing number (up to 99) with the / buttons. After selecting the desired image and printing number, press the SET button to confirm. 8.
Item Image sensor Description 6.20 Mega pixels CCD sensor 2816 x 2112, 2272 x 1704, 1600 x 1200, 640 x 480 Image resolution < Video clip> 640 x 480, 320 x 240 LCD monitor 2.5" LTPS TFT color LCD Image quality Fine / Standard / Economy Recording media External memory: Supports SD card (optional, up to 512MB) Compression format JPEG compliant Image file format DCF 1.0, DPOF 1.1, EXIF 2.2, AVI 3x optical zoom lens F=2.8 - 4.8 Lens f=5.4 mm - 16.