AcerPower F3 User’s Guide
Copyright© 2005 Acer Incorporated All Rights Reserved AcerPower F3 User’s Guide Changes may be made periodically to the information in this publication without obligation to notify any person of such revision or changes. Such changes will be incorporated in new editions of this manual or supplementary documents and publications.
Front panel Rear Panel System Features Performance Multimedia Connectivity System peripherals Mouse (PS/2 or USB, manufacturing option) Keyboard (PS/2 or USB, manufacturing option) Speakers System upgrade Opening the computer Setting up new components Setting up your computer Before commencing setup Selecting location Opening the package Connecting the peripherals Starting your computer Shutting down your computer 1 1 3 4 4 4 4 4 5 5 6 7 7 7 9 9 9 9 10 10 10 Troubleshooting 11 Taking Care of your comp
Remark: All the drawings in the Guide are diagrams. About components’s quantity and style, substances shall take precedence.
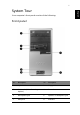
1 Your computer’s front panel consists of the following: Front panel No. Description No.
English 2 No. Description No. Description 1 Optical drive 2 Floppy drive 3 Indicator 4 Power button 5 Speaker or headphone jack 6 Microphone jack 7 USB ports Note: The specifications above are for reference only. The exact configuration of your PC depends on the model purchased.
3 English Rear Panel No. Description No. Description 1 Power cord socket 2 Voltage selector switch 3 Fan aperture 4 PS/2 keyboard connector 5 PS/2 mouse connector 6 Serial port 7 Printer connector 8 Monitor connector 9 USB 2.
English 4 System Features Your computer features: Performance • Intel® Pentium® 4 Socket LGA775 CPU • System Memory DDR 333/400 DIMM, 4 DDR DIMM Slots, expandable to 4GB • Power management functions • 3.5 inch floppy drive / card reader (optional) • CD-ROM, DVD-ROM, CD-RW (52X/24X), DVD/CD-RW combo or DVD writer • High-capacity, Enhanced-IDE drive / SATA • Support for USB 2.
5 The included mouse is a standard two-button wheel mouse. Connect the mouse to the PS/2 mouse port or USB port on the back panel of the system. Keyboard (PS/2 or USB, manufacturing option) Connect the keyboard to the PS/2 keyboard port or USB port on the back panel of the system.
English 6 Speakers For systems bundled with speakers, before powering on the system, connect the speaker cable to the audio out (external speaker) port on the back panel of the system. For more detailed information about the speakers, please refer to the included operating instructions. Note: speakers are optional and the appearance might be different depending on the actual product.
7 You can expand your AcerPower F3 system quickly and easily by adding components. You can also upgrade the components of your AcerPower F3 system. Opening the computer Before removing any panels or covers, please make sure to shut off the computer and unplug the power cord from the outlet. • Remove the two screws on the side panel. • Slide the panel back and off. Setting up new components You can only use components compatible with AcerPower F3 computers.
English 8
9 AcerPower F3 is a versatile, high-power system, supporting Intel® Socket LGA775 CPUs. The computer uses Peripheral Component Interface Express (PCI Express). This improves system efficiency and helps the system support varied multimedia and software applications.
English 10 • AcerPower F3 Series • PS/2 or USB keyboard (manufacturing option) • PS/2 or USB mouse (manufacturing option) • Speakers ( for selected models only) • User's Guide and Starter poster Other user documentation and third party software. Connecting the peripherals Note: Don't connect the system power cord before connecting all peripherals to the system. After everything is connected, plug the power cord into the system and insert the other end into a power outlet.
13 Please read the important instructions listed in this section. Following these instructions will help you maximize the durability of your computer. Important tips • Do not expose the computer to direct sunlight. Do not place it near sources of heat, such as a radiator. • Do not subject the computer to magnetic fields. • Do not expose the computer to rain or moisture. • Do not spill water on the computer. • Do not subject the computer to heavy shock or vibration.
English 14 To clean your pointing device To clean your mouse (with rubber ball) 1 Open the circular cover underneath the mouse. 2 Take out the rubber ball and wipe it with a soft, damp cloth. 3 Put the ball back and replace the cover. To clean your optical mouse For users of an optical mouse, refer to the documentation that came with your mouse for maintenance instructions. To clean your monitor Make sure that you keep your screen clean.
15 As an Energy Partner, Acer Inc., has determined that this product meets the Energy Star guidelines for energy efficiency. Declaration of Conformity for EU countries Hereby, Acer, declares that this personal computer is in compliance with the essential requirements and other relevant provisions of Directive 1999/5/EC. Notice: Shielded cables All connections to other computing devices must be made using shielded cables to maintain compliance with FCC regulations.
English 16 2 Unplug this product from the wall outlet before cleaning. Do not use liquid cleaners or aerosol cleaners. Use a damp cloth for cleaning. 3 Do not use this product near water. 4 Do not place this product on an unstable cart, stand, or table. The product may fall, causing serious damage to the product. 5 Slots and openings are provided for ventilation; to ensure reliable operation of the product and to protect it from overheating. These openings must not be blocked or covered.
17 If the product exhibits a distinct change in performance, indicating a need for service. 12 Use only the proper type of power supply cord set (provided in your accessories box) for this unit. It should be a detachable type: UL listed/CSA certified, type SPT-2, rated 7A 125V minimum, VDE approved or its equivalent. Maximum length is 15 feet (4.6 meters). 13 Always disconnect all telephone lines from the wall outlet before serving or disassembling this equipment.
English 18 ähnlichen Typ. Entsorgung gebrauchter Batterien nach Angaben des Herstellers. Laser compliance statement The CD or DVD drive used with this computer is a laser product. The CD or DVD drive’s classification label (content shown below) is located on the drive. CLASS 1 LASER PRODUCT CAUTION: INVISIBLE LASER RADIATION WHEN OPEN. AVOID EXPOSURE TO BEAM. APPAREIL A LASER DE CLASSE 1 PRODUIT LASERATTENTION: RADIATION DU FAISCEAU LASER INVISIBLE EN CAS D’OUVERTURE. EVITTER TOUTE EXPOSITION AUX RAYONS.
19 Name of Manufacturer: Acer Inc. Address of Manufacturer: 8F, 88, Sec. 1, Hsin Tai Wu Rd.
English 20
11 The following questions are possible situations that may arise during the use of your computer and each is followed by simple answers and solutions to the situation. Q: I pressed the power switch but the system did not boot up. A: Check the LED located above the power switch. If the LED is not lit, no power is being applied to the system. Do any of the following: • Check if the voltage selector switch located on the rear panel of the computer is set to the correct voltage.
English 12 Q: No sound comes out from the speakers. A: Check the following: • The volume may be muted. Look for the Volume icon on the taskbar. If it is crossed-out, click on the icon and deselect the Mute option. You can also press the volume control/mute knob on your USB keyboard to toggle the mute function. • If headphones, earphones, or external speakers are connected to the line-out jack of your computer, the internal or built-in speakers are automatically turned off.