Acer LCD TV Contents AT2326/2026 User Guide Important safety instructions-------------------------------------- 3 Disposal instructions-----------------------------------------------------------------------4 Your LCD TV overview------------------------------------------------ 5 Front and side panels---------------------------------------------------------------------5 Rear panel view-----------------------------------------------------------------------------6 Remote control------------------------------
© 2010 All Rights Reserved. Acer LCD TV User Guide Original Issue: 03/2010 Model Number: Serial Number: Purchase Date: Place of Purchase: HDMI, the HDMI logo and High-Definition Multimedia Interface are trademarks or registered trademarks of HDMI Licensing LLC. DVB is a registered trademark of the DVB Project.
Important safety instructions Read these instructions carefully. Please put them somewhere safe for future reference. 1. Only use attachments/accessories specified by the manufacturer. 3. Unplug this apparatus during lightning storms or when unused for long periods of time. 4. Do not install this equipment in a confined space such a book case or similar unit. 5. No naked flame sources, such as lighted candles, should be placed on the apparatus. 6.
a. When the power cord or plug is damaged or frayed. b. If liquid has been spilled into the product. c. If the product has been exposed to rain or water. English d. If the product does not operate normally when the operating instructions are followed. Adjust only those controls that are covered by the operating instructions. Improper adjustment of other controls could result in damage; extensive work by a qualified technician might then be required to restore the product to normal condition. e.
Your LCD TV overview Front and side panels Common interface 2 HDMI port 3 USB port 4 Earphone 5 Remote control receiver 6 Power Button English 1 1 2 3 4 6 5 7 8 9 10 11 12 7 Volume down When the OSD is on, functions the same as the Left arrow. 8 Volume up When the OSD is on, functions the same as the Right arrow. 9 Channel down When the OSD is on, functions the same as the Down arrow. 10 Channel up When the OSD is on, functions the same as the Up arrow.
English Rear panel view 1 AC-in 5 AV in-COMPONENT + Audio L/R 2 HDMI port 6 SPDIF out 3 VGA-in + PC Audio-in 7 AV in-S-video, CVBS, Audio L/R 4 SCART 8 Tuner* 1 2 3 4 5 * Tuner supports analog, digital and mixed signals.
Remote control SOURCE (TV/Video/S-Video/Component/ SCART/D-Sub/HDMI) Press to select correct input mode. 5 WIDE Press to toggle scaling mode between 4:3, 16:9, and Letterbox 1, 2, 3 modes. 6 MPX Press to display and select the audio signal. 7 MENU Press to open or close the Menu. 8 Back/CANCEL Press to back to previous Menu. 9 Directional keys On certain models, the left and right directional keys also function as rewind and fast-forward keys when viewing multimedia files.
English Teletext and Multimedia 1 SUBTITLE TELETEXT 2 3 INDEX SIZE HOLD REVEAL 5 4 Teletext Multimedia 1 Colour buttons (R/G/Y/B) Operates corresponding button on the teletext page. 1 Colour buttons (R/G/Y/B) No function when using the mutimedia interface. 2 INDEX Press to go to the index page. 2 3 SIZE Press once to zoom teletext page to 2X. Press again to resume. Previous Track Press to go to the beginning of a track, or the previous track. 3 Stop Press to stop playback.
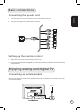
Basic connections Connecting the power cord Connect the AC cord into the AC input on the back of the set. 2 Connect the plug to the wall outlet as shown. English 1 Setting up the remote control 1 Open the cover on the back of the remote unit. 2 Insert two AA batteries (supplied) to match the polarity indicated inside the battery compartment.
Getting started watching your TV English 1 2 4 3 1 1 Power a. Turn on the power switch beneath the screen. b. Press the power button or channel up/down button on the remote control. 2 Installation Guide The first time you switch on the TV, you will be asked to select the language and scan for channels. Press the OK key to begin the setup process. You can also adjust these settings using the front control panel. Please see "Front panel view" on page 8 for details. Step 1.
4 Adjusting the volume Adjust the volume level using the ( VOL ) up/down button on the remote control. English Setup may vary due to local broadcast differences.
Connecting external audio/video devices English Connecting a DVD, VCR, STB or audio/video equipment Connect your DVD player, VCR or audio/video equipment using the SCART port located at the rear of your LCD TV as shown below.
TV-out English SCART SPDIF Recorder AV * Analog TV signal output through SCART is only available when watching an analog TV channel. Connecting a camera, camcorder or game console Connect your camera or camcorder to the video/audio ports on the left of the TV set as shown below.
Connecting a PC or notebook computer English To display PC output on your TV, connect your PC or notebook computer to the TV as shown below. D-Sub D-Sub For VGA connections, Acer recommends setting your PC’s external monitor resolution to 1600 x 900 pixels @ 60 Hz refresh rate (for 20” models ) or 1920 x 1080 pixels @ 60 Hz refresh rate (for 23” models ). Connecting a USB storage device To display multimedia content on your TV, connect the USB device to the TV as shown below.
Selecting the input source Once you have connected your antenna or external equipment to the TV, you need to select the correct input source. English Press the SOURCE button on the remote control to select the correct input source (TV/ SCART/Component/PC-RGB/HDMI1/HDMI2/AV/S-Video/Storage).
Playing multimedia files from a USB storage device English Connecting a USB storage device Connect the USB storage device to the USB port on your computer. Press the Source button on the remote control and select Storage. SOURCE Navigating in the multimedia screen There are three main areas of the multimedia screen: a c b a. Media selection The top-left of the screen shows the type of media being viewed: Photo, Music or Movie.
c. File preview The section on the right shows a preview of the selected file, including important file information. English Note: that it may be a short pause before the preview is displayed, depending on the size of the selected file. Playing media files Once you have found the file or files that you want to play, you may open them in full screen or as a slideshow. If you want to play all files from a folder, in the order they are shown, simply press Play (‘Hold’ on the remote control).
Music files English Selected music files will be shown in a playlist on the right of the screen; use the up and down directional keys to select a specific track. Press Play/Pause to pause a track. Press Previous (‘Index’) or Next (‘Reveal’) to skip to the previous track or advance to the next track in the playlist. You may use the left and right directional buttons to avance or rewind in a track. Press the button again to increase how fast the track advances or rewinds (x2/x4/x8/x16).
BACK MENU OK Channel controls FAV MUTE Channel list English Channel list allows you to quickly find the TV channel you are searching for. OK TELETEXT To open the channel list feature: 1 OK INDEX SUBTITLE SIZE HOLD REVEAL Press the OK key on the remote control. This will bring up the channel list menu. 2 The current channel will be highlighted. 3 Use the directional keys to navigate the list and select the channel you wish to watch.
Favourite channel list The favourite channel list allows you to store your favourite TV channels and flick between them at the touch of a button. English To set a favourite channel, follow the steps described on this page. Storing favourite channels 1 OK Press the OK key on the remote control. This will bring up the channel list menu. The current channel will be highlighted and press the FAV key to store it as favourite channel. 2 3 Back Press the BACK key on the remote control to exit.
d. Audio language e. Programme summary Electronic programme guide English The electronic programme guide (EPG) is an onscreen service available on digital and cable TV that provides information about scheduled broadcast programmes on all digital channels by time, title and channel. GUIDE Guide screen There are four main areas of the EPG screen: a b c d a.
Navigating the EPG (for Digital TV mode) English GUIDE OK 1 2 22 GUIDE Press the GUIDE key on the remote control. Use the directional keys to navigate around the EPG menu and press OK to select your highlighted option.
OSD navigation Many of the advanced settings and adjustments are available through using the OSD (onscreen display) menus, as shown in the example screenshot below. English Basic operations required to navigate these menus (Picture, Audio, Channel management, Settings and Advanced) are described in this section. Navigating the OSD with the remote control MENU OK You can also interact with these menus using the right panel controls. Please see "Front panel view" on page 5 for details.
Adjusting the OSD settings The OSD can be used for adjusting the settings of your LCD TV. English Press the Menu key to open the OSD. You can use the OSD to adjust the picture quality, audio settings, channel settings and general settings. For advanced settings, please refer to following page: Adjusting picture quality 1 Press the Menu key to bring up the OSD. 2 Using the directional keys, select Picture from the OSD. Then navigate to the picture element you wish to adjust.
Adjusting settings Press the Menu key to bring up the OSD. 2 Using the directional keys, select Settings from the OSD. Then navigate to the feature you wish to adjust. 3 The Settings menu can be used to adjust the screen Wide Mode, Menu Language, Sleep, Intelligent Zapping and other important settings. English 1 Adjusting advanced settings 1 Press the Menu key to bring up the OSD. 2 Using the directional keys, select Advanced from the OSD. Then navigate to the feature you wish to adjust.
OSD menus English Picture settings Open the Picture menu as described in the OSD navigation section. This menu provides the following settings: Scenario mode Scenario mode provides preset viewing modes designed to give you the best picture quality when watching a particular kind of programme. These provide preset values for brightness, contrast, hue colour and sharpness.
Contrast Change the contrast of the image. Brightness English Change the brightness of the image. Colour Change the colour depth of the image. Sharpness Change the sharpness of the image. Hue Change the hue of the image. Colour temperature This setting adjusts the colour temperature of the image. You can set it to Standard, Cold, User or Warm depending on your preference. With the User setting, you may change the colour values individually.
Audio settings Open the Audio menu as described in the OSD navigation section. This menu provides the following settings: English Scenario mode Scenario mode provides preset audio modes designed to give you the best sound quality when listening to a particular kind of programme. These provide preset values for treble and bass. There are pre-defined audio and video settings for optimal enjoyment of the following scenarios: Standard, Movie, Game, Sport, Concert, User.
Treble Boost or reduce high audio tones. Bass English Boost or reduce low audio tones. Balance Change the balance between the left and right speakers. Steady sound This function prevents sudden changes in the audio output level. If this function is On, volume levels will be consistent when switching between input sources and changing channels. Sound effects Turn Sound Effects on to add virtual surround sound. If Sound Effects are on, Treble and Bass settings are not available.
Channel management Open the Channel Management menu as described in the OSD navigation section. This menu provides the following settings: English Auto scan Auto scan allows you to scan for new or deleted channels. If you completed the setup wizard the first time you turned on your TV, all available channels are listed. To scan again, select the Auto Scan setting, and then your country from the Country List. Use the directional keys to select Start and press the OK key.
Preferred MPX If you are viewing an analog channel that supports multiple sound signals (e.g. NICAM, Bilingual), you may set which signal is used. Preferred subtitle language English If multiple subtitles are available, the TV will display the language selected in this option, if it is available. When watching TV, press the SUBTITLE key to see a list of available subtitles. CI information This setting shows information about the CI interface, if a CI card is being used.
Settings Open the Settings menu as described in the OSD navigation section. This menu provides the following settings: English Wide mode Press to toggle scaling mode between 4:3, 16:9 and different Letterbox modes (1, 2, 3). Wide Detect is also available when viewing SD content over digital TV, HDMI and SCART signals. HDMI scan info Use this setting to adjust the size of the image if you are using a HDMI connection. Menu language Set the language displayed for the OSD menus.
Advanced Open the Advanced menu as described in the OSD navigation section. This menu provides the following settings: English Parental control Parental control is a handy feature that can block chosen TV sources. Parental control allows you to enter a password and effectively stop anyone without the password from watching TV. Three options are available: Channel Block, Age Rating and Change Password. MENU OK Navigate to the Parental Contol setting and press OK.
Advanced picture adjust Select this option to adjust noise reduction settings, the backlight brightness, or activate ACM (Adaptive Contrast Management) to automatically vary the brightness depending on the image on the screen. English SCART A SCART connection can send AV, S-video, or both signals. Use this setting to select the correct signal, or the signal that provides the best quality.
Troubleshooting Before you call the Acer service center, please check the following items: English Here is a list of possible situations that may arise during the use of your LCD TV. Easy answers and solutions are provided for each. There is no picture or sound • Make sure the power cord is properly inserted in the power outlet. • Make sure the input mode is correctly set by your selected input. • Make sure the antenna at the rear of the TV is properly connected.
English PC Input Signal Reference Chart Resolution Horizontal Freq. (kHz) Vertical Freq. (Hz) Standard 1 640 x 480 31.5 60.0 VGA 2 640 x 480 37.9 72.8 VGA 3 640 x 480 37.5 75.0 VGA 4 640 x 480 35.0 66.7 MAC 5 720 x 400 31.5 70.1 VESA 6 800 x 600 35.2 56.3 SVGA 7 800 x 600 37.9 60.3 SVGA 8 800 x 600 48.1 72.2 SGVA 9 800 x 600 46.9 75.0 SVGA 10 832 x 624 49.7 74.6 MAC 11 1024 x 768 48.4 60.0 XGA 12 1024 x 768 56.5 70.1 XGA 13 1024 x 768 60.
Product specifications Brightness (typ.) Contrast Ratio (typ.) Dynamic Contrast Ratio (max.) Display colour Viewing angle (typ.) Response (typ.) Power supply Input Max. power consumption Power saving Mechanical Dimensions (W x H x D mm) Weight (kg) Weight (lbs.
English Terminal Analog/ Digital Tuner In SCART Component in AV-in HDMI 1 HDMI 2 PC D-sub in PC audio in RCA audio out SPDIF out Headphone out USB Port Resolution HDMI Audio system Speakers Mutimedia support via USB Photo Audio Video 38 Hybird CVBS (In/Out), RGB (In), Audio R/L YPbPr, Audio (R/L) CVBS, S Video, Audio (R/L) Yes (HDMI 1.3) Yes (HDMI 1.3) Yes Yes Yes Yes (Coxial) Yes Yes 480i/480P/576i/576P/720P/1080i/1080P 5W+5W JPG, BMP, PNG MP3, AAC MPEG-2, H.
Wall mount preparation / removing the base English Caution: Disassemble the base carefully otherwise the plastic parts and/or TV body may be damaged. 1 1) Remove the base. 1 2 2) Remove the screws from inside the stand. 3) Assemble the wall mount following the instructions included with the wall mount.