SERVICE MANUAL C20 Date Revise Version Description 2010.09.21 V1.
Preface This manual is applied to C20 projection system. The manual gives you a brief description of basic technical information to help in service and maintain the product. Your customers will appreciate the quick response time when you immediately identify problems that occur with our products. We expect your customers will appreciate the service that you offer them. This manual is for technicians and people who have an electronic background.
Table of Content Chapter 1 Chapter 2 Introduction Highlight 1-1 Compatible Mode 1-2 Multimedia specification 1-5 Product Overview 1-6 Disassembly & Assembly Process Equipment Needed & Product Overview 2-1 Disassemble Battery Cover Module 2-2 Disassemble Top Cover Module 2-2 Disassemble Key Pad Module 2-3 Disassemble Speaker Holder Disassemble Engine Module and Main Board Module 2-4 2-4 Disassemble the Focus R
Test Condition 4-2 Test Inspection Procedure 4-3 PC Mode 4-4 Video Performance 4-6 SD Card Test 4-7 Optical Performance Measure 4-7 Others 4-9 Chapter 5 Firmware Upgrade Equipment Needed Chapter 6 5-1 Firmware Upgrade Procedure 5-2 EDID Upgrade EDID introduction 6-1 Equipment needed 6-2 Setup procedure 6-3 EDID Key-In Procedure(VGA & HDMI Interface) 6-3 Appendix A Exploded Image I Ap
Chapter 1 Introduction 1-1 Highlight No 1 2 3 Item Dimensions (WxDxH) Weight Power Supply Description • 118mm x 60.80mm x 18.60mm • < 135g without battery (Battery is 31g) • Auto-ranging: AC100V ~ 240V ± 10%, 50-60Hz DC 5V/2A, 10W Power consumption • Multimedia File Playback: <7.9W (Typical) in Bright Mode; <5.9W in ECO mode • VGA display mode: <7.4W (Typical) in Bright Mode; <5.4W in ECO mode • Standby Mode < = 0.
No Item Description • 17 ANSI Lumens (Typical) • 14.
1-2 Compatible Mode A. VGA Analog (1) VGA Analog - PC Signal Modes Resolution V.Frequency[Hz] H.Frequency[KHz] VGA 640x480 60 31.5 WVGA 848x480 60 29.8 SVGA 800x600 60 37.9 XGA 1024x768 60 48.4 PowerBook G4 640x480 60 31.4 PowerBook G4 800x600 60 37.9 PowerBook G4 1024x768 60 48.4 (2) VGA Analog - Extended Wide timing Modes Resolution V.Frequency[Hz] WXGA H.Frequency[KHz] 1280x768 60 47.8 1280x720 60 44.8 1280x800 60 49.6 V.Frequency[Hz] H.
1280x720 60 44.8 1280x800 60 49.6 480i 720x480(1440x480) 59.94(29.97) 15.7 (3) HDMI - Video Signal 576i 720x576(1440x576) 50(25) 15.6 480p 720x480 59.94 31.5 576p 720x576 50 31.3 720p 1280x720 60 45 720p 1280x720 50 37.5 1080i 1920x1080 60(30) 33.8 1080i 1920x1080 50(25) 28.1 Graphic source Horizontal scan monitor range limits rate: Vertical scan rate: Max.
1-3 Multimedia specification Video File format Video Format Max res. Profile AVI,MOV,MP4,3GP H.264 720x480 30fps or 720x576 25fps Baseline AVI MPEG4 720x480 30fps or 720x576 25fps Simple Profile AVI Xvid 720x480 30fps or 720x576 25fps Baseline AVI MJPEG 640x480 30fps Baseline Note: Video format does not support content with B-Frame function Photo File format File extension BMP *.bmp JPG, JPEG *.
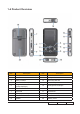
1-4 Product Overview Projector Outlook Item Description Item Description 1 Power Button 11 Audio Out Connector 2 Enter Button 12 AV Input Connector 3 Battery Indicator 13 MicroSD Card Slot 4 Auto Search Source Button 14 Micro USB port 5 Navigation/Volume Button (up/down/left/right) 15 Through-hole for straps 6 Menu/Esc Button 16 Lens 7 Focus Dial 17 IR Receiver 8 VGA/Component Input Connector 18 DC Input 9 Mini HDMI Connector 19 Screw Hole for Tripod Convertor 10 Sp
Connecting the Projector Item Description Item Description 1 Universal-to-D-Sub Cable 5 Universal to RCA Cable 2 USB Cable 6 HDMI Cable (mini-to-STD) 3 Micro USB to USB A Cable 7 Audio Cable Jack/RCA 4 2.5mm-to-3.5mm A/V Cable 8 Adapter for iPod/iPhone Note: To ensure the projector works well with your computer, please make sure the timing of the display mode is compatible with the projector.
System Block Diagram C20 Confidential 1-
Chapter 2 Disassembly & Assembly Process 2-1 Equipment Needed & Product Overview 1. Screw Bit (+): No.00 2. Tweezers (Wide flat-head tweezers) 3. C20 units * Before you start: This process is protective level II. Operators should wear electrostatic chains.
2-2 Disassemble Battery Cover Module 1. Disassembe the Battery Cover Module (as red arrow direct). 2. Remove the Battery. 2 3 2-3 Disassemble TOP Cover Module 1. Unscrew 6 screws from the Bottom Cover (as red circle).
2. Unplug the keypad cable which connects to the main board.(as red circle) Note: - There are 2 tenons (as blue circle) of the top cover,when disassembling it, you must be careful so as not to damage the top cover. 2-4 Disassemble KeyPad Module 1. Unplug the keypad cable which connects to the keypad board and tear off two thermal pads.(as red square) 2. Unscrew 4 screws.(as red circle) 3. Take out the keypad board.
2-5 Disassemble Speaker Holder 1. Unscrew 2 screw (as red circle) to disassemble the Speaker Holder. 2-6 Disassemble Engine Module and Main Board Module 1. Unplug the RGB Led cable first and then unplug the 50 Pin FPC cable. 2. Unscrew 1 screw (as red circle). 3.Disassemble the Main Board Module from the Bottom Cover Module.
Note: - To disassemble the Main Board from the bottom cover module,you can push one side of the bottom cover module out and then lift up the main board(as red arrow) - After then,take out the speaker from the slot.(as yellow square) - Finally,take out the main board module and speaker simultaneously. - If the bottom cover module is broken during disassembling process, please change it. 4. Unscrew 3 screws (as blue circle). 5. Disassemble the Engine Module.
2-7 Disassemble the ������ Focus Ring/Focus Gear� ���� and ��� IR Cover (1) (2) 1. Unscrew 3 screws (as red circle). 2. Disassemble the Focus Ring and Focus Gear. 3.Unscrew 2 screws (as yellow circle) 4.Disassemble the IR Cover 5. Disassemble complete. Note: - To distinguish the two thermal pads,here list the PN of them. (1) 52.8EN10G001 (2) 52.8EN12G001 - When paste the thermal pads,please refer to the red lines. Note:- Please do follow steps when assemble the three focus gears.
2-8 LED Duty Selection After changing the main board or engine module,we should match the "DUTY" value to the engine value. 1. Get into service mode,choose "DUTY". 2. Check the value of engine module. 3. Press "left" or "right" to choose the "DUTY" value. 4. Ensure the "DUTY" value is same with the engine value(as red squares). 5.If there is no value on the engine module,the "DUTY" value should be 7.
2-9 Assemble ���� the ������ Focus Ring/ Focus Gear and IR Cover (1) (2) 1. Screw 2 screws (as yellow circle). 2. Assemble the IR Cover 3.Screw 3 screws (as red circle) 4. Assemble the Focus Ring and Focus Gear. Note: - To distinguish the two thermal pads,here list the PN of them. (1) 52.8EN10G001 (2) 52.8EN12G001 - When paste the thermal pads,please refer to the red lines. Note:- Please do follow steps when assemble the three focus gears. - Allocate gear A to the bottom, as red arrow direct.
2-10 Assemble Engine Module and Main Board Module 1. Screw 3 screws (as blue circle). 2. Assemble the Engine Module. 3. Assemble the Cone Guide (as red square). RGB Led cable 4. Assemble the Main Board Module. 5. Plug the 50 Pin FPC cable first and then plug the RGB Led cable. 50 Pin FPC cable . 6. Screw 1 screw (as red circle).
Note: - To assemble the Main Board from the bottom cover module,you can pull one side of the bottom cover module in and then lift down the main board(as red arrow) - After then,put the speaker in the slot.(as yellow square) - If the bottom cover module is broken during assembling process, please change it. 2-11 Assemble Speaker Holder 1. Screw 2 screw (as red circle) to assemble the Speaker Holder.
2-12 Assemble KeyPad Module 1. Screw 4 screws.(as red circle) 2. Plug the keypad cable which connects to the keypad board and paste two thermal pads.(as red square) . Note: - To distinguish the five thermal pads,here list the PN of them. (1) 52.8EN09G001 (2) 52.8EN07G001 (3) 52.8EN06G001 (4) 52.8KE04G001 (5) 52.8KE05G001 - When paste the thermal pads,please (4) (5) (3) (2) (1) refer to the blue lines. 2. Plug the keypad cable which connects to the main board.
2-13 Assemble TOP Cover Module 1. Screw 6 screws on the Bottom Cover (as red circle). 2-14 Assemble Battery Cover Module 1.Put the Battery in. 2. Assemble the Battery Cover Module (as red arrow direct). 3. Assemble complete.
Chapter 3 Troubleshooting Main Procedure No Procedure Symptom • Ensure the Power Adapter and Outlet or battery are connected securely • Ensure all connectors are securely connected and aren’t 1 No Power broken • Check keypad board 2 Auto Shut Down • Check Main Board • Check the Power Adapter and Outlet or battery • Check Main Board • Ensure the Signal Cable and Source work well • Ensure all connectors are securely connected 3 No Image • Check Main Board • Check Engine Module • Ensure all conn
No Procedure Symptom • Do “System reset” in Service mode • Do “Duty selection” in Service mode 7 Color Abnormal • Check the source cable is connected properly • Check Main Board • Check Engine Module • Ensure the projection screen without dirt 8 Poor Uniformity/ Shadow • Ensure the projection lens is clean • Ensure the Brightness is within spec • Check Engine Module • Ensure the projection screen without dirt 9 Dead Pixel/Dust (Out of spec.
Chapter 4 Function Test&Alignment Procedure 4-1 Test Equipment Needed - DVD player with Multi-system (NTSC/PAL) - Minolta CL-100 - Equipped "Component", "S-Video" , "Composite" - Quantum Data 802B or CHROMA2327 (Color Video Signal & Pattern Generator) - Remote control (P/N: 45.89Z01G001 only for C20 test using) - C20 24P to VGA-M (P/N: 42.0020AG001) - MINI JACK-M 2.5mm TO 3.5mm 1000mm cable (P/N: 42.002C1G003) 4-2 Service Mode 1. Turn on the projector 2.
4-4 Test Condition 4-4-1 Normal Test Condition - Circumstance brightness: Dark room less than 2.
4-4-2 Burn-In Test - Temperature: 15°C~35°C - Circumstance brightness: Normal environment - Screen size: No concern - Display mode: ECO mode After repairing C20, it should be Burn-in (refer to the below table). Symptom Normal repair NFF Auto shutdown Burn-in Time 2 hours 4 hours 6 hours - Get into Burn-In Mode * Cycle setting is based on the defect symptoms. ie: If it is NFF, the burn-in time is 4 hours. You have to set the lamp on for 50 min. and lamp off for 10 min for 4 cycles.
4-6 PC Mode 1. Bright Pixel Note: Link Chroma VGA port to the ‘‘Universal I/O’’ port of the projector by universal to VGA cable. Procedure Inspection item Criteria - Test equipment: video generator. - Test signal: analog 800x600@60Hz. - Test Pattern: Gray 10 pattern - Bright pixel check. - Adjacent pixel check. - Bright pixel is unacceptable. - Only one bright dot on frame is acceptable. - Adjacent pixel with each other is unacceptable. Gray 10 2.
3. Color performance Procedure - Test equipment: video generator - Test signal: Analog 800X600@60HZ - Test Pattern: 64 gray RGBW, Master pattern * Please refer to 4-2 to get into service mode. Use test signal to do the test. Color can not 64 gray RGBW discolor to purple and blue. Inspection item - Check if each color level is well-functioned. - Color saturations Criteria - Screen appears normal.
4-7 Video Performance Note: Plug JACK-M to 3*RCA-F R/W/Y cable into the AV-IN port of projector, the CVBS signal and Audio signal will be inputted.Then turn the sound of DVD player down.the signal test is as follows. AV-IN Port AUDIO Signal Cable CBVS Signal Cable 1. ECO/Bright Mode Function Test Turn on the projector, get into service mode then press ‘‘Left’’/‘‘Right’’ button on remote control to check if Bright mode/ECO mode exchange normally. 2.
4-8 SD Card Test 1. Turn on the projector and unplug signal cable, select “Video“, play the video file in it: -C heck any abnormal color, line distortion or any noise on the screen. - Check the sound from speaker. 2. Turn on the projector, connect “micro USB” port of the projector and PC USB port by universal to USB cable: - Check whether PC can detect the SD card information,there should be three removable disk.
2. Brightness Procedure - Full white pattern - Use CL100 to measure brightness values of P1~P9. - Follow the brightness formula to calculate brightness values. ☼ Brightness Formula Avg. (P1+P2+P3+...+P9) x 0.12 Criteria • 8 ANSI Lumens Full white pattern 3.
4-10 Others 1. Function Inspection Keypad button - All keypad buttons must operate smoothly. General - All OSD functions must be checked for functionality. When OSD menu is displayed, there shall be no visible peaking, ringing, streaking, or smearing artifacts on the screen. Factory Default Display Size - The factory settings (with appropriate centering, size, geometry distortion, etc.
Chapter 5 Firmware Upgrade 5-1 Equipment Needed Software : - C20_FW_MSTUPUP.BIN - C20_FW_AMAMUPUP.BIN Hardware : - Projector (C20) - SD Card - Power adapter (47.8BU11G001 and 47.8BU14G001) - PC - Monitor - USB Male cable(42.
5-2 Firmware Upgrade Procedure� 1. Insert Micro SD card into the projector and connect it to PC by USB Male cable. Then turn on the projector. 2. There is one removable Disk in "My Computer" .Copy firmware "MSTUPUP. BIN ","AMAMUPUP.BIN" to the removable Disk.Then unplug the USB Male cable. 3. Process (1) Insert power adapter into C20. (1) (2) (2) Press the power button to turn on the projector.
(3) Press “right“,’’enter” to select Micro (3) SD. (4) Choose "Setting" icon.
(7) Choose "system setup" (8) The "system upgrade" will show,choose "system upgrade" (7) Choose "Yes". (7) (8) (9) 4. Wait a few minutes until the projector downloads finish,then the system will reboot.In this process, please ensure the projector power on and don't plug out power adapter.
5. When firmware upgrade ������������� procedure���� is finished,press "menu","enter",''enter'', ''System Setting'' and choose "Version" item. The new window will show the latest Multimedia Firmware Version for us to check if it is correct. 6. Get into service mode.Press "right","right", then check the System Firmware Version.
Chapter 6 EDID Upgrade 6-1 EDID Introduction Extended Display Identification Data is a VESA standard data format that contains basic information about a display device and its capabilities, including vendor information, maximum image size, color characteristics, factory pre-set timings, frequency range limits, and character strings for the monitor name and serial number.
6-2 Equipment Needed Software - EDID Program (Generic V0.67) - EDID File (*.ini) Hardware - Projector - Generic Fixture :80.00001.001 for EDID Key-in (Fixture: JP3 must be closed) - Power adapter for projector (P/N: 47.8BU11G001&47.8BU14G001) - DVI-HDMI adapter(42.00293G001) - Mini HDMI to HDMI cable (42.00253G001) - Monitor - PC - Universal to VGA Cable (P/N: 42.0020AG001) - RS-232 Cable : 42.83C07G001 - Power adapter 2 for fixture: 47.
6-3 Setup Procedure P1 RS232 Cable P2 VGA to IO CABLE 1. Connect all ports - Power adapter 2 to fixture JP1. JP1 adapter - Fixture P1 to PC COM1 Port. - Fixture P2 to Projector ''Universal I/O'' port by VGA to IO cable. P3 DVI-HDMI adapter and HDMI cable - Fixture P3 to Projector "Mini HDMI" port by DVI-HDMI adapter and HDMI cable - Connect the power adapter 1 to projector “dc in 5v” port. DC in 5V 6-4 EDID Key-In Procedure (VGA & HDMI Interface) 1. Click on "EDID" to execute EDID program. 2.
(3) (3) Choose the source file ''C20 EDID_XX.ini''. (4) Click ''Open''. (4) (1) 3. Programming (1) Key in the serial number into the barcode blank space. (3) (2) In "Write Source Select", click “Analog”. (3) Click "Program". (2) 4. When the message “Please change the cable to Analog” shows on the screen, click “OK” button. 5.When the message “Please change the cable to Digital” shows on the screen, click “OK” button.
6. W hen the EDID program is completed, a message "OK" will appear on the screen. 7. Select ''Trans'' & "Analog" in the read item, and then click ''Read'' button, EDID information will show the result. 8. Select ''Trans'' & "Digital" in the read item, and then click ''Read'' button, EDID information will show the result.
Appendix A Note: This chapter is only designed to show the exploded image of the projector. For updated part numbers, please refer to RSPL report. DP.
Item P/N Description Parts Supply 1 85.1A52AG030 2 85.1A52AG060 SCREW PAN HEAT MACHINE M1.4*6.0 P=0.3 NYLOK NICKEL 3 70.8KE01G001 TOP COVER MODULE C20 4 70.8KE02G001 BOTTOM COVER MODULE C20 5 51.8EN06G001 SPEAKER HOLDER MN3600HA PK201 6 85.1A12AG080 SCREW CAP HEAD TAP M1.4*8 PK201 7 70.8KE03G001 BATTERY COVER MODULE C20 8 70.8KE05G001 ASSY ENGINE MODULE C20 SCREW PAN HEAD MACHINE M1.4*3.0 P=0.3 NYLOK NICKEL 9 70.8KE04G001 MAIN BOARD PCBA MODULE C20 10 41.
Assy Top Cover Module C20 Confidential III
Item P/N Parts Supply Description 70.8KE06GR01 TOP COVER MODULE C20(SERVICE) V 1 51.8KE02H001 TOP COVER LN2520 C20 2 51.8KE04H001 TOP COVER TRIM LN2520 C20 2 52.8KE04G001 FLASH THERMAL PAD GR-Hm 11.3mmX19.5mmX1.5mm 3 51.8KE08H002 KEYPAD BUTTON P+R C20 4 80.8KE03G001 PCBA KEYPAD BD FOR C20 PICO PROJECTOR V 5 42.0030BG101 FFC M/B TO KEYPAD BOARD 10P P=0.5 50mm V 6 85.3A12AG030 SCREW CAP MACHINE M1.4*3.0 P=0.3 NICKEL 7 61.8KE01H001 TOP CU PLATE C1100 C20 8 52.
Assy Bottom Cover Module C20 Confidential
Item P/N Parts Supply Description 70.8KE07GR01 BOTTOM COVER MODULE C20(SERVICE) V 1 51.8KE01H001 BOTTOM COVER PC C20 2 51.8KE09G001 IO CAP USB P+R C20 3 51.8KE10G001 IO CAP HDMI P+R C20 4 52.8EN10G001 BOTTOM ENGINE THERMAL PAD GR-Hm 22.6x19.5x0.8t 5 51.8KE05H001 FOCUS RING POM C20 6 52.8KE03H001 RUBBER RING C20 7 51.8EN09G001 TRANSFER GEAR POM PK201 V 8 51.8EN10G001 FOCUS GEAR PK201 V 9 51.8KE06H001 IR COVER GE-121R C20 V 10 85.GA12AG030 SCREW CAP HEAD TAP M1.
Assy Battery Cover Module Item P/N 1 2 70.8KE08GR01 51.8KE03H001 52.
Assy Engine Module Item P/N Parts Supply Description 70.8KE09GR01 ASSY ENGINE MODULE C20(SERVICE) V 1 42.00320G001 FPC ENGINE TO MB BOARD 50P WITH BTB CNNT PK201 2 85.YA32AG031 SCREW FLAT TAP M1.4*3 BLACK 3 75.8KE01G002 4 41.83J07G001 0.3” DMD, F/2.4 PL, OSTAR COMPACT LED - R/B:Q6WM - G: Q9WM(YOI FLC II ENGINE ) EMI TAPE W5*H1.
Assy Main Board Module Item P/N Parts Supply Description 70.8KE10GR01 ASSY MAIN BOARD MODULE C20(SERVICE) 1 80.8KE01G001 PCBA MAIN BD FOR C20 PROJECTOR 2 41.8EM02G001 EMI GASKET W5*H0.5*L11mm 3 41.8EN03G001 EMI GASKET W5.5xH3xL5.5mm 4 41.8CU07G001 EMI gasket W5xH0.
DP.
Parts Supply Item P/N Description 1 DC.8KE01G001 D.C. C20 2 47.8BU11G001 AC ADPTR 100-240VAC IN 5V 2A OUT FOR PHIHONG V 3 47.8BU13G001 AC ADAPTOR PLUG EU TYPE PHIHONG PK-102 V 4 47.8BU14G001 AC ADAPTOR PLUG UK TYPE PHIHONG PK-102 V 5 46.8CU01G001 BTRY LI-ION POLYMER BATTERY PACK 3.7V 1410MAH SMP 6 42.002C1G003 CABLE AV IN MINI JACK-M 2.5mm TO 3.5mm 1000mm BLACK C20 7 42.0020AG001 CABLE 24P TO VGA-M 600MM 8 42.0028DG001 CABLE USB MICRO B-M TO USB A-M 1000MM 9 53.
Appendix B I. Serial Number System Definition Serial Number Format for Projector EYJBT01001 029 00000 59 0 1 1 2 3 4 5 6 1 : EYJBT01001 = Part Number 2 : 029 = Date Code (ex:2010=0, the twenty-ninth week of the year= 29) 3 : 00000 = Serial Numbers 4 : 59 = Manufacturing Code 5 : 0 = Version Code 6 : 1 = Auto-Language Code EX: EYJBT01001029000005901 This label represents the serial number for C20. It is produced at CPC on twenty-ninth week of 2010. Its serial code is 00000.
II.