Acer LCD Monitor User's Guide
Copyright © 2007. Acer Incorporated. All Rights Reserved. Acer LCD Monitor User's Guide Original Issue: 11/2007 Changes may be made periodically to the information in this publication without obligation to notify any person of such revisions or changes. Such changes will be incorporated in new editions of this manual or supplementary documents and publications.
iii Special notes on LCD monitors The following are normal with the LCD monitor and do not indicate a problem. • Due to the nature of the fluorescent light, the screen may flicker during initial use. Turn off the power switch and then turn it on again to make sure the flicker disappears. • You may find slightly uneven brightness on the screen depending on the desktop pattern you use. • The LCD screen has 99.99% or more effective pixels. It may include blemishes of 0.
iv Accessibility Be sure that the power outlet you plug the power cord into is easily accessible and located as close to the equipment operator as possible. When you need to disconnect power from the equipment, be sure to unplug the power cord from the electrical outlet. Safe listening To protect your hearing, follow these instructions. • Gradually increase the volume until you can hear it clearly and comfortably and without distortion.
v • • ampere rating of the equipment plugged into the extension cord does not exceed the extension cord ampere rating. Also, make sure that the total rating of all products plugged into the wall outlet does not exceed the fuse rating. Do not overload a power outlet, strip or receptacle by plugging in too many devices. The overall system load must not exceed 80% of the branch circuit rating. If power strips are used, the load should not exceed 80% of the power strip's input rating.
vi Note: Adjust only those controls that are covered by the operating instructions, since improper adjustment of other controls may result in damage and will often require extensive work by a qualified technician to restore the product to normal condition. Potentially explosive environments Switch off your device in any area with a potentially explosive atmosphere and obey all signs and instructions.
vii Disposal instructions Do not throw this electronic device into the trash when discarding. To minimize pollution and ensure utmost protection of the global environment, please recycle. For more information on the Waste from Electrical and Electronics Equipment (WEEE) regulations, visit http://global.acer.com/about/sustainability.
viii refers to http://www.energystar.gov and http://www.energystar.gov/ powermanagement. As an ENERGY STAR partner, Acer Inc. has determined that this product meets the ENERGY STAR guidelines for energy efficiency. Note: The statement above is applicable only to Acer LCD monitor with an ENERGY STAR logo. This product has been shipped enabled for power management: • • • Activate display’s Sleep mode within 15 minutes of user inactivity. Activate computer’s Sleep mode within 30 minutes of user inactivity.
ix Taking care of your vision Long viewing hours, wearing incorrect glasses or contact lenses, glare, excessive room lighting, poorly focused screens, very small typefaces and low-contrast displays could stress your eyes. The following sections provide suggestions on how to reduce eyestrain. Eyes • • • Rest your eyes frequently. Give your eyes regular breaks by looking away from the monitor and focusing on a distant point. Blink frequently to keep your eyes from drying out.
x We, Acer Computer (Shanghai) Limited 3F, No. 168 Xizang medium road, Huangpu District, Shanghai, China Contact Person: Mr. Easy Lai Tel: 886-2-8691-3089 Fax: 886-2-8691-3000 E-mail: easy_lai@acer.com.tw Hereby declare that: Product: LCD Monitor Trade Name: Acer Model Number: V223W SKU Number: V223Wxxxx The first x shows the front frame's ID and color. The second x shows pedestal's ID color. The third x shows the sale area. The fourth x shows the others.;ADSP.
xi Federal Communications Commission Declaration of Conformity This device complies with Part 15 of the FCC Rules. Operation is subject to the following two conditions: (1) This device may not cause harmful interference, and (2) This device must accept any interference received, including interference that may cause undesired operation.
xii
1 Special notes on LCD monitors Information for your safety and comfort Safety instructions Cleaning your monitor Connecting/disconnecting the device Accessibility Safe listening Warnings Using electrical power Product servicing Additional safety information IT equipment recycling information Disposal instructions LCD pixel statement Tips and information for comfortable use Federal Communications Commission Declaration of Conformity Unpacking Attaching/removing the base Screen position adjustment Connectin
2
1 Please check that the following items are present when you unpack the box, and save the packing materials in case you need to ship or transport the monitor in the future.
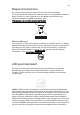
English 2 Attaching/removing the base Attaching: Align the release button on the bottom of the monitor with the corresponding slots on the bottom of the base. Removing: Press the release button as indicated, then pull in the direction of the arrow to remove the base. Screen position adjustment To optimize the viewing position, you can adjust the monitor tilt by using both of your hands to hold the edges of the monitor as shown below. The monitor can be adjusted to 15 degrees up or 5 degrees down.
3 • Check first to make sure that the power cord you use is the correct type required for your area. • The monitor has a universal power supply that allows operation in either 100/120 V AC or 220/240 V AC voltage area. No user-adjustment is required. • Plug one end of the power cord to the AC inlet, and plug the other end into an AC outlet. • For units using 120 V AC: Use a UL-listed cord set, type SVT wire and plug rated 10 A/125 V.
English 4 Connector pin assignment 1 5 10 6 11 15 15-pin color display signal cable PIN No. Description PIN No.
5 English 24-pin color display signal cable PIN No. 1 Description PIN No. Description TMDS data 2- 13 NC 2 TMDS data 2+ 14 +5 V power 3 TMDS data 2/4 shield 15 GND (return for +5 V hsync.
6 English Standard timing table Mode Resolution 1 Acer 648 x 500 58 Hz 2 Acer 1280 x 800 60 Hz 3 VGA 640 x 480 59.941 Hz 4 VGA 640 x 480 72.809 Hz 5 VGA 640 x 480 75 Hz 6 MAC 648 x 500 66.66 Hz 7 VESA 720 x 400 70.087 Hz 8 SVGA 800 x 600 56.25 Hz 9 SVGA 800 x 600 60.317 Hz 10 SVGA 800 x 600 72.188 Hz 11 SVGA 800 x 600 75 Hz 12 MAC 832 x 624 74.55 Hz 13 XGA 1024 x 768 60.004 Hz 14 XGA 1024 x 768 70.
7 To install the monitor on your host system, please follow the steps below: Steps 1 Connect the video cable a Make sure both the monitor and computer are switched off. b Connect the VGA video cable to the computer. c Connect the digital cable (only for dual-input models). (1) Make sure both the monitor and computer are switched off. (2) Connect one end of the 24-pin DVI cable to the back of the monitor and the other end to the computer's port.
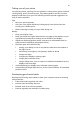
English 8 User controls 7 6 5 4 3 2 1 Front panel controls 1 Power LED: Lights up to indicate the power is turned on. 2 Power Switch: Turn the power on or off. 3.4 < / > : Press < or > to navigate to the desired function, press Enter to select the function. Press < or > to change the settings of the current function. 5 Menu/Enter: Activate the OSD menu when the OSD is off or activate / deactivate the adjustment function when the OSD is on. 6 Auto adjust button/Exit: a.
9 1 Press the Menu button to activate the OSD window. 2 Press < or > to select the desired function. 3 Press the Menu button again to select the function that you want to adjust. 4 Press < or > to change the settings of the current function. 5 To exit and save, select the exit function. If you want to adjust any other function, repeat steps 2 to 4. A. B. Acer eColor Management: If "Acer eColor Management" is selected, the Acer eColor Management OSD will appear.
English 10 Acer eColor Management • Operation instructions 1 2 3 Press the Empowering Key to open the Acer eColor Management OSD and access the scenario modes. Press "<" or ">" to select the mode. Press the Auto-adjust button to confirm the mode and run Auto Adjust. • Features and benefits Main menu icon Sub menu item Description User mode User-defined. Settings can be fine-tuned to suit any situation. Text mode Optimal balance of brightness and contrast to prevent eyestrain.
11 Main menu icon Sub menu icon N/A N/A English User Sub menu item Description Contrast Adjusts the contrast between the foreground and background of the screen image. Brightness Adjusts the background brightness of the screen image. ACM ACM (Adaptive Contrast Management) ACM On/Off switch, default Off. Focus Adjusts picture focus (available in analog mode only). Clock Adjusts the picture clock (available in analog mode only). H.
English 12 Main menu icon Sub menu icon Sub menu item Description N/A English Language selection. N/A 繁體中文 N/A Deutsch N/A Français N/A Español N/A Italiano N/A 简体中文 N/A 日本語 N/A Suomi N/A Nederlands N/A Русский EMEA version OSD only. H. Position Adjusts the horizontal position of the OSD. V. Position Adjusts the vertical position of the OSD. OSD Timeout Adjusts the OSD timeout. N/A Analog Selects input signal from analog (D-sub).
13 Before sending your LCD monitor for servicing, please check the troubleshooting list below to see if you can self-diagnose the problem. VGA mode Problem No picture visible LED status Remedy Blue Using the OSD, adjust brightness and contrast to maximum or reset to their default settings. Off Check the power switch. Check if the power cord is properly connected to the monitor. Amber Check if the video signal cable is properly connected at the back of monitor.
English 14 DVI mode Problem No picture visible LED status Remedy Blue Using the OSD, adjust brightness and contrast to maximum or reset to their default settings. Off Check the power switch. Check if the AC power cord is properly connected to the monitor. Amber Check if the video signal cable is properly connected at the back of monitor. Check that the computer system is switched on and in power saving/ standby mode.