Acer DA222HQL User Guide
© 2013. All Rights Reserved. Acer DA222HQL User Guide Model: DA222HQL This Revision: 07/2013 Acer DA222HQL Model number: __________________________________ Serial number*: ___________________________________ Date of purchase: ________________________________ Place of purchase: ________________________________ *Note: See the back of the DA222HQL.
Table of contents Getting to know your DA222HQL Features and functions . . . . . . . . . . . . . . . . . . . . . . . . . . . . . . . . . . . . . . . . . . . . 5 Product registration . . . . . . . . . . . . . . . . . . . . . . . . . . . . . . . . . . . . . . . . . . . . . . 5 Setting up Unpacking your DA222HQL . . . . . . . . . . . . . . . . . . . . . . . . . . . . . . . . . . . . . . . . 6 Getting to know your DA222HQL . . . . . . . . . . . . . . . . . . . . . . . . . . . . . . . . . . . .
FAQ and troubleshooting Other sources of help . . . . . . . . . . . . . . . . . . . . . . . . . . . . . . . . . . . . . . . . . . . .
Getting to know your DA222HQL Features and functions Your new DA222HQL offers leading, easy-to-access multimedia and entertainment features. You can: • • • • • • Connect to the Internet. Access your email. Play music and video. Keep in touch with your friends via your People and social networking apps. View content from an HDMI device. Use touch to control a PC. Product registration When using your product for the first time, it is recommended that you immediately register it.
Setting up Unpacking your DA222HQL Your new DA222HQL comes packed in a protective box. Carefully unpack the box and remove the contents.
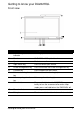
Getting to know your DA222HQL Front view No. Item Description 1 Front-facing camera and indicator A 2-megapixel camera for video chats 2 Touchscreen 21.5” 1920 x 1080 optical touch screen. 3 Speakers Emit stereo audio. 4 Input switch key Press to switch input source. 5 eColor management key Press to activate the eColor management key. 6 Function key Press to open the main menu.
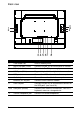
Back view 11 10 9 1 2 3 4 5 67 8 No. Item Description 1 Card reader slot Insert a memory card. 2 Micro USB port (Slave) Connects to your PC for ADB and MTP function. 3 DC-in jack Connects to the DC power supply. 4 HDMI port (MHL) Supports high-definition digital video connections. 5 VGA port Connect the VGA video cable to the computer. 6 Audio in jack Connect the audio cable to the computer. 7 Ethernet (RJ-45) port Connects to an Ethernet network.
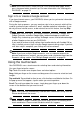
Using your DA222HQL Setting up your DA222HQL Open the stand until it snaps in place. Then, tilt the display panel to an angle of between 10 and 90 degrees from an upright position. Connect the DC-in jack to your DA222HQL and plug the AC adapter into any AC outlet. Warning: Only use the bundled power adapter to power your DA222HQL. Turning on for the first time To turn on your DA222HQL, press and hold the power button until the screen turns on. Wait a moment for your DA222HQL to get ready.
Note: If the DA222HQL’s screen turns off, it has entered sleep mode. Briefly press the power button to wake it up. For more information, see "Waking your DA222HQL" on page 19. Sign in to or create a Google account If you have Internet access, your DA222HQL allows you to synchronize information with a Google account. During the start-up process, you may create or sign in to an account, which will be used to synchronize your contact list, email, calendar and other information.
The Home screen When you start your DA222HQL, or wake it from power saving, it will display the Home screen. This screen gives you quick access to information and simple controls with widgets or shortcuts. These display information such as the time and weather, or provide additional controls and direct access to apps. Some have been pre-installed on your DA222HQL, while others may be downloaded from Google Play. The Home screen already features some useful controls and information.
Recent Tap this icon to see recently opened apps. Tap an app to open it, or tap anywhere on the screen to return to the Home screen. The extended Home screen The Home screen extends to either side of the initial Home screen, giving you more room to add widgets or organize shortcuts. To view the extended Home screen, swipe your finger to the left or right. A total of five pages are available, two to the left and two to the right.
Otherwise swipe to the left to see more Applications. When you are on the last page of applications, swipe to the left to see widgets available on your DA222HQL. See "Personalizing the Home screen" on page 14. Tap the Shop icon to open Google Play. Adding an application to a Home screen Tap and hold an icon to add a shortcut to one of your Home screens. While a shortcut is selected, thumbnails of the Home screens are shown below the list of applications, simply drag the shortcut to a screen.
Status and notification icons Notification icons Icon Description Icon Description Alarm is set Speaker is silenced New Gmail message DA222HQL microphone is off New Google Talk message Song is playing Upcoming event SD card or USB storage is full DA222HQL is connected to PC via USB Syncing data Application update available Sync is on System update available Problem with sign-in or sync Virtual private network (VPN) status Uploading data Downloading data Connection icons Icon Description
applications that display constantly-updated information or quick shortcuts to applications or special functions. To move an App or Widget to the Home screen, tap and hold an item until it is selected. The Home screen will open. Drag the item to any free area on the screen. To move the item to a different Home screen, drag it to the side of the screen, the Home screen will switch to the screen in that direction. Release the item when it is positioned correctly.
Changing the Home screen image Tap and hold any open space on the Home screen. You can choose from a set of pre-formatted wallpapers, images stored in the Gallery, selected Wallpapers, or Live wallpapers that feature animated or interactive backgrounds. The onscreen keyboard When you tap a text box to enter text, an onscreen keyboard will appear. Simply tap on keys to enter text. Tap the ?123 button to see numbers and special characters, and then tap the ~ \ { key to see more options.
To turn predictive text on or off with the Android keyboard, tap the Input options key, and then Android keyboard settings. Tap Auto correction or Show correction suggestions and select one of the options. Editing text You can select and edit text in certain applications, such as text you have entered in a text field. Selected text can be cut or copied and later pasted within the same application, or to a different application.
If you previously copied (see below) text, tap where you want to insert the text. A PASTE button appears briefly below the cursor. Tap the button to paste the text. To replace a word, double tap the word. A PASTE button appears above the word. Tap the button to paste to replace the text. 3. Modify the text: Type, paste or delete text. 4. Tap Enter on the keyboard (or tap 18 on the XT9 keyboard).
Locking your DA222HQL If you will not use your DA222HQL for a while, briefly press the power button to lock access. This saves power and ensures your DA222HQL does not unintentionally use any services. Your DA222HQL will lock automatically if it is not used after a while. To change the delay, tap APPS > Settings > Display > Sleep. Waking your DA222HQL If the screen is off and the DA222HQL does not react to any taps on the screen, then it has been locked and is in sleep mode.
Connecting devices to your DA222HQL Connecting to AC power See "Setting up your DA222HQL" on page 9. Connecting to a PC as a monitor Your DA222HQL has an HDMI port (MHL), that can be used to connect it to a computer, or video player. Use an MHL cable to connect the display to a mobile device with MHL support. To use the DA222HQL as a touchscreen monitor, you must also connect a USB cable between a Windows 7 or Windows 8 computer and the micro USB port on the rear side of your DA222HQL. Note: The USB 2.
Accessing files on a USB storage device Note: Your DA222HQL supports USB storage devices that use the NTFS, FAT or FAT32 file systems. You can access media files (photos, music and video) on USB storage devices with your DA222HQL's multimedia apps. For more flexible access, “file management” apps are available in the Google Play store. Caution: Before removing USB storage, make sure your device is not using data on the USB storage device.
Connecting a Bluetooth device Only A2DP stereo headsets (playback only, no microphone) are supported. Please check for updates to the DA222HQL's software which may add support for additional Bluetooth devices. For Bluetooth settings, tap APPS > Settings > Bluetooth. Turn Bluetooth on and tap Search for devices to scan for nearby devices. Note: Please check for updates to the DA222HQL's software that may add support for additional Bluetooth devices. See "Updating your DA222HQL’s operating system" on page 29.
Using the webcam Your DA222HQL features a 1.3-megapixel digital webcam mounted on the front. Many chat or instant messaging apps can use this webcam so you can be seen by your family and friends. Use the settings in the app to control the webcam. Using the webcam as a camera To activate the camera, open the application menu and tap Camera. Camera icons and indicators In the camera window, the controls on the right allow you to change settings or select camera or camcorder.
Camera options Icon Description White balance Change the color balance to match the lighting: Auto, Incandescent, Daylight, Fluorescent or Cloudy. Exposure Increase or decrease image exposure. Camera settings Activate or change special settings: Picture size, Store Location, Scene mode and Anti-flicker. • Set the resolution of the image (QVGA, VGA, 1 MP or 1.3MP). • Use only Internal Storage. Taking a photo 1. Ensure the options described above are set to your preferences. 2.
Icon Description Camera mode Switches to the camera. Camcorder options Adjust camcorder options to obtain the best image: Icon Description White balance Change the color balance to match the lighting: Auto, Incandescent, Daylight, Fluorescent or Cloudy. Options Tap to see camcorder options. Shooting a video 1. 2. 3. 4. Ensure the options described above are set to your preferences. Frame your subject and steady your DA222HQL and zoom in or out as needed. Tap the record icon to begin recording.
Advanced settings Access Settings from the Application menu. Tap APPS, then Settings. Wireless & Networks Activating or deactivating connections Open the Application menu and tap Settings. Under WIRELESS & NETWORKS each connection has an ON/OFF switch that controls the connection. Tap an entry to manage your connection settings. Item Description Wi-Fi Turn the Wi-Fi function on or off. Bluetooth Turn the Bluetooth function on or off.
DA222HQL name and discoverability. Tap SEARCH FOR DEVICES to scan for nearby devices. To connect to a device, tap the device in the list of available devices. You may be asked to enter a PIN on both devices to establish the connection. Note: Only A2DP stereo headsets (playback only, no microphone) are supported. Please check for updates to the DA222HQL's software which may add support for additional Bluetooth devices.
Item Description Sleep Sets a delay before the screen will be turned off. Font size Sets the font size so either more text is visible or the text is easier to read. You can adjust screen brightness and contrast from the OSD. Storage You can check how much of your DA222HQL’s storage (Internal, SD or USB) has been used, and what type of files are using storage. Apps Closing an application To close an active application, go to APPS > Settings > Apps.
Tap APPS > Settings > Accounts & sync to access the synchronization settings. To manage synchronization of individual accounts, tap an account name. Some applications, such as Gmail and Calendar, have additional synchronization settings. Open the application and tap the Menu button (three dots) and then tap Settings.
Note: Downloading new firmware can take up to 40 minutes, depending on your network speed. Resetting your DA222HQL You may have to perform a reset if your DA222HQL fails to respond when buttons are pressed or the screen is tapped. To reset your DA222HQL disconnect the main power supply for ten seconds, then reconnect. Clean boot A clean boot will restore your DA222HQL to the factory settings.
FAQ and troubleshooting This section lists frequently asked questions that may arise during the use of your DA222HQL, and gives easy answers and solutions to these questions. Aspect Question Answer Audio Why is there no sound coming from the device? If a headset is plugged into the device, the speaker is automatically shut off. Disconnect the headset. Check that the device volume setting is not muted. Check that the volume control is not at its lowest setting.
Other sources of help For information on: Refer to: Up-to-date information regarding your www.acer.com DA222HQL Service enquiries 32 support.acer.