TABLE OF CONTENTS Special notes on LCD monitors .................................................. 1 Information for your safety and comfort .................................. 2 Unpacking ................................................................................... 5 Attaching/Removing the base .................................................... 6 Screen position adjustment ........................................................ 6 Connecting the power cord ...........................................
SPECIAL NOTES ON LCD MONITORS The following symptoms are normal with LCD monitor and do not indicate a problem. NOTES • Due to the nature of the fluorescent light, the screen may flicker during initial use. Turn off the Power Switch and then turn it on again to make sure the flicker disappears. • You may find slightly uneven brightness on the screen depending on the desktop pattern you use. • The LCD screen has effective pixels of 99.99% or more. It may include blemishes of 0.
Information for your safety and comfort Safety instructions Read these instructions carefully. Keep this document for future reference. Follow all warnings and instructions marked on the product. CAUTION for accessibility Be sure that the power outlet you plug the power cord into is easily accessible and located as close to the equipment operator as possible. When you need to disconnect power to the equipment, be sure to unplug the power cord from the electrical outlet.
Product servicing Do not attempt to service this product yourself, as opening or removing covers may expose you to dangerous voltage points or other risks. Refer all servicing to qualified service personnel.
• • • • take short rests to relax your neck and shoulders avoid tensing your muscles or shrugging your shoulders install the external display, keyboard and mouse properly and within comfort able reach if you view your monitor more than your documents, place the display at the center of your desk to minimize neck strain Taking care of your vision Long viewing hours, wearing incorrect glasses or contact lenses, glare, excessive room lighting, poorly focused screens, very small typefaces and low-contrast dis
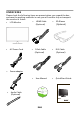
UNPAC KI NG Please check the following items are present when you unpack the box, and save the packing materials in case you will need to ship or transport the monitor in future.
Attaching / Removing the Base -------------------------------------------------------------------Note: Remove the monitor and monitor base from its packaging. Carefully place the monitor face-down on a stable surface -- use a cloth to avoid scratching the screen. In stal l: Align the release button on the bottom of the monitor with the corresponding slots on the bottom of the base. Remo ve: Depress the release button as indicated first before removing the base and follow the arrow direction to remove it.
CONNECTING THE POWER CORD • Check first to make sure that the power cord you use is the correct type required for your area. • This monitor has a universal power supply that allows operation in either 100/120V AC or 220/240 V AC voltage area. No user-adjustment is required. • Plug one end of the power cord to the AC Inlet, plug another end to a proper AC outlet. • For unit using at 120 V AC: Use a UL Listed Cord Set, Type SVT wire and plug rated 10 A/125 V. • For unit using at 220/240 V AC (outside of U.S.
Power saving The monitor will be driven into Power Saving” mode by the control signal from the display controller, as indicated by the amber-color power LED. LED L ig h t S tate ON Blue P o w e r S a v in g Mode A m ber 3D Mode G re e n The power saving states will be kept until a control signal has been detected or the keyboard or mouse is activated. The recovery time from Active OFF state back to ON state is around 3 seconds.
CONNECTOR PIN ASSIGNMENT 5 1 10 6 15 11 15-Pin Color Display Signal Cable PIN NO. DESCRIPTION PIN NO. DESCRIPTION 1. Red 9. +5V 2. Green 10. Logic Ground 3. Blue 11. Monitor Ground 4. Monitor Ground 12. DDC-Serial Data 5. Self Test 13. H-Sync 6. R-Ground 14. V-Sync 7. G-Ground 15. DDC-Serial Clock 8.
24-Pin Color Display Signal Cable* PIN Signal PIN Signal 1. TMDS Data2- 13. TMDS Date 3+ 2. TMDS Data2+ 14. +5V Power 3. TMDS Data GND 15. Self Test 4. TMDS Date 4- 16. Hot Plug Detect 5. TMDS Date 4+ 17. TMDS Data 0- 6. DDC Clock 18. TMDS Data 0+ 7. DDC Data 19. TMDS Data GND 8. NC 20. TMDS Date 5- 9. TMDS Data1- 21. TMDS Date 5+ 10. TMDS Data1+ 22. TMDS Clock GND 11. TMDS Data GND 23. TMDS Clock+ 12. TMDS Date 3- 24.
Sta nd a rd T imi ng T a ble Mode Resolution 1 VGA 640x480 60 Hz 2 MAC 640x480 66.66 Hz 3 VESA 720x400 70 Hz 4 SVGA 800x600 56 Hz 5 SVGA 800x600 60 Hz 6 XGA 1024x768 60 Hz 7 XGA 1024x768 70 Hz 8 VESA 1152x864 75 Hz 9 WXGA 1280x800 60 Hz 10 SXGA 1280x1024 60 Hz 11 WXGA+ 1440x900 60 Hz 12 UXGA 1920x1080 60 Hz 13 UXGA 1920x1080 144 Hz * *Modes that require a dual link DVI cable and compatible graphic card.
INSTALLATION To install the monitor to your host system, please follow the steps as given below: Steps 1. 1-1 Connect Video Cable a. Make sure both the monitor and computer are powered-OFF. b. Connect the VGA video cable to the computer. 1-2 Connect Digital Cable (Only Dual-Input Model) a. Make sure both the monitor and computer are powered-OFF. b. Connect one end of the 24-pin DVI cable to the back of the monitor and connect the other end to the computer’s port.
USER CONTROLS Power Switch / Power LED: To turn the monitor ON or OFF. Lights up to indicate the power is turned ON. Using the Shortcut Menu Press the function button to open the shortcut menu. The shortcut menu lets you quickly select the most commonly accessed settings. Empowering: Press the Empowering Key to open the Acer eColor Management OSD and access the scenario modes. AUTO Auto Adjust: Press this button to activate the Auto Adjustment function.
Acer eColor Management Operation instructions Step 1: Press “ “ Key to open the Acer eColor Management OSD and access the scenario modes Step 2: Press “ “ or “ ” to select the mode Step 3: Press “ Adjust/Exit “ Key to confirm the mode and run Auto Adjust. Features and Benefits M a in Men u ic o n Su b Men u ic o n Sub Menu ite m D e sc rip tio n N /A U ser mode User defined.
Adjusting the OSD settings -------------------------------------------------------------------Note: The following content is for general reference only. Actual product specifications may vary. The OSD can be used for adjusting the settings of your LCD Monitor. Press the MENU key to open the OSD. You can use the OSD to adjust the picture quality, OSD Timeout and general settings. For advanced settings, please refer to following page: Adjusting the picture quality 1 Press the MENU key to bring up the OSD.
Adjusting the OSD Timeout 1 Press the MENU key to bring up the OSD. 2 Using the directional keys, select OSD from the on screen display. Then navigate to the feature you wish to adjust.
Adjusting the setting 1 Press the MENU key to bring up the OSD. 2 Using the / keys, select Setting from the OSD. Then navigate to the feature you wish to adjust. Use the to Enter to the item page. 3 The Setting menu can be used to adjust the screen Menu Language and other important settings.
Product information 1 Press the MENU key to bring up the OSD. 2 Using the / keys, select Information from the OSD. Then the basic information of LCD monitor will show up for current input.
TROUBLESHOOTING Before sending your LCD monitor for servicing, please check the troubleshooting list below to see if you can self-diagnose the problem. (VGA Mode) Problems C urrent Status Remedy LED ON · Using OSD, adjust brightness and contrast to maximum or reset to their default settings. LED OFF · Check the power switch. · Check if AC power cord is properly connected to the monitor. · Check if video signal cable is properly connected at the back of monitor.
(DVI Mode) Prob lems Curren t Status Remed y LED ON · Using OSD, adjust brightness and contrast to maximum or reset to their default settings. LED OFF · Check the power switch. · Check if AC power cord is properly connected to the monitor. · Check if video signal cable is properly connected at the back of monitor. · Check if the power of computer system is ON.
Acer Incorporated 8F, 88, Sec. 1, Xintai 5th Rd., Xizhi New Taipei City 221, Taiwan Declaration of Conformity We, Acer Incorporated 8F, 88, Sec. 1, Xintai 5th Rd., Xizhi, New Taipei City 221, Taiwan Contact Person: Mr. RU Jan, e-mail: ru_jan@acer.com.tw And, Acer Italy s.r.l Via Lepetit, 40, 20020 Lainate (MI) Italy Tel: +39-02-939-921, Fax: +39-02 9399-2913 www.acer.
Acer America Corporation 333 West San Carlos St., San Jose CA 95110, U. S. A. Tel : 254-298-4000 Fax : 254-298-4147 www.acer.com Federal Communications Commission Declaration of Conformity This device complies with Part 15 of the FCC Rules. Operation is subject to the following two conditions: (1) this device may not cause harmful interference, and (2) this device must accept any interference received, including interference that may cause undesired operation.
ENERGY STAR® Acer’s ENERGY STAR qualified products save you money by reducing energy costs and helps protect the environment without sacrificing features or performance. Acer is proud to offer our customers products with the ENERGY STAR mark. What is ENERGY STAR? Products that are ENERGY STAR qualified use less energy and prevent greenhouse gas emissions by meeting strict energy efficiency guidelines set by the U.S. Environmental Protection Agency.
3D Monitor User Guide
© 2014 All Rights Reserved. 3D Monitor User Guide Original Issue: 01/2014 Changes may be made periodically to the information in this publication without obligation to notify any person of such revisions or changes. Such changes will be incorporated in new editions of this manual or supplementary documents and publications.
iii Information for your safety and comfort The content in this guide supplements the safety and comfort information contained in the user documentation that came with your computer. Safety requirements Do not wear the wireless glasses in any situation that requires normal visual perception. Do not use the glasses as sunglasses. Under normal conditions, stereoscopic 3D viewing is safe for any duration that you would usually view your display. However, some people may experience discomfort.
iv Warning about seizures SOME LIGHT PATTERNS MAY INDUCE SEIZURES IN PERSONS WITH NO PRIOR HISTORY OF EPILEPSY.
v Tips and information for comfortable use Computer users may complain of eyestrain and headaches after prolonged use. Users are also at risk of physical injury after long hours of working in front of a computer. Long work periods, bad posture, poor work habits, stress, inadequate working conditions, personal health and other factors greatly increase the risk of physical injury. Incorrect computer usage may lead to carpal tunnel syndrome, tendonitis, tenosynovitis or other musculoskeletal disorders.
vi Eyes • • • Rest your eyes frequently. Give your eyes regular breaks by looking away from the monitor and focusing on a distant point. Blink frequently to keep your eyes from drying out. Display • Keep your display clean. • • • • • Keep your head at a higher level than the top edge of the display so your eyes point downward when looking at the middle of the display. Adjust the display brightness and/or contrast to a comfortable level for enhanced text readability and graphics clarity.
iii Safety requirements Warning about Epilepsy Warning about seizures Tips and information for comfortable use iii iii iv v Charging the glasses Using the glasses 1 2 Introducing 3D technology Wireless glasses Hardware Installation Setting up 3D Vision (Dual DVI to PC) Connecting the display Frequently asked questions 3D Vision is not working Excessive flickering Eyestrain/headache 3D content isn’t shown correctly on the display 1 1 3 3 3 5 5 5 6 6 Contents Information for your safety and comfo
English 1 Introducing 3D technology The Acer 3D monitor you have purchased supports NVIDIA 3D Vision technology to deliver a fully immersive stereoscopic 3D experience. And, with the use of high-tech wireless glasses, the 3D Vision kit transforms hundreds of PC games and digital photographs into an eye-popping interactive experience. Just slip on the glasses to see characters and environments come to life on the screen. 3D Vision automatically transforms hundreds of PC games into full stereoscopic 3D.
2 Using the glasses It is a good idea to keep the glasses in the protective pouch when you are not using them. When wearing your glasses, you must be in line-of-sight with the IR emitter. Press the ON button to turn the glasses on. The glasses turn off automatically when there is no activity. Warning: The wireless glasses are not prescription eye wear, sunglasses, nor protective goggles. Do not use the glasses for any general eye wear purposes (e.g.
English 3 Hardware Installation Setting up 3D Vision (Dual DVI to PC) Connecting the display Connect your 3D Vision Ready display to your NVIDIA graphics card. Use the dual-link DVI-to-DVI cable supplied with the display. Note: Connect ONLY the display now. The driver and software must be installed prior to connecting the USB IR Emitter. Note: Compatible graphics cards include: NVIDIA GeForce 8 Series (8800GT+), 9 Series (9600GT+) or GTX 200 Series. For more information, please visit: www.nvidia.
4 3D LCD DVI PC IR Emitter USB DVI DO NOT MAKE THIS CONNECTION UNTIL TOLD TO DO SO BY THE INSTALL WIZARD USB Cable Dual Link DVI cable (supplied with the display) English Note: LCD monitors with built-in IR Emitters do not require additional USB connectors from the PC to the monitor.
English 5 Frequently asked questions NVIDIA provides an online knowledge-base system with answers to most common questions, available 24x7x365. You can also use it to submit questions online to our technical support staff. For more details please visit www.nvidia.com/3dvision/support. Note: Questions may only be submitted in English. NVIDIA recommends you register your wireless glasses for support at www.nvidia.com/3dvision/register.
6 120 Hz refresh rate for use in North America when lights are on • 110 Hz refresh rate for daytime and when lights are off • 100 Hz refresh rate for countries with 50 Hz lighting and when lights are on Once you have selected a refresh rate on the Setup Wizard screen, click Test to verify the new refresh rate which also helps reduce flickering. Once you have found the best setting, click Next to continue.