© 2013 Alle rechten voorbehouden Acer Liquid E1 Duo V360 Gebruikershandleiding Model: V360 Eerste uitgave: 2/2013 Acer Liquid E1 Duo V360 Smartphone Modelnummer: _____________________________ Serienummer: ______________________________ Aankoopdatum: _____________________________ Plaats van aankoop: _________________________
Inhoudsopgave Inhoudsopgave. . . . . . . . . . . . . . . . . . . . . . . . . . . . . . . . . . . . . . . . . . . . 3 Instellen. . . . . . . . . . . . . . . . . . . . . . . . . . . . . . . . . . . . . . . . . . . . . . . . . . 5 De smartphone uitpakken . . . . . . . . . . . . . . . . . . . . . . . . . . . . . . . . . . . . . . . . . . 5 De smartphone leren kennen . . . . . . . . . . . . . . . . . . . . . . . . . . . . . . . . . . . . . . . 5 De batterij plaatsen of verwijderen . . . . . . . . . . . . . . . .
AcerCloud instellen . . . . . . . . . . . . . . . . . . . . . . . . . . . . . . . . . . . . . . . 38 AcerCloud instellen voor Windows 7 . . . . . . . . . . . . . . . . . . . . . . . . . . . . . . . . . 38 De camera gebruiken. . . . . . . . . . . . . . . . . . . . . . . . . . . . . . . . . . . . . . 41 Indicatoren en pictogrammen van de camera . . . . . . . . . . . . . . . . . . . . . . . . . . 41 Een foto maken . . . . . . . . . . . . . . . . . . . . . . . . . . . . . . . . . . . . . . . . . . . . . . . .
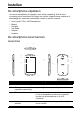
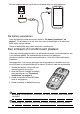
Instellen De smartphone uitpakken Uw nieuwe smartphone is ingepakt in een veilige verpakking. Pak de doos voorzichtig uit en haal alles eruit. Mocht een van de volgende items ontbreken of beschadigd zijn, neem dan onmiddellijk contact op met de verkoper: • • • • • • Acer Liquid E1 Duo V360 Smartphone Batterij Snelgids Usb-kabel Adapter Headset De smartphone leren kennen Aanzichten 3 2 4 5 7 6 12 10 1 8 13 11 14 9 Nr.
Nr. Item Beschrijving 5 Naar voren gerichte camera Een 0,3-megapixel camera voor videogesprekken en zelfportretten. 6 Led-indicator Geeft de batterij-, oproep- en berichtstatus van de telefoon aan (zie onderstaande tabel). 7 Lichtsensor Detecteert omgevingslicht en past automatisch de helderheid van het scherm aan. 8 Touchscreen Capacitief touchscreen van 4,5-inch en 960 x 540 pixels voor het weergeven van gegevens, telefoonnummers en om informatie in te voeren.
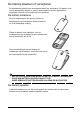
De batterij plaatsen of verwijderen De smartphone gebruikt een vervangbare batterij als stroombron. De batterij is los van de smartphone verpakt en moet in de smartphone worden geplaatst en opgeladen, voordat u de smartphone kunt gebruiken. De batterij installeren Duw uw vingernagel in de opening tussen de batterijklep en de smartphone. Maak de klep los en til de batterijklep omhoog.
Sluit de adapterkabel aan op de micro-usb-aansluiting van de smartphone. De batterij verwijderen Open de batterijnis zoals beschreven wordt in "De batterij installeren" op pagina 7. Til de batterij uit de nis door die er aan de bovenzijde uit te halen aan beide zijden van de camera. Plaats de batterijklep terug zoals hierboven is beschreven. Een simkaart of microSD-kaart plaatsen U kunt pas volledig gebruik maken van alle telefoonfuncties van de smartphone, als u een simkaart plaatst.
Simkaart blokkeren De smartphone is wellicht uitgerust met een simkaartblokkering, d.w.z. alleen u kunt een simkaart gebruiken die door uw netwerkaanbieder is geleverd. U kunt de simblokkering opheffen door contact op te nemen met uw netwerkaanbieder.
De smartphone gebruiken Voor het eerst inschakelen U schakelt de smartphone voor het eerst in, door de toets Aan/uit ingedrukt te houden totdat het scherm wordt ingeschakeld. Vervolgens wordt u gevraagd enkele instellingen te configureren voordat u de smartphone kunt gebruiken. Volg de instructies op het scherm om de instellingen te voltooien. Meld u aan of maak een Google-account Als er verbinding met internet is, kan de smartphone gegevens synchroniseren met een Google-account.
De smartphone activeren Als het scherm is uitgeschakeld en de smartphone niet reageert als u op het scherm of toetsen aan de voorkant tikt, is de smartphone geblokkeerd en in de slaapstand geschakeld. Druk op aan/uit-knop om uw smartphone te activeren. Ontgrendel uw smartphone door met uw vinger van een zijde van het scherm naar de andere te vegen (dat werkt in beide richtingen). Voor extra veiligheid kunt u een ontgrendelingspatroon instellen.
U kunt een andere invoertaal selecteren door te tikken en vast te houden op de kommatoets. Ook kunt u het menu Toepassingen openen en daarna tikken op Instellingen > Taal en invoer. Tik daarna op de knop Instellingen naast "Androidtoetsenbord" > Invoertalen. De toetsenbord-layout zal gewijzigd worden aan de hand van de geselecteerde taal. Nadat u meer dan een taal ingesteld hebt, verschijnt de knop met de wereldbol naast de spatiebalk. Tik op deze knop om snel tussen meerdere invoertalen te schakelen.
Wanneer er meerdere suggesties zijn voor het woord dat u wilt invoeren, toont Swype een Woordkeuzelijst. Om het standaard woord in de Woordkeuzelijst te accepteren, gaat u gewoon verder met het gebruik van Swype. Of u scrolt door de lijst door uw vinger te verslepen en te tikken op het woord dat u wilt invoeren. Druk op de Swype-toets en houd die ingedrukt voor het openen van instellingen, functies, updates, voorkeuren en help.
Het Beginscherm Zodra de smartphone is opgestart, verschijnt het beginscherm. Via dit scherm heeft u snel toegang tot informatie en eenvoudige besturingselementen met widgets of snelkoppelingen. Deze tonen informatie, zoals de tijd en het weer, of bieden extra functionaliteit of directe toegang tot toepassingen en andere veelgebruikte functies van uw smartphone. Tijd en status Zoeken Toepassingmenu Navigatie Onderin het scherm staat de toepassingklapper die de standaardtoepassingen toont.
Terug Tik op dit pictogram om terug te gaan naar de vorige pagina of om naar een hoger niveau in een menu te gaan. In sommige gevallen is dit pictogram wellicht vervangen door het pictogram verbergen (zoals wanneer het toetsenbord of de lijst met recente toepassingen wordt weergegeven). Verbergen Begin Tik op dit pictogram om direct naar het Beginscherm te gaan. Recent Tik op dit pictogram om recent geopende toepassingen te bekijken.
Snelkoppelingen en widgets toevoegen en verwijderen Om snelkoppelingen of widgets toe te voegen, tikt u op het menupictogram Toepassingen onderaan in het midden van het Beginscherm. Tik op APPS om een lijst met snelkoppelingen naar toepassingen te zien, die u naar het Beginscherm kunt slepen. Tik op WIDGETS om kleine toepassingen en koppelingen te bekijken (zoals aangepaste snelkoppelingen, contacten of bladwijzers) die u kunt toevoegen aan het Beginscherm.
Mappen toevoegen of verwijderen U kunt ook mappen toevoegen aan het Beginscherm. Om een nieuwe map aan te maken, versleept u het pictogram van een toepassing en plaatst u het op het pictogram van een andere toepassing in het Beginscherm. Daarmee zal een Naamloze map worden aangemaakt. Tik op het pictogram van de map en tikt dan op de naam van de map om die te wijzigen.
Het vergrendelingsscherm Tik en houd vast op een zone in het Beginscherm. Tik op de tab Vergrendelingsscherm-manager om de pictogrammen van het vergrendelingsscherm in en uit te schakelen of te wijzigen welke pictogrammen er worden weergegeven. Beginscherm-instellingen wijzigen Tik en houd vast op een zone in het Beginscherm. Tik op de tab Instellingen beginscherm om de schuif-effecten te wijzigen. U kunt het overgangseffect wijzigen wanneer u door de verschillende schermen bladert.
Dit gebied bevat diverse pictogrammen die u informeren over de telefoonstatus. In het linkerdeel van het Meldingsgebied verschijnen pictogrammen die nieuwe gebeurtenissen aangeven (zoals een nieuw bericht). De pictogrammen aan de rechterzijde geven signaalsterkte, verbinding, batterijstatus en de tijd aan. Versleep het Meldingsgebied omlaag over het scherm om meer informatie over nieuwe gebeurtenissen te zien.
Meldingspictogrammen Opmerking: Meldingspictogrammen worden in verschillende kleuren weergegeven wanneer u twee simkaarten geplaatst hebt.
Multitasken Diverse toepassingen kunnen tegelijk geactiveerd zijn. Start te tikken om terug te een nieuwe toepassing door op keren naar het Beginscherm. Start vervolgens de nieuwe toepassing. Om de actieve toepassingen te bekijken, tikt u op . Tik vervolgens op een pictogram om naar de betreffende toepassing te gaan. Tip: U kunt de gebruiksduur van de batterij verlengen door toepassingen te sluiten die u niet meer gebruikt.
Contacten beheren Contactpersonen beheren De smartphone bevat een telefoonboek waarmee u contacten in het intern geheugen of op de simkaart kunt opslaan. Open de toepassing Contacten in het menu Toepassingen of tik op de tab op het Toetsenblok om die te bekijken. Als er geen contacten op de telefoon staan, kunt u de contacten van uw Google-account importeren, een nieuw contact toevoegen of contacten importeren van uw simkaart of SD-kaart.
Door te tikken op de naam van het contact zal haar/zijn profiel worden weergegeven. Tik op terwijl u het profiel van een contactpersoon bekijkt, om de contactpersoon te bewerken, delen, verwijderen of af te drukken. U kunt ook een beltoon instellen voor de contactpersoon of de contactpersoon koppelen aan een simkaart. Tip: U kunt ook een contact maken van een gebeld of ontvangen nummer. Zie "Een gebeld nummer opslaan in contacten" op pagina 27.
Bellen In dit hoofdstuk vindt u informatie over het voeren van telefoongesprekken en over de diverse beschikbare opties tijdens een gesprek. Voordat u kunt bellen Controleer voordat u belt of de telefoonfunctie is ingeschakeld. Je kunt de status van de telefoon bevestigen via het Meldingsgebied. Opmerking: Kleuren van status en meldingspictogrammen kunnen afwijken. Pictogram Beschrijving Niet verbonden met het netwerk: U kunt niet bellen. Verbonden met het netwerk: U kunt bellen.
Gemiste oproepen weergeven Gemiste oproepmeldingen worden weergegeven in de volgende drie gebieden: 1. Het Meldingsgebied met het pictogram voor de gemiste oproep. Open het Meldingsgebied en tik de gemiste-oproepmelding om de details van de gemiste oproep weer te geven. (het nummer in het vakje geeft het aantal gemiste 2. Via het telefoonpictogram oproepen aan). Tik op Telefoon in het Beginscherm of in het menu Toepassingen om de details van de gemiste oproepen direct weer te geven. 3.
Het belscherm Zodra u het nummer hebt gebeld, verschijnt het belscherm met daarop het nummer/ de contactpersoon waarmee u het gesprek voert, de gesprekstijd en de belopties. Door te tikken op het pictogram kunt u het oproepvenster verkleinen om te worden weergegeven als een verplaatsbaar dialoogvenster in plaats van een volledig scherm. U kunt het "zwevende" dialoogvenster zelfs instellen als het standaard belscherm. Daarvoor opent u het Meldingsgebied en tikt u op de knop Oproep zwevend.
Belopties Pictogram Beschrijving Zet het gesprek in de wacht. Het geluid uitschakelen tijdens een gesprek. Luidsprekerfunctie. Open het toetsenblok, terwijl u een gesprek voert. Twee opties: • Een tweede gesprek toevoegen • Het gesprek opnemen. Verkleint het scherm in een "zwevend" scherm. Een gebeld nummer opslaan in contacten U kunt een nummer dat u gebeld hebt opslaan in contacten zodat u het nummer later kunt gebruiken. 1.
Bellen via Internet U kunt Internetgesprekken via een draadloos netwerk plaatsen en ontvangen. Een Internet-telefoonaccount toevoegen Tik in het menu Toepassingen op Instellingen > Oproepinstellingen > Internetgesprek. Tik daarna op Bellen via internet > Accounts > ACCOUNT TOEVOEGEN. Voer Gebruikersnaam, Wachtwoord en Server accounts in. U kunt ook optionele instellingen configureren zoals Verificatie gebruikersnaam, Schermnaam, Uitgaand proxy-adres, Poortnummer, Transporttype en Keepalive verzenden.
Een telefoonnummer bellen met gebruik van Bellen via Internet Wanneer uw telefoon geconfirmeerd hebt om voor alle gesprekken Bellen via Internet te gebruiken of om daar voor ieder gesprek naar te vragen, kunt u ook een telefoonnummer bellen via het Internet, wanneer u verbonden bent met een draadloos netwerk. of kies het contact dat u wilt bellen en tik dan op het Kies het nummer en tik op Internet-telefoonaccount dat u wilt gebruiken om naar te bellen.
Berichten In dit hoofdstuk zal u worden getoond hoe u op uw smartphone de instellingen maakt voor Telefoonberichten, Sociale netwerkberichten en Sociale gebeurtenissen en hoe u die gebruikt. Alle sms- en mms-berichten zijn toegankelijk via Berichten. Berichten ordent ontvangen en verzonden berichten automatisch in reeksen. Open Berichten door op Berichten in het Beginscherm te tikken.
Optie Beschrijving Sneltekst invoeren Vooraf gedefinieerde tekstinhoud invoeren. Smiley toevoegen Voeg een smiley/emoticon in de berichttekst. Contact invoegen Een contact toevoegen aan de ontvangerslijst. Instellingen Verschillende berichtinstellingen wijzigen. Een bericht beantwoorden Wanneer een nieuw tekstbericht binnenkomt, verschijnt een berichtpictogram in het Meldingsgebied en geeft het berichtpictogram onder in de telefoon het aantal ongelezen berichten weer.
Tip: Vraag de benodigde gegevens aan uw netwerkaanbieder als u het mmsprofiel handmatig wilt instellen. Mms-berichten ontvangen Als u een nieuw mms-bericht ontvangt, verschijnt bovenaan op het scherm een pictogram en een melding. 1. Open Berichten om een samenvatting van het bericht te zien. 2. Tik op Downloaden om de berichtgegevens te downloaden. Opmerking: Downloaden kan even duren, afhankelijk van de verbindingskwaliteit. Als u antwoordt of een andere toepassing opent, wordt de download gestopt.
Online gaan Internet verkennen Om te kunnen internetten met de smartphone moet u verbonden zijn met een draadloos netwerk of een gegevensnetwerk. De browser gebruiken Start met internetten door op Chrome in het Beginscherm te tikken of open het menu Toepassingenmenu en kies Chrome. Open een nieuwe website door op het adresvak bovenin op de pagina te tikken. Voer het adres in met het toetsenbord en tik op Gaan. U kunt pagina’s in- en uitzoomen door uw vingers naar elkaar of uit elkaar te bewegen.
zoeken op internet en zelfs uzelf notities sturen. Open Zoeken met spraak in het menu Toepassingen of tik in het Beginscherm op. Google-e-mail instellen 1. Zorg dat de smartphone is verbonden met een gegevens- of Wi-Fi-verbinding. 2. Tik in het menu Toepassingen op Gmail. Als nog geen adres en wachtwoord van het Google-account is ingevoerd toen de telefoon voor het eerst werd gestart, volgt u de instructies op het scherm. Een e-mail schrijven 1.
Google Play Opmerking: Google Play is wellicht niet beschikbaar in alle landen en regio’s. Opmerking: U moet een Google-account activeren om Google Play te kunnen gebruiken. De eerste keer dat u Google Play opent, dient u de Gebruiksvoorwaarden te lezen en accepteren. Tik op Play Store in het menu Toepassingen om Google Play te openen. Hier kunt u diverse extra programma’s en toepassingen verkrijgen om de functionaliteit van de smartphone te verbeteren.
U kunt de voortgang van de download zowel bijhouden op de pagina van de app als op de smartphone. Belangrijk: Voor enkele toepassingen moet eventueel worden betaald voordat u ze kunt downloaden. U hebt een Google Checkout-account nodig om voor deze toepassingen te kunnen betalen of een creditcardnummer dat gekoppeld is aan uw Google-account.
Kaarten, navigatie, plaatsen en breedtegraad Ontvang gemakkelijk te volgen aanwijzingen bij het gebruik van Google Maps, bekijk de verkeerssituatie in real-time en navigeer met gedetailleerde instructies met Navigatie, bekijk op Google Maps waar uw vrienden, poi’s en plaatselijke bedrijven zich bevinden met gebruik van Plaatsen en Breedtegraad. Belangrijk: De kaarten hebben geen informatie over elke locatie. De kaart gebruiken Tik op het Kaarten-pictogram in het toepassingenmenu.
AcerCloud instellen AcerCloud is een persoonlijke cloudservice waarmee u via het internet toegang kunt krijgen tot uw bestanden en ervoor kunt zorgen dat uw belangrijkste bestanden altijd up-to-date zijn. Met uw persoonlijke cloud kunnen al uw apparaten (PC, tablet, telefoon) waarop AcerCloud geïnstalleerd is, toegang krijgen tot bestanden op uw centrale cloud-pc. Open het menu Toepassingen en tik op AcerCloud. Voor meer informatie bezoekt u de AcerCloud-website: www.acer.
AcerCloud installeren Dubbelklik op het pictogram AcerCloud en dubbelklik daarna op AcerCloudSetup. Volg de instructies om AcerCloud te installeren. Meld u aan met uw Acer-ID Start het AcerCloud-programma via het bureaublad of het Menu Start. Wanneer u al beschikt over een Acer-ID, gebruikt u uw e-mailadres en een wachtwoord om u aan te melden bij uw AcerCloud-account. Een AcerCloud-ID aanmaken Wanneer u nog geen AcerCloud-ID hebt, moet u zich eerst registreren voor een AcerCloud-account.
Nadat u de informatie ingevoerd hebt, tikt u op Volgende om een Acer-ID aan te vragen. Controleer uw e-mailaccount voor een activeringsbericht van de Acer-ID en klik op de link om uw Acer-ID-apparaat te activeren. AcerCloud-opties Wanneer u AcerCloud installeert, beschikt u over verschillende opties. Selecteer de opties die nuttig zijn voor uw pc en klik op Volgende om de installatie te voltooien: PicStream - Maak vakantiefoto's met uw smartphone en deel die met andere smartapparaten.
De camera gebruiken Uw smartphone heeft aan de achterzijde een 5-megapixel digitale met een 0,3megapixel naar de voorzijde gerichte camerafunctie. In dit hoofdstuk vindt u alle informatie over het maken van foto's en video's met de smartphone. Om de camera te activeren, tikt u op Camera in het Beginscherm of opent u het menu Toepassingen en tikt u op Camera. Indicatoren en pictogrammen van de camera In her cameravenster bevinden zich bedieningselementen aan beide zijden van de afbeelding.
Menu Camera-instellingen U kunt de instellingen aanpassen door op de instellingenknop menu-opties zijn: te tikken. De Pictogram Beschrijving * Vastlegmodus: Normaal, Panorama, MAV, HDR, Doorlopende foto, Glimlachfoto of Mooier. * Resolutie: Stel de fotokwaliteit in. * Beeldaanpassing: Stel helderheid, contrast, verzadiging, scherpte en tint in.
Een foto maken 1. Zorg dat de instellingen zijn aangepast zoals hierboven is beschreven. 2. Zoek het beeld in de zoeker en houd de smartphone stil. 3. Indien nodig zoomt u in of uit. 4. Tik op of druk op de cameraknop om een foto te maken. Een panoramafoto maken In de panoramamodus kunt u een serie van vijf foto's maken die de cameratoepassing aan elkaar zal "hechten" om er een grote afbeelding van te maken. 1. Een panoramafoto maken, de panoramische opnamemodus selecteren . 2.
Instellingenmenu van camcorder Tik op om de camcorder in te schakelen. Tik en tik nogmaals om die uit te schakelen. om demping in te schakelen U kunt de instellingen aanpassen door op de instellingenknop menu-opties zijn: te tikken. De Pictogram Beschrijving Resolutie: De videokwaliteit instellen. Timer instellen: Uit, 5 seconden, 10 seconden, 15 seconden. * Enkel voor de camera aan de achterzijde. Foto-opslaglocatie selecteren: Sd-kaart of intern geheugen.
Foto’s en video's weergeven Als u een foto of video hebt gemaakt, wordt deze automatisch opgeslagen. Zodra u een foto of video hebt gemaakt, kunt u deze bekijken in de Galerie door op de miniatuur in de rechterbenedenhoek te tikken. U kunt ook het menu Toepassingen openen en op Galerie tikken. In de Galerie kunt u het bestand direct via diverse diensten delen. Opmerking: Opties voor delen verschillen per bestandstype.
Geavanceerde instellingen De smartphone in de Vliegtuigmodus schakelen U activeert de Vliegtuigmodus (ook vluchtmodus genoemd) om de telefoon- en Bluetooth-functies uit te schakelen en de smartphone tijdens een vlucht als een handheldtoestel te gebruiken. Vraag de vliegmaatschappij of dit aan boord is toegestaan. Schakel de smartphone uit tijdens de start en landing omdat de smartphone storing kan veroorzaken op elektronische systemen van vliegtuigen. De Vliegtuigmodus in- of uitschakelen 1.
Item Beschrijving Dataverbruik Geschat mobiel dataverbruik op de simkaart bekijken. Oproepinstellingen Spraak, video, internet en andere oproepinstellingen wijzigen. Meer... Extra verbindingsinstellingen openen: Vliegtuigmodus: Alle draadloze verbindingen uitschakelen zodat u het toestel veilig aan boord van een vliegtuig kunt gebruiken. VPN: Virtuele privénetwerken instellen en beheren.
Wi-Fi hotspot U kunt de smartphone als draagbaar Wi-Fi hotspot gebruiken, zodat u de mobiele internetverbinding met maximaal 8 clients kunt delen. 1. Druk op de knop Menu en tik daarna op Instellingen > Meer... > Tethering en draagbare hotspot > Wi-Fi hotspot instellen. 2. Stel de Netwerk SSID in en stel de beveiliging in op Geen of WPA2 PSK. Tik op Opslaan om te beëindigen.
Besturingsinstellingen dataverbruik Met besturingsinstellingen voor dataverbruik kunt u het totale verbruik per netwerktype en toepassing bekijken en kunt u, zo nodig, limieten instellen. Om de instellingen voor dataverbruik te openen, tikt u in menu Toepassingen op Instellingen > Dataverbruik. Opmerking: Om een datalimiet in te stellen, moeten Wi-Fi of mobiele gegevens ingeschakeld zijn.
Item Beschrijving Thema Menu kleur veranderen. Scherm automatisch Het beeld wordt automatisch gedraaid als het toestel wordt draaien gekanteld. Slaapstand Pas de tijd aan voordat het scherm automatisch uitschakelt. Tekengrootte De standaard tekengrootte van de gebruikersinterface wijzigen. Verbinden met een pc Als u gegevens wilt uitwisselen tussen de microSD-kaart in de telefoon en de computer, kunt u de telefoon met de bijgesloten usb-kabel aansluiten op een pc.
Google Sync In Google kunt u synchronisatie instellen voor browser, agenda, contacten, Gmail in Google-foto's. In het menu synchronisatie-instellingen van uw Google-account, vinkt u het keuzevakje aan naast het item waarvoor u wilt dat het automatisch gesynchroniseerd wordt. Tik nogmaals om uit te vinken zodat het item handmatig moet worden gesynchroniseerd.
Alarmsignalen instellen De telefoon bevat twee standaardalarmsignalen. Tik in het menu Toepassingen op Klok en tik daarna op Alarm instellen om de instellingen van het alarm te bewerken. U kunt: • • • • • • Het alarm aan- of uitzetten. De alarmtijd instellen. Instellen op welke dagen het alarm wordt herhaald. Een beltoon instellen. Trilstand in- of uitschakelen. Het alarm een label geven.
Waarschuwing! Dit wist alle persoonlijke gegevens, alle contacten die op de telefoon zijn opgeslagen en alle geïnstalleerde programma's. Wanneer uw telefoon reageert op tikken op het scherm, opent u Instellingen in het menu Toepassingen. Tik op Back-up en herstel > Fabriekswaarden herstellen > Telefoon opnieuw instellen en daarna op Alles wissen om de telefoon te formatteren.
Accessoires en tips Dit hoofdstuk legt uit hoe u de accessoires van de smartphone gebruikt. Daarnaast vindt u hier handige tips over de smartphone. De headset gebruiken De smartphone wordt geleverd met een headset met geïntegreerde microfoon, zodat u handsfree kunt telefoneren. U gebruikt de headset door de headset aan te sluiten op de 3,5 mm koptelefoonaansluiting bovenop de telefoon. Als de headset is aangesloten, wordt al het geluid naar de headset geleid, en worden de luidsprekers uitgeschakeld.
Appendix FAQ en problemen oplossen Dit hoofdstuk bevat een lijst met veelgestelde vragen die kunnen optreden als u de smartphone gebruikt, en biedt eenvoudige antwoorden en oplossingen voor deze vragen. Onderdeel Vraag Geluid Waarom komt er geen Als de headset op het toestel is geluid uit het toestel? aangesloten, wordt de luidspreker automatisch uitgeschakeld. Maak de headset los. Antwoord Controleer of het volume van het toestel niet gedempt is.
Onderdeel Vraag Ontgrendelingspatroon Ik ben mijn Na een bepaald aantal mislukte ontgrendelingspatroon pogingen, krijgt u de optie het vergeten. patroon opnieuw in te stellen. Tik op Patroon vergeten? en voer de gebruikersnaam en het wachtwoord van uw Googleaccount in. Antwoord Opmerking: U hebt een actief Google-account nodig op de smartphone. U kunt uw smartphone ook terugzetten naar de fabriek instellingen. Zie "Fabrieksinstellingen terugzetten" op pagina 52.
• Duw nooit objecten in dit product door de sleuven in de behuizing. De objecten kunnen in contact komen met punten met gevaarlijk hoge voltages of kortsluiting veroorzaken, wat kan resulteren in brand of een elektrische schok. Mors nooit water of een andere vloeistof op of in het product. • Plaats dit product nooit op een trillend oppervlak, om beschadiging van de interne componenten en batterijlekkage tegen te gaan.
Het achterlaten van de batterij in koude of warme omgevingen, zoals in een afgesloten auto in zomer of winter, vermindert de capaciteit en levensduur van de batterij. Probeer de batterij altijd op een temperatuur tussen 15°C en 25°C (59°F en 77°F) te houden. Een toestel met een hete of koude batterij kan eventueel tijdelijk niet functioneren, zelfs als de batterij volledig is opgeladen. De batterijprestaties worden met name belemmerd bij temperaturen onder het vriespunt.
Medische apparatuur Het gebruik van apparatuur dat radiosignalen uitzendt, zoals mobiele telefoons, kan storing veroorzaken op onvoldoende afgeschermde medische apparatuur. Raadpleeg een arts of de fabrikant van het medisch apparaat om te bepalen of het apparaat afdoende is afgeschermd tegen externe rf-energie of als u andere vragen hebt. In zorginstellingen dient u het toestel uit te schakelen als dat daar gevraagd wordt.
Alarmnummers Belangrijk: Draadloze telefoons, zoals dit toestel, maken gebruik van radiosignalen, draadloze netwerken, vaste lijnen en door gebruiker geprogrammeerde functies. Vanwege deze redenen, wordt verbinding niet onder alle omstandigheden gegarandeerd. Voor essentiële communicaties, zoals medische noodgevallen, kunt u nooit uitsluitend vertrouwen op een draadloze toestel. Als bepaalde functies in gebruik zijn, moet u deze functies eventueel eerst uitschakelen voordat u een alarmnummer kunt bellen.
Uw simkaarten beheren Wanneer uw telefoon een nieuwe simkaart detecteert, zal u gevraagd worden om het gebruik van de simkaart van uw voorkeur voor iedere handeling te bevestigen. Het geeft de volgende informatie weer: 1. De kleur van iedere simkaart en de netwerknaam ervan. 2. De simkaart van uw voorkeur voor uitgaande oproepen. 3. De simkaart van uw voorkeur voor het verzenden van berichten. 4. De simkaart van uw voorkeur voor 3G-gegevens.
Een simkaart selecteren voor spraakoproepen Wanneer u Spraakoproep ingesteld hebt op Altijd vragen, zal u iedere keer dat u wilt bellen, gevraagd worden welke simkaart gebruikt moet worden. Voer het nummer in en tik dan op . Er wordt een dialoogvenster geopend; tik op de simkaart die u wilt gebruiken en de oproep zal worden doorverbonden.
Een simkaart selecteren voor het verzenden van een tekstbericht Wanneer u Berichten ingesteld hebt op Altijd vragen, zal u iedere keer dat u een tekstbericht wilt verzenden, gevraagd worden welke simkaart gebruikt moet worden. Voer het bericht en de gegevens van de ontvanger in en tik dan op Verzenden. Er wordt een dialoogvenster geopend; tik op de simkaart die u wilt gebruiken en het bericht zal worden verzonden.
Beperkingen bij gebruik van twee simkaarten Wanneer SIM1 is: Kan SIM2 geen: • In gesprek • Oproepen uitvoeren • Overgaat • • Een bericht verzendt of ontvangt Oproepen ontvangen (de oproeper zal het bericht "nummer niet beschikbaar" te zien krijgen) • Een gegevensverbinding gebruikt • Berichten verzenden of ontvangen • Geen gegevensverbinding gebruiken Opmerking: Wanneer u gegevens gebruikt op de ene simkaart en u met de andere simkaart een oproep maakt of een tekstbericht verzendt of ontva
Specificaties Prestaties • 1 GHz dual-core ARM® Cortex™-A9 CPU • Systeemgeheugen: • • 1 GB RAM 4 GB ROM • Android besturingssysteem Beeldscherm • 4,5" qHD TFT, capacitief touchscreen • 960 x 540 resolutie Multimedia Ondersteunde formaten: Type Formaten Afspelen van geluid MP3, AMR, WMA Beltoon MP3, MIDI, iMelody, WAVE, WMA Opnemen van video 3GP, MPEG-4, H.263, H.264 Afspelen van video 3GP, MPEG-4, H.263, H.
Batterij • Oplaadbare 1760 mAh lithium-ion batterij van hoge dichtheid (vervangbaar) Opmerking: De duur van het batterijgebruik is afhankelijk van het stroomverbruik, wat afhankelijk is van het gebruik van de systeembronnen. Als bijvoorbeeld altijd de verlichting is ingeschakeld, of als toepassingen worden gebruikt die veel stroom eisen, moet de batterij vaker worden opgeladen.
Veiligheid Informatie over de batterij Dit product maakt gebruik van een lithium batterij. Gebruik het niet in een vochtige of natte omgeving, en niet op plekken waar bijtende stoffen worden gebruikt. Plaats het product nooit in of bij een warmtebron, op een plek met een hoge temperatuur, in direct sterk zonlicht, in een magnetron of in een opslagruimte die onder druk staat, en stel het niet bloot aan temperaturen boven 60°C (140°F).
De accu plaatsen De smartphone maakt gebruik van een lithium batterij. Vervang de batterij altijd met eentje van hetzelfde type als de batterij die bij het product is geleverd. Het gebruik van een andere batterij kan resulteren brand of explosie. Waarschuwing! Bij onjuiste behandeling kunnen accu’s exploderen. Maak accu’s niet open en werp ze niet in vuur. Houd deze buiten het bereik van kinderen. Volg de plaatselijke reguleringen bij het weggooien van gebruikte accu's.
Kanalen voor draadloos gebruik in verschillende regio's N.
en EN62209-2, voor het gebruik in combinatie met accessoires die geen metaal bevatten en het toestel op een positie van tenminste 1,5 cm van het lichaam plaatsen. Het gebruik van andere accessoirs kan resulteren in het overschrijden van de richtlijnen voor blootstelling aan rf-energie van de ICNIRP. Als u geen accessoire gebruikt waarbij de telefoon op het lichaam wordt gedragen en de telefoon niet bij uw oor houdt, plaatst u het toestel tenminste 1,5 cm van uw lichaam als de telefoon is ingeschakeld.
Keurmerk-logo’s Om de keurmerklogo's op uw apparaat te bekijken: tik op Instellingen > Over telefoon > Juridische informatie > Keurmerklogo.
Lithium batterijwaarschuwing ATTENZIONE! Rischio di esplosione della batteria se sostituita in modo errato. Sostituire la batteria con un una di tipo uguale o equivalente consigliata dalla fabbrica. Non disperdere le batterie nell’ambiente. VORSICHT! Explosionsgefahr bei unsachgemäßen Austausch der Batterie. Ersatz nur durch denselben oder einem vom Hersteller empfohlenem ähnlichen Typ. Entsorgung gebrauchter Batterien nach Angaben des Herstellers.
Acer Incorporated Datum: 20.12.12 Verklaring van conformiteit Wij, Acer Incorporated, met adres 8F., No. 88, Sec. 1, Xintai 5th Rd., Xizhi Dist, New Taipei City, 22181, Taiwan Verklaren op eigen verantwoordelijkheid dat het product: Model: V360 Beschrijving: Smart Handheld De apparatuur voor op deze verklaring betrekking heeft, is in conformiteit met de volgende normen en/of andere normatieve documenten: • • • • • • • • • • • • • EN 301 511 V9.0.2 EN 301 908-1 V5.2.1; EN 301 908-2 V5.2.1 EN 300 328 V1.
Gebruiksrechtovereenkomst BELANGRIJK - LEES ZORGVULDIG DOOR: DEZE EINDGEBRUIKERSLICENTIEOVEREENKOMST ("OVEREENKOMST") IS EEN JURIDISCHE OVEREENKOMST TUSSEN U (ALS INDIVIDU OF RECHTSPERSOON) EN ACER INC. MET INBEGRIP VAN HAAR DOCHTERONDERNEMINGEN ("ACER") VOOR DE SOFTWARE (GELEVERD DOOR ACER OF DOOR LICENTIEHOUDERS OF LEVERANCIERS VAN ACER) DIE BIJ DEZE OVEREENKOMST HOORT, MET INBEGRIP VAN GERELATEERDE MEDIA, DRUKWERK EN GERELATEERDE ELECTRONISCHE GEBRUIKERSHANDLEIDINGEN MET HET MERK "ACER" ("SOFTWARE").
ZICH VAN ALLE ANDERE GARANTIES EN BEPALINGEN, HETZIJ UITDRUKKELIJK, GEÏMPLICEERD OF VERPLICHT, INCLUSIEF MAAR NIET BEPERKT TOT ELKE GEÏMPLICEERDE GARANTIE, PLICHT OF CONDITITES M.B.T. VERKOOPBAARHEID, GESCHIKTHEID VOOR EEN BEPAALD DOEL, NAUWKEURIGHEID OF VOLLEDIGHEID VAN REACTIES, RESULTATEN, VAKMANSCHAP, AANWEZIGHEID VAN VIDUSSEN EN VERWAARLOZING MET BETREKKING TOT DE SOFTWARE EN DE VOORWAARDE VAN OF HET NALATEN VAN DIENSTVERLENING.