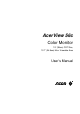
AcerView 56c Color Monitor 15” (38cm) CRT Size, 13.7” (34.8cm) Max.
Copyright Copyright © 1998 by Acer Peripherals, Incorporated. All rights reserved. No part of this publication may be reproduced, transmitted, transcribed, stored in a retrieval system or translated into any language or computer language, in any form or by any means, electronic, mechanical, magnetic, optical, chemical, manual or otherwise, without the prior written permission of Acer Peripherals, Incorporated.
Safety Instructions The AC plug isolates this equipment from the AC supply. Unplug this product from the wall outlet before cleaning. Do not use liquid cleaners or aerosol cleaners. Use a damp cloth for cleaning. Slots and openings in the cabinet and the back or bottom are provided for ventilation. They must not be blocked or covered. This product should never be placed near or over a radiator or heat register, or in a built-in installation unless proper ventilation is provided.
FCC Class B Radio Frequency Interference Statement Note: This equipment has been tested and found to comply with the limits for a Class B digital device, pursuant to Part 15 of FCC Rules. These limits are designed to provide reasonable protection against harmful interference in a residential installation. This equipment generates, uses, and can radiate radio frequency energy and, if not installed and used in accordance with the instructions, may cause harmful interference to radio communications.
CE Declaration This monitor, AcerView 56c, complies with 72/23/EEC and 89/336/EEC modified by 92/31/ECC. These directives refer to EMC. Canadian Department of Communications Regulatory Statement This digital apparatus does not exceed Class B limits for radio noise emissions from digital apparatus set out in the Radio Interference Regulations of the Canadian Department of Communications.
Table of Contents Table of Contents ......................................................................................... vi Chapter 1 Introduction.....................................................................................1-1 Unpacking the Package ..............................................................................1-1 Features.....................................................................................................1-1 Power Management......................................
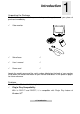
Introduction Unpacking the Package Check following items. purchase immediately. 1 If they are missing or damaged, consult your place of ü Color monitor ü Swivel base ü ü User’s manual ü ü Power cord ü Locate the model name and the serial number labeled on the back of your monitor. Write down the related information of your monitor and dealer in the space on page ii for future reference.
ü Flicker-free Image The monitor supports high refresh rates up to 85Hz at 1024x768 resolution with VESA’s best recommendation. ü Larger Viewable Size With its 13.7” viewable size, it offers a larger screen than other 15” monitors. ü iScreen (Intelligent Screen) Technology The On-Screen Display (OSD) allows you to adjust all settings simply with onscreen menus. ü Low Power Consumption By reducing the diameter of the CRT neck, the performance is increased and the power consumption is reduced a lot.
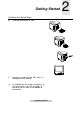
Getting Started Installing the Swivel Base Place the monitor on its side. Locate the arrow and the four slots at the bottom of the monitor. As directed by the arrow inscribed on the swivel base, insert the four pegs on the base into the slots at the bottom of the monitor.
Push the swivel base gently toward the front of the monitor until it is locked. Place the monitor back to its normal position.
Installing the Monitor This monitor is equipped with an autosensing power supply for voltage ranges 90~264V AC, 47~63Hz. Make sure that the system power is turned off. Plug the signal cable into the video signal port of your computer and fix it with the two screws. Connect the power cord to the monitor and attach it to power source. Turn on the computer and the monitor.
Adjusting the Monitor 3 A Look at the Control Panel Adjusting the Monitor You can adjust the monitor with the On-Screen Display (OSD) menus. Press the following four keys on the control panel settings. , , , to make necessary Panel key introduction Page switches between function control pages. Three pages, each containing its functions controls, are available: display control, color weighting and user mode display. Left/Low adjusts the setting to left or to a lower value.
Selecting page and making adjustments Grouped by functions, the OSD offers three pages for making adjustments: Display Control, Color Weighting, and User Mode display. Following describes the contents of each page and how you can make adjustments. Page 1 Display control This page contains 9 control functions represented by different icons. Follow steps below to make your favorite adjustments. For description of each function, see below. Press to locate the page.
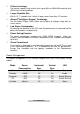
H. Position adjusts the Trapezoid makes the vertical horizontal position of the display. edges of the display parallel. H. Size adjusts the display Parallelogram corrects image width. distortions. V. Position adjusts the vertical position of the display. F In the event that the display is distorted due to magnetic field interference, turn off the monitor for 15 minutes. Then power on. Page 2 Color Weighting Color weighting allows you to set five default factory color settings (C1 to C5).
Following is the setting of each factory default: Factory Default Color Temperature C1 C2 C3 C4 C5 9300K 6500K 5500K 7100K 11500K Page 3 User Mode Display This page shows the current resolution, horizontal and vertical frequency status. Timing Setting By making adjustments of your video card settings, you can set the timing and the refresh rate to your preferences. The monitor will automatically save the settings.
F To set the timing and the refresh rate, see the user’s guide of your video card. Reset to Defaults Press and simultaneously to reset the monitor to the default factory settings.
Troubleshooting and Useful Hints 4 Troubleshooting Make sure that your monitor is properly installed if you have encountered any trouble using this product (For hardware installation, see Chapter 2, Getting Started). If the problems persist, check this chapter for possible solutions. ü Can't find AcerView 56c on the Windows 95 monitor lists. q ü You need to update the Windows 95 setup information for your AcerView 56c. You can download the updated file from the API web site (http://www.api.com.tw).
ü Colors are impure. q Check signal cable connector pins. consult your place of purchase. If there are bent or missing pins, Maintenance û û û û û û Do not expose the monitor to direct sunlight or heat. Do not spill liquid on the monitor. û You û Do not attempt to open the monitor. may be hurt by electric shock. For service, call your place of purchase. Do not use your monitor when magnets or electronic products are operating nearby.
Need More Help? If your problems remain after checking this manual, please contact your place of purchase or e-mail us at: stevenleung@api.com.
Specifications 5 Picture Tube Size Type Dot pitch Surface coating 15” (38cm) diagonal Mini-neck 0.28mm dot pitch AG, AS coating Maximum Viewable Size 13.7” (34.8cm) diagonal Power Supply (Universal) Input voltage Power consumption 90~264 V AC, 47~63 Hz 75 W max. Max.
Ambient Temperature Operating Storage +5°C ~ +40°C / +41°F ~ +104°F -20°C ~ +60°C / -4°F ~ +140°F Humidity Operating Storage 20% ~ 90% 10% ~ 90% Dimensions (W x H x D) 376 mm (W) x 373 mm (H) x 385 mm (D) Weight (net) 12.