© 2013 All Rights Reserved Acer Liquid Z3 Duo User’s Manual Model: Z130 This revision: 7/2013 Acer Liquid Z3 Duo Smartphone Model number: _______________________________________________ Serial number: _______________________________________________ Date of purchase: ____________________________________________ Place of purchase: ___________________________________________ 2
Table of contents Table of contents - - - - - - - - - - - - - - - - - - - - - - - - - - - - - - - - - - - - - - 3 Setting up- - - - - - - - - - - - - - - - - - - - - - - - - - - - - - - - - - - - - - - - - - - - 5 Unpacking your smartphone . . . . . . . . . . . . . . . . . . . . . . . . . . . . . . . . . . . . . . . . 5 Getting to know your smartphone . . . . . . . . . . . . . . . . . . . . . . . . . . . . . . . . . . . . 5 Installing or removing the battery . . . . . . . . . . . . . . . . . . . . . . . . .
Geotagging . . . . . . . . . . . . . . . . . . . . . . . . . . . . . . . . . . . . . . . . . . . . . . . . . . . . 36 Advanced settings - - - - - - - - - - - - - - - - - - - - - - - - - - - - - - - - - - - - 37 Changing modes with QuickMode. . . . . . . . . . . . . . . . . . . . . . . . . . . . . . . . . . . 37 Putting your smartphone in Airplane mode . . . . . . . . . . . . . . . . . . . . . . . . . . . . 38 Restarting your phone . . . . . . . . . . . . . . . . . . . . . . . . . . . . . . . . . . . . . .
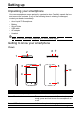
Setting up Unpacking your smartphone Your new smartphone comes packed in a protective box. Carefully unpack the box and remove the contents. If any of the following items is missing or damaged, contact your dealer immediately: • • • • • • Acer Liquid Z3 Smartphone Battery Quick Guide USB cable AC adapter Headset Note: In-box content varies depending on country and region. Getting to know your smartphone Views 6 7 2 1 3 5 8 10 4 9 No. Item Description 1 3.
No. Item Description 4 Touchscreen 3.5-inch, 320 x 480 pixel capacitive touchscreen to display data, phone content and enter information. 5 Phone speaker Emits audio from your smartphone; suitable for holding to your ear. 6 Micro USB connector Connects to a USB cable/charger. 7 Microphone Internal microphone. 8 Camera A camera for taking high-resolution images. 9 Handsfree stereo speakers Emit stereo audio from your smartphone; suitable for handsfree use.
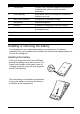
Align the tabs on the cover into the slots on the phone. Gently press the cover until it snaps in place. CAUTION: RISK OF EXPLOSION IF BATTERY IS REPLACED BY AN INCORRECT TYPE. DISPOSE OF USED BATTERIES ACCORDING TO THE INSTRUCTIONS. Charging the battery For initial use, you need to charge your smartphone for eight hours. After that you can recharge the battery as needed. Connect the AC adapter cord to the micro USB connector on your smartphone.
Your new phone has two SIM card holders, you may install one or two SIM cards. SIM 1 Additionally, you may wish to increase your smartphone’s storage by inserting a microSD Card into the slot provided. 1. Turn off the phone by pressing and holding the Power button. 2. Open the cover and remove the battery as described in "Removing the battery" on page 7. 3. Insert the SIM and/or microSD Card as shown. 4. Replace the battery and battery cover.
Using your smartphone Turning on for the first time To turn on your smartphone for the first time, press and hold the Power button until the screen turns on. You will then be asked to configure some settings before you can use your smartphone. Follow the onscreen instructions to complete setup. Sign in to or create a Google account If you have Internet access, your smartphone allows you to synchronize information with a google account.
Waking your smartphone If the screen is off and the smartphone does not react to any taps on the screen or front panel buttons, then it has been locked and is in sleep mode. Press the Power button to wake your smartphone. Unlock your smartphone by sliding your finger across the screen (it works both ways). The lock screen extends to either side of the screen, giving you room to add widgets for quick access. To view the extended lock screen, swipe in from the edge of the display.
Using the touchscreen Your smartphone uses a touchscreen for selecting items and entering information. Use your finger to tap the screen. Tap: Touch the screen once to open items and select options. Drag: Hold your finger on the screen and drag across the screen to select text and images. Tap and hold: Tap and hold an item to see a list of actions available for that item. On the pop-up menu that appears, tap the action you want to perform.
Swype Swype is a fast way to enter text. It allows you to type with one continuous motion across the screen keyboard; you create a word by drawing through letters. Put your finger on the first letter of the word and draw a path from letter to letter, lifting up only after the last letter. Swype will insert spaces where necessary. Swype will usually add a double letter in a word when needed, but you can help Swype recognize you want a double letter by scribbling slightly or making a loop on the letter.
Function Description Languages Set the language used by the keyboard. Gestures A list and description of the various Swype gestures. Help Learn how to use the Swype keyboard. Updates Check for application and dictionary updates. Predictive text Both Swype and Android keyboard provide predictive text input for the browser. As you tap the letters of a word, a selection of words are displayed above the keyboard that continue the sequence of letters tapped, or are a close match allowing for errors.
one of the suggestions, applications or files shown in the list. You can also choose what Search searches for. Within search, tap the Back button to hide the keyboard. Then tap the Menu icon > Settings > Phone search. Select the applications you want Search to search. Note: In order to search or browse the Internet, you must be connected to a cellular data (if available) or wireless network. See "Going online" on page 29.
Adding and removing shortcuts and widgets To add shortcuts or widgets, tap the Application menu icon in the bottom-center of the Home screen. Tap APPS to see a list of shortcuts to applications you can drag to a Home screen. Tap WIDGETS to see small applications and links (such as custom shortcuts, contacts or bookmarks) that you can add to a Home screen. Widgets are small applications that display constantly-updated information or quick shortcuts to applications or special functions.
To delete an application shortcut from a folder, tap on the folder icon to display the applications inside and then tap and hold the application icon that you want to remove. Drag and drop the icon on Remove that will appear at the top of the screen. To delete a folder, tap and hold on the folder and then drag and drop the folder on Remove that will appear at the top of the screen. Changing application dock icons You can set icons for installed applications in the application dock.
Status and notification area The Notification area is at the top of the screen. This area contains a variety of icons to inform you of your phone’s status. The left side of the Notification area displays event icons that indicate a new event (such as a new message). Drag the Notification area down the screen to view more information about new events. Tap Tap to to clear the notification area.
Battery icons Icon Description Icon Description Battery is very low Battery is partially drained Battery is low Battery is full Battery is charging Notification icons Note: Notification icons appear in different colors if you have two SIMs inserted.
Multitasking You can have multiple applications open at the same time. Tap the Recent button to see recently opened applications. To open a new application, tap the Home button to return to the Home screen, then start the new application. To prolong battery life, it is better to close an application when you’ve finished using it. You can do this three ways: 1. Press the Back key until the app is closed 2. Tap the Menu icon and select Exit (if available) 3.
Managing contacts Managing your contacts Your smartphone features an address book that allows you to save contacts to your phone’s internal memory, either one of your SIM cards, or your Google account. Open the People application from the Application menu or tap the Favorites and all contacts tab in Phone to view your contacts. If you don’t have any contacts stored on your phone, you can import contacts from your Google account, SIM, or SD card. You can also add a new contact.
Making calls This chapter shows you how to make phone calls, and the various options available to you during your call. Before making a call Check that the phone function is on before you make a call. You can confirm the phone status from the Notification area. Note: Status and notification icon colors may vary. Icon Description Not connected to the network: You are unable to make a call. Connected to the network: You may make a call.
4. To end the call, tap . Dialing a number from Call Log Your call history can be viewed by tapping the Call log tab at the top of the screen. It displays recent received, dialed, and missed calls. Tap the phone icon next to a contact to redial. To view details of the call, tap the number or contact’s name. While viewing the details of a call, tap the trash icon to remove that call from the call log or tap the Menu icon for other options to edit number before making a call.
network provider for roaming rates specific to the country you are visiting before you leave. Direct dial widget You may add a direct dial widget for a contact on the Home screen. Open the Application menu, then tap the WIDGETS tab. Tap and hold Direct dial and you will be able to place the widget on your Home screen. Once placed, you will be able to select a contact to associate with that particular widget on your Home screen.
Answering or declining a call When you have an incoming call, the number will be shown on the screen. To accept or decline the call, tap the appropriate icon and slide your finger across the screen. To decline the call with a text message, tap the icon and select a message. Ending a call To end a call, tap from the voice call screen. Voice call options Icon Description Access the keypad while a call is in progress. Speakerphone. Mute a call. Place the call on hold.
Conference calls If you have one call on hold and another on line, you can combine both calls to create a conference call. After the first call is established, tap conference call. to add a second call.
Messaging This chapter shows you how to set up and use the Phone messages, Social messages and Social events functions of your smartphone. All SMS and MMS messages are accessed via Messaging. Messaging automatically arranges received and sent messages into threads. To access Messaging tap Messaging on the Home screen.
Replying to a message When a new text message arrives, a message screen displays showing you the message and enabling you to quickly reply. To reply later, tap Close. To view the message and all previous messages from the sender, tap View. Message notifications appear in two places: the Notification area and the message icon at the bottom of the phone displays the number of unread text messages.
Note: Downloads can take a long time, depending on your connection quality. If you reply or open another application, the download will be stopped. Important: You may be charged to download message content, especially if you are roaming. Please contact your provider if you have any questions. 1. 2. 3. 4. Open Messaging to view a summary of the message. Tap the message to view the content. Tap Download to download the message content.
Going online Browsing the Internet In order to browse the Internet with your smartphone, you must be connected to a data or wireless network. Using the browser To start browsing, tap the Chrome icon on the Home screen, or open the Application menu and tap Chrome. To open a new website, tap the address box at the top of the page. Enter the address using the keyboard and tap Go. You can zoom in or out of pages by pinching or reverse pinching.
Setting up your Google email 1. Make sure your smartphone is connected to a data or Wi-Fi connection. 2. From the Application menu tap Gmail. If you did not enter your Gmail account address and password when you first started your phone, follow the onscreen instructions. Composing an email 1. 2. 3. 4. Make sure your smartphone is connected to a data or Wi-Fi connection. From the Application menu tap Gmail. Tap the Menu icon and then Compose. Enter the recipient's email address, the subject and message.
You can browse the store by category or tap the search icon to search for a specific application. Once you have selected an application, tap the Install button to download and install the application. You will be told which services (contact information, wireless access, GPS, etc.) the application requires access in order to function correctly. If none of these services seem unusual, tap Accept & download to proceed with the installation.
Uninstalling downloaded applications Once you’ve downloaded and installed an application, you may uninstall the application from the Application menu by pressing and holding the application icon and dragging it to the Uninstall trash can located at the top-left of the Home screen. Note: Deleting an app from the Home screen only deletes the shortcut. See "Adding and removing shortcuts and widgets" on page 15. Alternatively, you can go to Settings from the Application menu and select Apps.
Using the Camera Your smartphone features a digital camera mounted on the rear. This section will take you through all the steps in taking photos and videos with your smartphone. To activate the camera, tap Camera on the Home screen, or open the Applications menu and tap Camera.
Settings menus General You may adjust the following: • Turn GPS info on or off: Stores GPS information in the image information. • Exposure: Over- or under-exposes the image. • Color effect: Applies a color effect to the image. • None • Sepia • Mono • Negative • Sepia Blue • Scene mode: Adjust photo parameters for a particular environment. • Auto • Night • Portrait • Landscape • Sports • White balance: Compensate for different lighting environments.
• Set the Video quality. Taking a photo 1. Ensure you have adjusted the settings described above. 2. Frame your subject and steady your smartphone. 3. Zoom in or out as needed. 4. Tap to take a picture. Taking a panoramic photo Panoramic mode allows you to take a series of up to nine photos that the camera application will ‘stitch’ together to make a single extended image. 1. To take a panoramic photo, select panoramic capture mode. 2.
video thumbnail. Alternatively, open the Applications menu and tap Gallery. From Gallery you can share the file directly using various services. Note: Share options vary depending on the file type. You may also edit photos you have taken by tapping the hand corner. icon in the lower left- Geotagging Geotagging allows you to store the location where a photo or video was taken right in the photo or video itself. For the geotag to display, pictures must be taken with GPS location info turned on.
Advanced settings Changing modes with QuickMode Your smartphone contains an app called QuickMode that makes adjusting the user experience for different people very easy. From the Home screen, tap QuickMode. The first time you enter QuickMode, you’ll need to enter a PIN. Note: The default PIN is "1111". Several user mode options now display. Tap the appropriate option to display the explanation for setting up that mode. Follow the onscreen instructions to display your new easy-to-use mode.
Mode Switcher. To revert back to the phone’s default mode, tap Default Mode; otherwise, choose another mode to use. Putting your smartphone in Airplane mode You can enter Airplane mode (also known as flight mode) to turn off telephone, wireless, and Bluetooth functions and use your smartphone as a handheld device during a flight. Check with your airline to make sure this is permitted onboard. Switch your smartphone off during takeoff and landing as it may interfere with aircraft electronic systems.
Adjusting settings This section will show you how to adjust detailed settings for your phone, data, Wi-Fi and Bluetooth connections. Activating or deactivating connections Open the Application menu and tap Settings to manage your connection settings. Item Description SIM management Under SIM INFORMATION, both SIM cards are listed. Tap the SIM card name to display basic settings and tap on or off to activate or deactivate the SIM, respectively.
Important: If your phone is in Airplane mode, the option to turn Bluetooth on will be disabled. Please refer to "Putting your smartphone in Airplane mode" on page 38 for instructions on turning Airplane mode on or off. Adjusting Bluetooth settings You can use Bluetooth to exchange information between your smartphone and other mobile devices. Bluetooth connections For all Bluetooth settings, open the Application menu and tap Settings > Bluetooth.
Selecting a network Your phone will automatically detect your carrier/network settings when you insert a new SIM card. However, you may prefer to manually select a network. This may be a good idea when roaming. Tip: When you are traveling, manually selecting a network may help to reduce your roaming charges. Check with your home service provider for the network offering the most competitive rates at your destination. 1. Open the Application menu and tap Settings > More...
Sound To adjust your phone’s sound settings, in the Application menu tap Settings > Sound. Item Description Vibrate Vibrates the device for incoming calls. Volumes Adjust the Ringtone, Notifications, Alarm volumes. SIM1 ringtone Sets the default voice calls ringtone for SIM 1. To see which SIM card slot is SIM 1, see "Installing a SIM or microSD Card" on page 7. SIM2 ringtone Sets the default voice calls ringtone for SIM 2.
Connecting to a PC If you wish to transfer information between the microSD Card in your phone and your computer, you can connect your phone to a PC using the supplied USB cable. Plug the USB sync cable into the micro USB connector on your smartphone. Plug the USB client connector into an available USB port on your computer. Open the Notification area, and tap Connected as media device to configure the USB options.
FM radio The FM radio allows you to listen to your favorite stations while on the move. Headphones must be inserted to the 3.5 mm jack as it functions as an antenna. You can access the radio by tapping FM Radio from the Application menu. Tap the back icon to turn the radio off. Multimedia playback Your smartphone comes supplied with a variety of programs that you can use to enjoy multimedia content. Adjusting the volume Adjust the volume of your phone using the Volume button on the side of the phone.
Closing an application To close an active application, in the Application menu tap Settings > Apps. Swipe over to the Running tab, then tap the program you wish to close. Select Stop to close the program. Uninstalling an application You can remove programs installed on your smartphone to free up extra storage memory. 1. 2. 3. 4. In the Application menu tap Settings > Apps. Swipe over to the Downloaded tab. Find the application in the list and tap on it.
Accessories and tips This chapter shows you how to use accessories with your smartphone, as well as provide useful tips for when you are using your smartphone. Using the headset Your smartphone is compatible with headsets with built-in microphone for handsfree use when making calls. To use the headset, plug it into the 3.5 mm headphone jack at the top of the phone. When the headset is plugged in, all audio is routed to the headset, and the speakers are turned off.
Managing your SIM cards If your phone detects a new SIM card, you will be asked to confirm the preferred SIM to use for each action. It indicates the following information: 1. 2. 3. 4. The color used for each SIM card and its network name. The preferred SIM for outgoing calls. The preferred SIM for sending messages. The preferred SIM for 3G data. Tap Change to edit these settings from the SIM Management screen.
Selecting which SIM to use when sending a text message If you have set Messaging to Always ask, you will be asked which SIM to use each time you send a text message. Enter the message and recipient information, then tap Send. A dialog opens; tap the SIM to use and the message will be sent. Identifying calls Whenever you receive a call, the caller’s number will be shown using the color defined for the SIM that the call is being received on. You will also be shown the name of the SIM receiving the call.
Appendix FAQ and troubleshooting This section lists frequently asked questions that may arise during the use of your smartphone, and gives easy answers and solutions to these questions. Aspect Question Answer Audio Why is there no sound coming from the device? If the headset is plugged into the device, the speaker is automatically shut off. Disconnect the headset. Check that the device volume setting is not muted. Check that the volume control is not at its lowest setting.
Aspect Question Answer Unlock pattern I forgot my unlock pattern. After a certain number of wrong entries, you will be presented with an option to reset your pattern. Tap Forgot pattern? and enter your google account username and password. Note: You must have an active Google account on the smartphone. Alternatively, you restore your smartphone to factory settings. See "Restoring to factory settings" on page 45. Heat The phone heats up when charging or making long duration calls.
CAUTION when listening to music To protect your hearing, follow these instructions. • Increase the volume gradually until you can hear clearly and comfortably. • Do not increase the volume level after your ears have adjusted. • Do not listen to music at high volumes for extended periods. • Do not increase the volume to block out noisy surroundings. • Decrease the volume if you can’t hear people speaking near you.
Vehicles RF signals may affect improperly installed or inadequately shielded electronic systems in motor vehicles such as electronic fuel injection systems, electronic anti-skid (anti-lock) braking systems, electronic speed control systems, and air bag systems. For more information, check with the manufacturer, or its representative, of your vehicle or any equipment that has been added. Only qualified personnel should service the device, or install the device in a vehicle.
3. DO be careful not to drop your smartphone or subject it to any strong impact. Do not place your smartphone in your back pocket. 4. DO NOT expose your smartphone to extreme temperatures. For example, do not leave your smartphone on the dashboard of a car on a hot day or when temperatures are below freezing point. Also, keep it away from heaters and other sources of heat. 5. DO NOT use or store your smartphone in any location that is dusty, damp or wet. 6.
Specifications Performance • MT6572M 1.0 GHz dual-core processor • System memory: • • 512 MB of RAM 4 GB of ROM • Android operating system Display • 3.5" HVGA LCD, capacitive touchscreen • 320 x 480 resolution Multimedia Formats supported: Type Formats Audio playback MP3, AMR, WMA Ringtone MP3, MIDI, iMelody, WAVE, WMA Video recording 3GP, MPEG-4, H.263, H.264 Video playback 3GP, MPEG-4, H.263, H.
Battery • Rechargeable high density 1500 mAh Lithium-ion polymer battery (replaceable) Note: Length of battery operation will depend on power consumption which is based on system resource use. For example, constantly using the backlight or using power-demanding applications will shorten battery life between charges. Dimensions Height 109.9 mm Width 60 mm Thickness 10.
Safety Battery information Do not use this product in a humid, wet and/or corrosive environment. Do not put, store or leave your product in or near a heat source, in a high temperature location, in strong direct sunlight, in a microwave oven or in a pressurized container, and do not expose it to temperatures over 60 °C (140 °F). Failure to follow these guidelines may cause the battery to leak acid, become hot, explode or ignite and cause injury and/or damage. Do not pierce, open or disassemble the battery.
Warning! Batteries may explode if not handled properly. Do not disassemble or dispose of them in fire. Keep them away from children. Follow local regulations when disposing of used batteries. Disposal and recycling information Do not throw this electronic device into the trash when discarding. To minimize pollution and ensure utmost protection of the global environment, please recycle. For more information on the Waste from Electrical and Electronics Equipment (WEEE) regulations, visit www.acergroup.
Wireless operation channels for different domains N. America 2.412-2.462 GHz Ch01 through Ch11 Japan 2.412-2.484 GHz Ch01 through Ch14 Europe ETSI 2.412-2.
The unit of measurement for the European Council's recommended limit for mobile telephones is the "Specific Absorption Rate" (SAR). This SAR limit is 2.0 W/kg, averaged over 10 g of body tissue. It meets the requirements of the International Commission on Non-Ionizing Radiation Protection (ICNIRP) and was included in the European Standard EN 50360 for mobile radio devices. The SAR regulation for mobile telephones is in line with European Standard EN 62209-1.
Certification logos To view the certification logos on your device: tap Settings > About phone > Legal information > Certification logo.
Battery warning ATTENZIONE! Rischio di esplosione della batteria se sostituita in modo errato. Sostituire la batteria con un una di tipo uguale o equivalente consigliata dalla fabbrica. Non disperdere le batterie nell’ambiente. VORSICHT! Explosionsgefahr bei unsachgemäßen Austausch der Batterie. Ersatz nur durch denselben oder einem vom Hersteller empfohlenem ähnlichen Typ. Entsorgung gebrauchter Batterien nach Angaben des Herstellers. ADVARSELI! Lithiumbatteri - Eksplosionsfare ved fejlagtig håndtering.
Acer Incorporated Date: July 12, 2013 Declaration of Conformity We, Acer Incorporated, of 8F., No. 88, Sec. 1, Xintai 5th Rd., Xizhi Dist, New Taipei City, 22181, Taiwan Declare under sole responsibility that the product: Model: Z130 Description: Smart Handheld To which this declaration relates, is in conformity with the following standards and/or other normative documents: • EN 301 511 V9.0.2 • EN 301 908-1 V5.2.1; EN 301 908-2 V5.2.1 • EN 300 328 V1.7.1 • EN 300 440-1 V1.6.1; EN 300 440-2 V1.4.
Authorized person: Name: Harriot SL Lee For the addresses/telephone numbers of Acer service centers, please refer to the warranty card.
End User License Agreement IMPORTANT-READ CAREFULLY: THIS END USER LICENSE AGREEMENT ("AGREEMENT") IS A LEGAL AGREEMENT BETWEEN YOU (EITHER AN INDIVIDUAL OR A SINGLE ENTITY), AND ACER INC. INCLUDING ITS SUBSIDIARIES ("ACER") FOR THE SOFTWARE (WHETHER PROVIDED BY ACER OR BY ACER'S LICENSORS OR SUPPLIERS) THAT ACCOMPANIES THIS AGREEMENT, INCLUDING ANY ASSOCIATED MEDIA, PRINTED MATERIALS AND RELATED USER ELECTRONIC DOCUMENTATION WHICH MAY BE BRANDED "ACER" ("SOFTWARE").
SERVICES. ALSO, THERE IS NO WARRANTY OR CONDITION OF TITLE, QUIET ENJOYMENT, QUIET POSSESSION, CORRESPONDENCE TO DESCRIPTION OR NON-INFRINGEMENT WITH REGARD TO THE SOFTWARE.