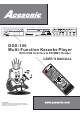
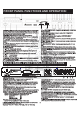
2 3 4 5 6 7 8 9 0 MPEG-4 Playback POWER DOLBY D I G I T A L CD+G SD/MMC USB MINI SD ON OFF DGX-106 MIC1 DVD MPEG-4 KARAOKE PLAYER MIC2 VOL1 VOL2 ECHO BASS DGX-106 Multi-Function Karaoke Player With USB Interface & SD/MMC Reader G V M A G P C R E LE 7 -B P A TU D M A U TE LA Y M P TE R S L/ O L W V S - M V O L IC D G X -1 06 R E S U M E R M E U S E TU Q R N O D E A P B U C D LO IO S U + A B N TI G TL LE E
Warnings, Cautions and Others Mises en garde, precautions et indications diverses For Canada/Pour le Canada CAUTION CAUTION: TO PREVENT ELECTRIC SHOCK, MATCH WIDE BLADE OF PLUG TO WIDE SLOT,AND FULLY INSERT. ATTENTION: POUR EVITER LES CHOCS ELECTRIQUES, INTRODUIRE LA LAME LA PLUS LARGE DE LA FICHE DANS LA BORNE CORRESPONDANTE DE LA PRISE ET POUSSER JUSQUAU FOND. RISK OF ELECTRIC SHOCK DO NOT OPEN CAUTION: TO REDUCE THE RISK OF ELECTRIC SHOCK. DO NOT REMOVE COVER (OR BACK).
Important Safety instructions 1. Read These Instructions. 2. Keep These Instructions. 3. Heed All Warnings. 4. Follow All Instructions. 5. Do not use this product near water. 6. Clean only with dry cloth. 7. Do not block any ventilation openings. 8. Do not install near any heat sources such as radiators, heat register, stoves, or other apparatus (including amplifiers) that produce heat. 9. Do not defeat the safety purpose of the polarized or grounding-type plug.
A cesonic DGX-106 Table of Contents Before Operation Included Accessories Playable Media Handling and Cleaning of Discs Front Panel Functions Back Panel Functions Remote Functions Player Connections Please check that you have all of the following accessories supplied to you. If anything is missing, please contact your dealer immediately.
Before Operation Playable Media Handling and Cleaning of Discs This unit supports the following disc formats: *DVD, MPEG-4, Video CD, Video CD 2.0 *CD+Graphics, Audio CD, HDCD, DTS CDs *MP3, WMA, JPEG, Kodak, MPEG Handling *At anytime, when handling discs, always hold them from their edges and/or by the circle in the center. *NEVER write on the any surface of the disc for it may render the disc unreadable. *Store discs in a clean and dry environment.
FRONT PANEL FUNCTIONS AND OPERATION: SD/MMC USB MINI SD DGX-106 24 23 14. KEY CONTROL UP- Transposes the music key. Use to raise key by a half tone. 1. NUMERIC KEYS 0-9: Used to input for track selections or programming purposes. Note: When Play Back Control (PBC) mode is on, songs will stop playing at the end of every track. Playing will not resume until another track entry has been submitted and set to play. 2. DVD/USB- Switch between USB mode and Disc Mode. 3.DISC TRAY - Press to open tray.
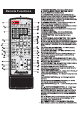
Remote Functions 22 STANDBY 1 USB/DISC 5.1CH 1 2 23 STEREO KARAOKE VIDEO 24 2 3 3 4 P/N 25 26 4 5 6 7 8 VGA 27 9 0 SEARCH CLEAR PROGRAM 28 29 TITLE MENU SETUP REPEAT 5 30 31 6 SUBTITLE ENTER A-B 32 33 7 8 PBC ANGLE ZOOM RETURN AUDIO L/R RESUME EQ SLOW VIEW 34 9 10 DISPLAY RANDOM 11 36 12 13 35 STEP 37 MUTE 38 14 39 15 MUSIC MODE 16 40 VOL + 41 17 42 43 18 VOL - 19 44 45 20 46 21 47 DGX-106 1. STANDBY BUTTON - Turns on or off the player.
25. KARAOKE BUTTON p. 10 - Toggles KARAOKE MODE on and off. Enable key control funcion if on. 26. P/N BUTTON - PAL/NTSC switch. Press P/N and within 2 seconds, press ENTER to complete switch. 27. VGA BUTTON - Press this button then press ENTER to swith between SCART and YCBCR output. 28. PROGRAM BUTTON p. 8 - To program tracks , p ress STOP then press PROGRAM . Enter your tracks selection and press PROGRAM again to accept . P ress the PLAY to start programmed tracks. 29. CLEAR BUTTON p.
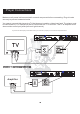
Player Connections Make sure all power is disconnected from each component before connecting. Plug all cords securely to prevent unwanted noise. You cannot connect this player to a TV that does not contain a video input jack. The player must be connected to a TV or amplifier that is connected to a TV or monitor. The TV or amplifier must also contain audio input jacks (left and right channel). If you wish to use this player in karaoke mode, you must have your player connected as the picture below.
Basic Operation 3. Select TV type: First, Select Video Setup.For a normal TV, select NORMAL/PS (Pan and Scan) or NORMAL/LB (Letter Box). For a wide-screen TV, select WIDE/HDTV. Turning on/off the player Press POWER button on the front panel of the unit to turn on the player. There is no POWER button on the remote control. Once the power is on, you will see the Ace Karaoke logo.
Basic Operation Basic Playback To Advance Or Reverse Playback While Viewing During playback on DVDs and VCDs, press FAST FORWARD >> or FAST BACKWARD << on the remote unit. You can select from 2 times, 4 times, 8 times, 16 times the normal playback speed. Loading A Disc 1. Press EJECT to open the disc tray. 2. Place a disc in the disc tray. 3. Press EJECT to close the disc tray. 4. The Disc will play automatically NOTE *During forward or reverse, the sound will be muted.
Programing Tracks Advanced Operations By programing tracks, you can play up to 99 tracks in any order. You may also repeat tracks. 1. To program tracks press STOP then press PROGRAM. 2. Using the NUMERIC KEYS 0-9, enter the desired track number and press PROGRAM again to accept. 3. Press PLAY to start playback of programed tracks. 4. To end the program playback, press STOP. If you wish to clear the programmed tracks, press STOP twice.
Advanced Operations How to adjust Language, Sound, And Scene Angles Selecting Subtitle Language Some DVD Video discs contain more than one subtitle language. You may select any of the desired languages that are available. 1. During playback, press SUBTITLE. The subtitle selection window will appear on the screen. 2. Each time SUBTITLE is pressed, the subtitle language will change. Press SUBTITLE continuously to make your selection. . Keep pressing to turn subtitles off.
Karaoke Operations/ Audio & Video Operations Audio setting TV signal setting Set up as below for swiching to different TV types to match your TV. There are 6 types: Multi System, NTSC, PAL, 480P, 576P and 720P) for your selection. In stop mode, press P/N button and ENTER button for selection. If your TV is not a HDTV but with video type set on 720 P, the image will not be displayed well. In this case, press STOP then press P/N button on the remote and press ENTER button to back to the regular TV image.
In c o r r e c t o p e r a ti o n s a r e o fte n m i s ta k e n fo r tr o u b l e a n d m a l fu n c ti o n s . If yo u s u s p e c t th a t s o m e th i n g i s w r o n g w i th th e u n i t, c h e c k th e l i s t b e l o w , fo r s o m e ti m e s th e tr o u b l e s l i e w i th i n a n o th e r c o m p o n e n t. R e m e m b e r to tr y i n s p e c ti n g o th e r c o m p o n e n ts a n d e l e c tr i c a l a p p l i a n c e s i n u s e .
Notes: 13
ACESONIC LIMITED WARRANTY WARRANTY PROCEDURE TO VALIDATE YOUR WARRANTY: Fill out the attached warranty card, be sure to include the model and serial number of the unit since this is how warranties are tracked. If your Acesonic product was purchased in the U.S., mail the completed card directly to Acesonic within 10 days from the date of purchase. If you purchased the product outside the U.S . you must file your warranty registration card with the Distributor in that country.
LIMITED DOMESTIC WARRANTY ACESONIC WARRANTS ALL PRODUCTS PURCHASED IN THE U .S . AGAINST DEFECTS IN MATERIAL OR WORK MANSHIP FOR A PERIOD OF ONE(1) YEAR FROM THE INITIAL DATE OF RETAIL PURCHASE FROM AN AUTHORIZED ACESONIC DEALER, OR, ONE(1) YEAR FROM THE DATE OF MANUFACTURE IF PROOF OF PURCHASE DATE IS NOT AVAILABLE. This limited warranty extends to all purchasers or owner of the product during the warranty period beginning with the original retail purchase.