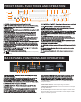
DGX-212 ® HDMI Multi-Format Karaoke Player with 4X CDG to MP3G Converter with Digital Recording User Manual v.1.0 NOTE: To ensure this system works safely and to its fullest potential, please read the User Manual carefully before use and keep it handy for future reference. CAUTION: To assure this player will work at its best, please read this user’s manual carefully before operation and keep for future reference. www.acesonic.
A cesonic DGX-212 Thank you for purchasing Acesonic's DGX212 HDMI Multi-Format Karaoke Player with Digital Recording. Acesonic takes pride in providing its customers with only the most advanced and highest quality products on the market. With proper care and use you will get many years of satisfying use from your Acesonic product. Be sure to keep original packaging in case re-shipping is required for returns or repairs.
Before Operation About This Manual The display window information and On Screen Display (OSD) items are all in UPPER CASE letters. Important Information Before You Start Compatible Media and File Formats This unit supports the following disc and file formats: DVD, AVI, Video CD, Video CD 2.
Before Operation Notes Regarding Discs With some DVDs, the player starts playback automatically after inserting the disc, whether or not PLAYBACK CONTROL is on or off. The image may be poor, noisy or grainy due to defects on the actual disc, and some functions as described in this manual may not be possible on all discs. Maintenance of Discs Handling When handling discs, always hold them from their edges and/or by the circle in the center.
FRONT PANEL FUNCTIONS AND OPERATION: 20 14 13 9 8 11 12 10 15 21 18 7 1 3 2 4 16 1. POWER - Press the button to turn the unit on or off. 2. MIC 1 & 2 INPUT jacks - Connects microphones with 1/4 in. plugs. 3. MIC 1 & 2 VOL knob - Control the volume output from MIC CHANNEL 1 and 2. 4. ECHO Button - Control the amount of ECHO(delay) applied to MIC CHANNELS 1 and 2. 5. SD CARD READER - Play or record MP3+G songs.
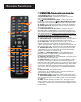
Remote Functions 1. POWER BUTTON - Turns the player on or off. 2. SD CARD - Press to change to SD card mode. 3.MUSIC BUTTON - In USB/SD Card mode, use this button to call out all the music files and display on the screen. 4. GUI SWITCH - Press the button to switch between windows and playback display mode. See more detail on page 17. 10 11 12 1 2 3 4 5 6 5. SHARP BUTTON (#) - Raises the key by a half tone. LOW BUTTON (b) - Lower the key by a half tone NATURAL BUTTON - Go back to original key tone.
Remote Functions 28 29 21 22 23 24 25 26 27 30 31 32 33 34 35 36 37 38 21. STEP BUTTON- Press to play the frame step by step. Press the PLAY button once to return to normal playback. 22. STOP BUTTON - Press to STOP playback. 23.RETURN BUTTON - This button is used to return to a menu screen while playing. 24. SKIP FORWARD BUTTON - Press to go to the beginning of the next track. SKIP BACKWARD BUTTON Press to go to the beginning of the current or previous track. 25.
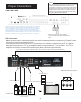
Note: Note: We cannot guarantee this machine will read and play all USB memory devices. See more information on page 9. For smooth recording and playback, we recommend using USB version 2.0 and SD cards that are Class 4 or higher. Please see page 3 for supported files and formats when using the USB/SD CARD MODE. Player Connections USB & SD CARD USB CARD NOTE: Your DGX-212 has a variety of ways to provide you audio and video.
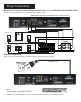
Player Connections Player Connections MAKING THE CONNECTION BETWEEN the PLAYER and 5.1 CH. SURROUND SOUND AMPLIFIERS You can connect this player with 5.1 channel amplifiers as shown below: *NO Microphone audio will be outputted in 5.1 Channel mode Rear Speaker (left) Rear Speaker (right) Subwoofer Speaker (for mid & low bass enhancement) Front Speaker (left) Center Speaker CEN SL SUB SR Front Speaker (right) 5.
Basic Operation To Advance Or Reverse Playback While Viewing During playback on DVDs and VCDs, press FAST FORWARD>> or FAST BACKWARD<< on the remote unit. You can select from 2X, 4X, 8X, 20X the normal playback speed. *During forward or reverse, the sound will be muted. Basic Playback Turn on the machine Play back from USB and SD card devices NOTE This player is not a computer system Loading A Disc 1. Press EJECT to open the disc tray. 2. Place a disc in the disc tray. 3.
Basic Operation Karaoke - USING MICROPHONE The system has 2 microphone inputs for connecting up to 2 microphones at once. Karaoke Karaoke - To recording singing(See Page12 -13): 1. Play MP3, CD,CDG,MP3G or VCD song from disc, or MP3, MP3G song from USB or SD card. 2. Insert SD card or USB as a file saving device if you play from disc. 3. Select the song you want to record, and play the song first. Then, press RECORD on the machine or remote to start recording.
Basic Operation SYSTEM SETUP Unload the Disc then: Press SETUP KEY to open the Setup MENU. TV SYSTEM 1) Press Direction KEY [ ] to choose “TV SYSTEM” . 2) Press Direction KEY [ ] to show Sub-MENU. 3) Press Direction KEY [ / ] to select the from [NTSC/ PAL/PAL60/AUTO]. POWER RESUME 1) Press Direction KEY [ / ] to choose “SCREEN SAVER”. 2) Press Direction KEY [ ] to show Sub-MENU. 3) Press Direction KEY [ / ] to select “ON” or “ OFF”. 4) Press ENTER to confirm it.
Basic Operation LANGUAGE SETUP Unload the Disc then: Press SETUP KEY to open the Setup MENU. Press Direction KEY [ / ] to select the “LANGUAGE SETUP”. The Sub-MENU: OSD LANGUAGE AUDIO LANGUAGE SUBTITLE LANGUAGE MENU LANGUAGE OSD LANGUAGE 1) Press Direction KEY [ / ] to choose “OSD LANGUAGE”. 2) Press Direction KEY [ ] to show Sub-MENU. 3) Press Direction KEY [ / ] to select the language. 4) Press ENTER to confirm it. AUDIO LANGUAGE 1) Press Direction KEY [ / ] to choose “AUDIO LANGUAGE”.
VIDEO SETUP Unload the Disc then: Press SETUP KEY to open the Setup MENU. Press Direction KEY [ / ] to select the VIDEO SETUP. The Sub-MENU: BRIGHTNESS - Select from level 0 ~12 CONTRAST - Select from level 0~12 HUE - Select from level -6~+6 SATURATION - Select from level 0~12 SHARPNESS - Select from level 0~8 SPEAKER SETUP Unload the Disc then: Press SETUP KEY to open the Setup MENU. Press Direction KEY [ / ] to select the SPEAKER SETUP. The Sub-MENU: DOWN MIX - Select from LT/RT,STERO,VSS & 5.
BASIC RECORDING OPERATION FOR MP3+G WHAT IS MP3+G An MP3+G file is a karaoke-based file format that consists of two parts, an audio file in MP3 format and a graphics file that displays on-screen lyrics. These two files combined are called an MP3+G file. An MP3+G file will occupy about the same disc space required for a standard CD+G track. The recording function on this player offers two applications. 1. Record your vocal performance in MP3 (CD, VCD) or MP3+G(CDG,MP3G) format and share with your friends.
BASIC RECORDING OPERATION FOR MP3+G 4. Next, go to TRACKS, to select one or few or all tracks which you desire to transfer to MP3+G format. Click here if you want to check/uncheck all tracks 5. Go to START, you will see the ripping information. To start the ripping process, press ENTER. There are two status bars showing the progress while ripping. 6. After ripping has finished, select QUIT to leave the window and go back to machine playback mode. 7.
Advanced Operations Playing From A Specific Position Repeating Playback 1. Press REPEAT. If you press REPEAT in stop mode, press PLAY to start playback. Each time you press REPEAT, the repeat mode cycles among REP-ALL, REPONE, and OFF. A window which indicates the current repeat mode will be displayed on the TV Screen. Locating a desired scene from the DVD menu DVD discs generally have their own menus showing the contents of the disc.
Advanced Operations Create Song List: 1. In the Disc/USB/SD Card mode, you can have a create your own song list from current MP3/MP3G songs in the disc/USB/SD Card. Press CREATE SONG LIST on the remote to start the process. Searching by name: You can search songs by inputting a song name in USB/SD CARD mode after you create the song list file (see Page6, #43 for more detail) Step by step: 1. Insert an SD card/USB drive into machine, and select the SD card/ USB mode accordingly. 2.
Troubleshooting Incorrect user operations are often mistaken for hardware/software problems and system malfunctions. If you suspect that something is wrong with the unit, check the comprehensive Troubleshooting Chart shown below, as sometimes the problems lie within other audio components and their individual settings. Remember to troubleshoot your other connected components and any other electrical/electronic devices that you are using in concert with the DGX-212.
Troubleshooting Karaoke Operations Symptom 11. There's no sound from the microphone Possible Causes * Only HDMI & RCA mix output will support Karaoke Output. See page 6. * You need to adjust the volume of microphone. 12. There's feedback and screeching * The microphones are too close to the speakers. Video 13. Screen is black & white, wavey, or * Use the P/N button from remote to switch between NTSC contains static. and PAL. Press P/N then ENTER. USB or SD card devices 14.
Safety Warnings & Precautions FOR CANADA/POUR LE CANADA Caution: To prevent electric shock, match the wide blade of the plug to the wide slot, and fully insert. Attention: Pour eviter les chocs electriques, introduire la lame la plus large de la fiche dans la borne correspondante de la prise et pousser jusquau fond.
Safety Warnings and Precautions 10. Refer all servicing to qualified service personnel. Servicing is required when the unit has been damaged in any way, such as when the power-supply cord or plug is damaged, liquids have been spilled or objects introduced into the enclosure, the device has been exposed to rain or moisture, the product does not operate normally or it has been dropped. 11.
Information SPECIFICATIONS Power Source 100V-240V~, 50/60Hz Power Consumption 14W Video HDMI(720p/1080i/1080p),Component (Y, Cb, Cr), Composite Video, Choice of Screen Ratio (16:9/4:3), PAL/NTSC Disc Compatible, Progressive Scan (500-p) Audio Output level: 0Vrms~1.5Vrms DA Converter: 24 bit, Frequency Response: DVD (PCM 96Khz): 2~44Khz(+/- 0.5 dB) S/N ratio: 100 dB (DVD), above 98dB (CD), Total Harmonic Distortion: 0.003% Operating Temp +5~+38 deg.