LINE IN LINE IN DVD DVD POWER ON REC MP3+G MP3+G REC USB SD/MMC MP3+G Recording MINI SD DGX-108 Disc Playback ENTER RETURN 1 2 3 4 5 6 7 8 9 0 L/R VOL- VOL + Multi - Karaoke Player with Digital Recording SD/MMC MINI SD MIC1 MIC2 VOL1 VOL2 ECHO BASS Playback OFF DGX-108 Multi-Function Karaoke Player With Digital Recording LI E TE EQ U M M U AR C LE EP RA ST OG EA T ET EN D L VO FA V D G X- 10 8 R EC O R D R ET U TO R LI N ST M EN
Warnings, Cautions and Others Mises en garde, precautions et indications diverses For Canada/Pour le Canada CAUTION CAUTION: TO PREVENT ELECTRIC SHOCK, MATCH WIDE BLADE OF PLUG TO WIDE SLOT,AND FULLY INSERT. ATTENTION: POUR EVITER LES CHOCS ELECTRIQUES, INTRODUIRE LA LAME LA PLUS LARGE DE LA FICHE DANS LA BORNE CORRESPONDANTE DE LA PRISE ET POUSSER JUSQUAU FOND. RISK OF ELECTRIC SHOCK DO NOT OPEN CAUTION: TO REDUCE THE RISK OF ELECTRIC SHOCK. DO NOT REMOVE COVER (OR BACK).
Important Safety instructions 1. Read These Instructions. 2. Keep These Instructions. 3. Heed All Warnings. 4. Follow All Instructions. 5. Do not use this product near water. 6. Clean only with dry cloth. 7. Do not block any ventilation openings. 8. Do not install near any heat sources such as radiators, heat register, stoves, or other apparatus (including amplifiers) that produce heat. 9. Do not defeat the safety purpose of the polarized or grounding-type plug.
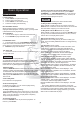
A cesonic DGX-108 Table of Contents Before Operation Included Accessories Playable Media.................................. . 2 Handling and Cleaning..........................2 Front Panel Functions...........................3 Back Panel Functions............................3 Remote Functions..............................4-5 Player Connections...............................6 Please check that you have all of the following accessories supplied to you.
Before Operation Playable Media Handling and Cleaning of Discs This unit supports the following disc formats: *DVD, MPEG-4, Video CD, Video CD 2.0 *CD+Graphics, Audio CD, HDCD, DTS CDs *MP3, WMA, JPEG, Kodak, MPEG Handling *At anytime, when handling discs, always hold them from their edges and/or by the circle in the center. *NEVER write on the any surface of the disc for it may render the disc unreadable. *Store discs in a clean and dry environment.
FRONT PANEL FUNCTIONS AND OPERATION: 4 5 3 6 7 8 9 11 12 13 14 15 16 10 18 17 DGX-108 2 LINE IN DVD MP3+G LINE IN DVD MP3+G REC REC SD/MMC Disc Playback MP3+G Recording MINI SD ENTER RETURN 1 POWER ON USB SD/MMC 1 2 3 4 5 19 9 0 L/R MIC1 20 MIC2 VOL1 21 13. VOL- VOL + VOL2 ECHO BASS TREBLE 22 23 24 STOP - Stops/ends playback. 14 . SKIP BACKWARD - Skips to the beginning of the current or previous track if pressed twice. 15.
1. CUE BUTTON - Switching between karaoke mode and DVD Mode . In Karaoke mode,Player will pause after one track finished . In DVD Mode, all tracks will be played continually.*Karaoke mode = Cue ON. DVD mode= Cue OFF. 2. EJECT - Used open and close tray door. 3. USB PORT SWITCH BUTTON - In DVD Input,switch to USB PORT Mode 4. DVD DISC - Switch to DVD mode. 5. TITLE BUTTON - DVD title has an indication number which makes it easy to locate chapters. 6.
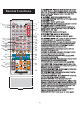
26. A-B BUTTON - A-B REPEAT allows you to repeat a segment of a track until stopped. To use this function: 1.Set a starting point A. 2.Set an end point B. Afterwards, the unit plays from A to B. 3. Press A-B again, till A-B disappears. Remote Functions 27. TITLE BUTTON - Used in DVD mode to go to the menu . 1 2 CUE 3 5 VIDEO 6 SD CARD USB PORT DVD DISC DVD 1 2 3 4 MP3G 5 6 7 8 LINE IN 28. CLEAR BUTTON - Used t o delete programmed track. 29.
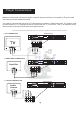
Player Connections Make sure all power is disconnected from each component before connecting. Plug all cords securely to prevent unwanted noise. You cannot connect this player to a TV that does not contain a video input jack. The player must be connected to a TV or amplifier that is connected to a TV or monitor. The TV or amplifier must also contain audio input jacks (left and right channel). If you wish to use this player in karaoke mode, you must have your player connected as the picture below.
Basic Operation To Advance Or Reverse Playback While Viewing During playback on DVDs and VCDs, press FAST FORWARD >> or FAST BACKWARD << on the remote unit. You can select from 2 times, 4 times, 8 times, 20 times the normal playback speed. Basic Playback Loading A Disc 1. Press EJECT to open the disc tray. 2. Place a disc in the disc tray. 3. Press EJECT to close the disc tray. 4. The Disc will play automatically NOTE *During forward or reverse, the sound will be muted.
Basic Operation INFORMATION: Pressing DISPLAY button can display playback time and disc information on the screen. Press DISPLAY button repetitively can change the display mode including count up, count down and cancel. USB port and operation You can play your own video and audio files(supports MP3,WMA, MPG, AVI, JPEG and VCD formats) stored in external memory devices(e.g., flash drive, card reader, external hard drive) by connecting any one of such devices to USB port on DGX-108.
Basic Operation FRAME-BY-FRAME PLAY: Every time when STEP button is pressed a frame of video will be displayed. Press PLAY button to switch the player to normal play mode.*Does not work on CDG Browsing mode: Press VIEW button to enter browsing mode. The system will play the first 15 seconds of each item by order automatically, and the disc information will be displayed on the screen. Fast Forward: Press will search backward rapidly and press will search forward rapidly. The max rate can be 20 times.
Basic Operation 3.Insert the MP3+CDM files into the “MP3G” folder or any folder you create. DIGITAL RECORDING The DGX -108 allows user to record themself singing. Follow the steps below to record. 1.Insert a SD Card into the MP3+G Recording slot. 2.Play any karaoke song from the disc tray, USB drive, SD Card or other audio source from the Line In input. 3.Push the RECORD button. You know it is recording when the REC LED blinks red. 4.Push the RECORD button or RETURN button to stop recording. 5.
Basic Operation MP3+G Mode MP3+G mode allows a user to record and playback the recorded file. Push the MP3+G button to go into MP3+G mode. *In MP3+G Mode, you can’t play MP3+G file directly. But, you can use the converting software (come with the machine) to convert MP3+G to MP3+CDM. Preparation There are 3 folders you need to create in the SD Card in order for it to work properly. You need to create the “REC”, “Favorite” and “MP3G” folders.
Basic Operation-System Setup Turning on/off the player 4. Select a desired Video Output: Select an Video Output according to your equipment setup. Press POWER button on the front panel of the unit to turn on the player. There is no POWER button on the remote control. Once the power is on, you will see the Ace Karaoke logo. Initial Setup Once you have the unit connected and powered on, you may want to change the settings in the player according to your preferences.
3. Menu Language : Press SETUP then select LANGUAGE SETUP and go to the MENU LANG. Move to the language of your choice and press ENTER. 8.Default: Change back to manufacture setting. 11 9.Resume: Basic Operation-Audio Setup 1. Select a desired Audio Output: Select an Audio Output according to your audio connection. To cancel COAXIAL or OPTICAL connection, use SPDIF/OFF. Basic Operation-Language Setup 1. Select the language for On-Screen-Display (OSD): The default OSD language is English.
3. Hue Set the Hue of the video: +color to increase red color, -color to increase green color 4.Saturation- Set the degree of the saturation of the video. 4. Rear Delay: You can adjust the rear speaker delay according the position of your rear speaker. 5. Font: Change the font to large or samll. Basic Operation-Speaker Setup Basic Operation-Digital Setup 1. Downmix: Switch the audio output from LT/RT Mono, STEREO,VSS and 5.1 CH mode.
Programing Tracks Advanced Operations By programing tracks, you can play up to 99 tracks in any order. You may also repeat tracks. 1. To program tracks Press PROGRAM. 2. Using the NUMERIC KEYS 0-9, enter the desired track number. 3. Press PLAY to start playback of programed tracks. 4. To end the program playback, press STOP. If you wish to clear the programmed tracks, press STOP twice.
Advanced Operations Audio & Video Playback How to adjust Language And Sound. Audio and Video File Playback This unit can play MP3, JPEG, MPEG, MPEG-4 and WMA files that are recorded onto CD-R/RW, DVD±R, and DVD±RW. Some DVD±R/RW media composed as multi border (multi-session) may not be compatible with the player. Selecting Subtitle Language Some DVD Video discs contain more than one subtitle language. You may select any of the desired languages that are available. 1. During playback, press SUBTITLE.
Trouble Shooting Incorrect operations are often mistaken for trouble and malfunctions . If you suspect that something is wrong with the unit, check the list below. Sometimes, the troubles lie within another component. Remember to try inspecting other component and electrical appliances in use. If the trouble cannot be rectified even after exercising the steps listed below, call our Acesonic service center 626-820-0670 to inquire about repairs.
Trouble Shooting Karaoke Operations 11. There is no sound from the microphone. *You need to connect the amplifier to the Karaoke Output jacks. *You need to press Karaoke Button to enable Karaoke Mode. 12. There is feedback and stretching. *The microphones are too close to the speakers. Video 13. Screen is black & white, wavy or contains static. *Used the P/N button from remote to switch between NTSC and PAL. Press P/N then ENTER. MP3 + G 14.
SPECIFICATION & CONTACT INFO.
ACESONIC LIMITED WARRANTY WARRANTY PROCEDURE TO VALIDATE YOUR WARRANTY: Fill out the attached warranty card, be sure to include the model and serial number of the unit since this is how warranties are tracked. If your Acesonic product was purchased in the U.S., mail the completed card directly to Acesonic within 10 days from the date of purchase. If you purchased the product outside the U.S . you must file your warranty registration card with the Distributor in that country.
LIMITED DOMESTIC WARRANTY ACESONIC WARRANTS ALL PRODUCTS PURCHASED IN THE U .S . AGAINST DEFECTS IN MATERIAL OR WORK MANSHIP FOR A PERIOD OF ONE(1) YEAR FROM THE INITIAL DATE OF RETAIL PURCHASE FROM AN AUTHORIZED ACESONIC DEALER, OR, ONE(1) YEAR FROM THE DATE OF MANUFACTURE IF PROOF OF PURCHASE DATE IS NOT AVAILABLE. This limited warranty extends to all purchasers or owner of the product during the warranty period beginning with the original retail purchase.