Professional DSP Karaoke Mixer USER’S MANUAL v2 KM-360 CAUTION: To assure this player will work at its best, please read this user’s manual carefully before operation and keep for future reference. Acesonic Corp. City of Industry CA,U.S.A Sale:(626)820-0645 Tech. Support:(626)820-0670 www.acesonic.
Warnings, Cautions and Others Mises en garde, precautions et indications diverses FCC INFORMATION (U.S.A.) 1.This equipment has been tested and found to comply with the limits for a Class B digital device, pursuant to part 15 of the FCC Rules. These limits are designed to provide reasonable protection against harmful interference in a residential installation.
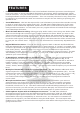
` Important Safety instructions 1. Read These Instructions. 2. Keep These Instructions. 3. Heed All Warnings. 4. Follow All Instructions. 5. Do not use this product near water. 18. Overloading Do not overload wall outlets, extension cords, or integral convenience receptacles as this can result in a risk of fire or electric shock. 19.
Inedex Table of Contents 1.Features --------------------------------------------------------------------Page 2~3 2.Remote Control ------------------------------------------------------------Page 4~5 3.Front Panel View -------------------------------------------------------------Page 6 4.Rear Panel View --------------------------------------------------------------Page 7 5.System Setup---------------------------------------------------------------- Page 8 6.
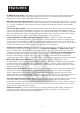
FEATURES Feedback Eliminator - KM-360's real-time feedback eliminator processor was designed to provide state-of-the-art feedback elimination processing, while maintaining a simple control interface. You just select one of the 3 room sizes and it will automatically filter out howling feedback noise from the speakers. This is a necessary function for any venue that is looking for a professional sound environment or any KJ who are looking to prolong your speakers' life.
FEATURES S/PDIF Digital Input - KM-360 has a coaxial input to carry digital audio signals from your player to the mixer. Using the S/PDIF connector, you can send the purest audio signal to the mixer without any RF interference noise. RS-232 Serial Port PC Interface - KM-360 has a serial port for PC connections. You can control all functions of the KM-360 mixer using either 1) pre-bundled Windows™ software or 2) serial commands. This powerful feature makes the KM-360 a perfect PC karaoke companion.
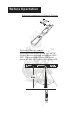
Before Opertation Batteries installation of Remote Control Remote Control usage: Remote control will send out an IR signal as a command to control KM360.
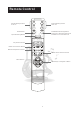
Remote Control Preset Memory Button #1 & #3 Preset Memory Button #2 & #4 Mute Button Feedback Eliminating Button. There are 3 different effect level and OFF to turn the effect off.
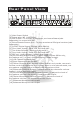
Front Panel View 1 2 3 4 5 6 7 8 INPUT 15 16 9 10 11 12 13 14 FB-EX 17 18 [1]Microphone Volume Control- for #1 & #A(rear) [2]Microphone Volume Control- for #2 & #B(rear) [3]Memory- Use these buttons to recall preset effect settings, to save preferred effect settings, or to reset to default settings.
Rear Panel View 1 2 3 4 5 6 7 8 9 10 11 12 13 14 15 16 17 18 [1] Main Power Switch [2] Power plug (AC 110V/50Hz) [3] Rs232 Port - To connect to computer, and use software(sale separately) to control KM-360. [4] Extra Remote Sensor port - To plug an external IR signal receiver(sale separately). [5] S/PDIF Digital Input (PCM 44.
System Setup Surrounding Speakers Front Left/Right Speakers Microphones Computer Power Cable Professional Amplifier S/PDIF Digital Input External IR Senser AUDIO L R VIDEO OUT AUDIO AUDIO OUT Power Subwoofer or Amplifier + subwoofer DVD/VOD Television Professional Amplifier 8
Operation Power on KM-360 Plug the power cable, and press the power switch in Pic#1; Power indicator at front panel will turn on, the LED screen shows KARAOKE(Pic#2). Then machine will do an auto detecting from all the inputs(Pic#3). When machine ready to work, Display will show like Pic#4, Mic means microphone volume, E stands for Echo volume, Music means music volume.
Music Menu Operation Music EQ Setting: KM-360 allows to customize the EQ setting in following frequencies: 10KHz/3300Hz/1000Hz/330Hz/100Hz/60Hz Remote Use Up/Down buttons to find the EQ frequency Use Left/Right buttons to adjust the value FL SCART SL SR Key Control: To change music tone for karaoke purpose: Use & buttons to change music keys INPUT FB-EX Down Up To reset the key control, press INPUT / button. Down Reset Up FB-EX LED display message: If key changes while song playing.
Music Menu Operation Subwoofer Reducer: This function helps you reduce subwoofer volume when you are singing. This dynamic comes handy when a singer has low vocal range. Select “Subwoofer Reducer” from Music menu. Use parameter buttons to adjust the level(1~20).
Music Menu Operation Music Auto Level Setup: When playing audio tracks, some songs are louder than others even though the volume of your system remains the same. When you turn on the "Music Volume Auto Leveling" function KM-360 will automatically adjust music to one of the six preset volume level. It boosts the audio signal for audio too low, and if the music is too loud, it will decrease the music volume back to your pre-set volume level. This function will eliminate lots unnecessary adjustment for KJs.
Music Menu Operation Center Channel Setup: There are three center channel modes: Microphone/ Music/ Mic.+Muisc 1. Microphone mode: only microphone signal will be the audio output 2. Music mode: only music signal be the audio output 3. Mic.+Music mode: audio output will be the mixed from both mic. & Music. Surrounding Volume setup: You can use this function to change the audio signal(-10dB~+10dB) of the surrounding audio outputs.
Microphone Menu Operation Microphone Preset Max Volume: Presetting a max microphone volume to prevent uncomfortable microphone noise while unappropriated using. Remote Select “Max Mic volume” from MIC MENU buttons, then use parameter buttons to change the preset microphone max volume. Select “microphone setup” from menu, go into Max mic volume to change setting. LED screen display Mic Volume +40 Microphone Effect Volume: Use to adjust microphone effect volume.
Microphone Menu Operation Reverb Time Setting: A reverb is created when a sound is produced in an enclosed space causing a large number of echoes to build up and then slowly decay. Reverb is most noticeable when the sound source stops but the reflections continue, decreasing in amplitude, until they can no longer be heard. Reverb time means the length of the reverb effect.
Microphone Menu Operation Echo Delay Setting: Echo delay function is used to adjust the echo delay timing, range from 0~250ms. You can adjust Echo Delay L and Echo Delay R separately to enhance the stereo sound effect. Remote Up/Down buttons to select “Echo Delay R” or “Echo Delay L” Left/Right buttons to adjust volume. Select “Echo Delay L” or “Echo Delay R” LCD screen display Echo Delay 180 Microphone EQ Setting: 5 bands equalizers settings:100Hz/300Hz/911Hz/2.7KHz/8Khz.
Other Operation Preset Memory Recall: 4 preset effect settings allow you to store your favorite effect settings. 4 preset memory store factory default effect setting. INPUT FB-EX INPUT To store/renew your own setting. To press “Down” button of parameter for about 2 seconds, the LCD screen will shows “SAVE to ?”, then press any of M1~M4 buttons on the remote to assign the memory number to store the settings. FB-EX INPUT FB-EX To reset the settings to default settings.
Menu Operation Music Menu Center channel volume control C Volume Subwoof Max Volume Music Volume Subwoofer volume control Preset max music volume control Subwoof Reducer Reduce low frequence while singing Subwoof LPF Low frequence filter Music Auto Level Music Vocal Voice cancellation of multiplex tracks Surrounding sound volume control S Volume Surround Music Digital Auto level the music loudness Sel Surrounding out selection(vocal,music or both) Left/Right channel music volume balanci
Trouble shooting If you are having problems operating the KM-360, or suspect something is wrong with the unit, please check the troubleshoot list below to see if the issue is a result of incorrect operation rather than equipment malfunction. If you are still unable to resolve the problem, please contact our Acesonic tech.