
Installation Guide
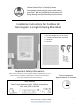


Installation Instructions for Cordless GII
Morningstar 1-in. Light Filtering Mini Blind
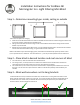
Step 1 – Determine mounting type: inside, ceiling or outside
Step 2 – Place blind in desired location and mark corners of blind
Step 3 – Mark wall area where not to hang brackets
x x
x
x
There are three options for hanging:
1. Inside mount will allow the blind to fit inside the window frame and will be installed using the bracket’s top
screw holes into the underside of the window frame.
2. Ceiling mount will allow the blind to hang in front of the window frame from the ceiling and will use the
bracket’s top screw holes.
3. Outside mount is typically chosen when there is not a traditional window frame. The blind will be installed
into the wall above the window casing, using the bracket’s back screw holes.
Measure the width of your desired hanging option, this blind will fit windows 3/8” (0.95 cm) smaller and ½”
(1.27 cm) wider than it’s stated size. This actual blind is ½ “ (1.27 cm) narrower/smaller than the stated size.
Tilt blind forward to see top of head rail and mark wall, window frame or ceiling with the location of the
blind’s internal components. Place an X in this area. For proper operation of the blind, the brackets must
be outside this area. Please note, the brackets will not fit securely into place if they are installed in the
same area as the inside components of the blind.
Achim Home Décor: 1-800-54-ACHIM
Customerservice@achimonline.com
2
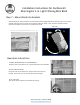
1. 2. 3.
1. For inside mount, mark the underside of the window frame.
2. For ceiling mount, use a tape measure to measure the thickness of the window frame and mark an
equal distance from the wall as well as the corners of the blind on the ceiling.
3. For outside mount, use a level to help ensure that the blind is completely level and mark the corners of
the blind. You can also use a tape measure to make sure the blind is perfectly centered above your
window.