
Installation Instructions

INSPIRE COLLECTION FLOOR PLANKS
INSTALLATION INSTRUCTIONS
Achim’s Family of Home Furnishings
www.achimonline.com
Customer Service # 1.800.54.ACHIM
CustomerService@Achimonline.com
2. To Begin
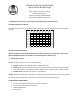
You must determine the center point of your room. Measure the center points of opposite walls and
secure a chalk line from one to the other. Snap the line. Repeat the process with the other set of
opposite walls. The point at which the chalk lines intersect is the room’s center. (Figure 1)
3. Plank Installation
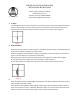
Starting at the center point as shown in Figure 1, peel off the protective paper and carefully align the
plank with the chalk line markings. Press down firmly.
(Caution: the plank’s protective paper covering is very slippery. To avoid accidents, do not leave the
paper on the floor after you’ve peeled it from the plank.)
Moving along the chalk line, abut each plank squarely and as tightly as possible. Without going
directly against the wall initially, form a pyramid shape as shown in Figure 2.
Do not install planks to the edges of the room until the main floor area has been covered.
4. Cutting Planks
Planks should be cut with a straight edge and utility knife. Cut edges should face the wall. If possible,
slide cut edges under wall molding.
To fit planks around irregularly shaped objects, make a pattern of the exposed area with a sheet of
paper. Use the paper cut-out as a template. Placing the paper cut-out on the front side of the plank,
trace the contours of the paper onto the plank. Cut around the marked contours.