Bitporter User Guide UG004 v5.1.1 – June 18, 2013 www.achronix.
Copyright Information Copyright © 2008–2013 Achronix Semiconductor Corporation. All rights reserved. Achronix is a trademark, and Speedster, RadRunner, and picoPIPE are registered trademarks of Achronix Semiconductor Corporation. All other trademarks are the property of their respective owners. All specifications subject to change without notice. NOTICE of DISCLAIMER: The information given in this document is believed to be accurate and reliable.
WARNING! Read Before Using Bitporter Never apply power to the target board without the Bitporter pod turned on. The Bitporter pod must always be powered if the connected target board is powered. Always supply power to the Bitporter pod first before supplying power to the target board. Always power down the target board before powering down the Bitporter pod. When power-cycling the Bitporter pod, leave it turned off for at least five seconds.
Table of Contents Preface ‐ ‐ ‐ ‐ ‐ ‐ ‐ ‐ ‐ ‐ ‐ ‐ ‐ ‐ ‐ ‐ ‐ ‐ ‐ ‐ ‐ ‐ ‐ ‐ ‐ ‐ ‐ ‐ ‐ ‐ ‐ ‐ ‐ ‐ ‐ ‐ ‐ ‐ ‐ ‐ ‐ ‐ ‐ ‐ ‐ ‐ ‐ ‐ ‐ ‐ ‐ ‐ ‐ ‐ v About this Guide ‐ ‐ ‐ ‐ ‐ ‐ ‐ ‐ ‐ ‐ ‐ ‐ ‐ ‐ ‐ ‐ ‐ ‐ ‐ ‐ ‐ ‐ ‐ ‐ ‐ ‐ ‐ ‐ ‐ ‐ ‐ ‐ ‐ ‐ ‐ ‐ ‐ ‐ ‐ ‐ ‐ ‐ ‐ ‐ ‐ ‐ ‐ ‐ ‐ ‐ ‐ ‐ ‐ ‐ ‐ v Reference Documents ‐ ‐ ‐ ‐ ‐ ‐ ‐ ‐ ‐ ‐ ‐ ‐ ‐ ‐ ‐ ‐ ‐ ‐ ‐ ‐ ‐ ‐ ‐ ‐ ‐ ‐ ‐ ‐ ‐ ‐ ‐ ‐ ‐ ‐ ‐ ‐ ‐ ‐ ‐ ‐ ‐ ‐ ‐ ‐ ‐ ‐ ‐ ‐ ‐ ‐ ‐ v Conventions Used in this Guide ‐ ‐ ‐ ‐ ‐ ‐ ‐ ‐ ‐ ‐ ‐ ‐ ‐ ‐ ‐ ‐ ‐ ‐ ‐ ‐ ‐ ‐ ‐ ‐ ‐ ‐ ‐ ‐ ‐ ‐ ‐ ‐ ‐ ‐ ‐ ‐ ‐ ‐ ‐ ‐ ‐ ‐ ‐ v Ch
Ethernet Connection Errors: ‐ ‐ ‐ ‐ ‐ ‐ ‐ ‐ ‐ ‐ ‐ ‐ ‐ ‐ ‐ ‐ ‐ ‐ ‐ ‐ ‐ ‐ ‐ ‐ ‐ ‐ ‐ ‐ ‐ ‐ ‐ ‐ ‐ ‐ ‐ ‐ ‐ ‐ ‐ ‐ ‐ ‐ ‐ ‐ ‐ ‐ ‐ ‐ ‐ 22 Chapter 4 – Using the Achronix STAPL Player ‐ ‐ ‐ ‐ ‐ ‐ ‐ ‐ ‐ ‐ ‐ ‐ ‐ ‐ ‐ ‐ ‐ ‐ ‐ ‐ ‐ ‐ ‐ 23 Introduction ‐ ‐ ‐ ‐ ‐ ‐ ‐ ‐ ‐ ‐ ‐ ‐ ‐ ‐ ‐ ‐ ‐ ‐ ‐ ‐ ‐ ‐ ‐ ‐ ‐ ‐ ‐ ‐ ‐ ‐ ‐ ‐ ‐ ‐ ‐ ‐ ‐ ‐ ‐ ‐ ‐ ‐ ‐ ‐ ‐ ‐ ‐ ‐ ‐ ‐ ‐ ‐ ‐ ‐ ‐ ‐ ‐ 23 Location ‐ ‐ ‐ ‐ ‐ ‐ ‐ ‐ ‐ ‐ ‐ ‐ ‐ ‐ ‐ ‐ ‐ ‐ ‐ ‐ ‐ ‐ ‐ ‐ ‐ ‐ ‐ ‐ ‐ ‐ ‐ ‐ ‐ ‐ ‐ ‐ ‐ ‐ ‐ ‐ ‐ ‐ ‐ ‐ ‐ ‐ ‐ ‐ ‐ ‐ ‐ ‐ ‐ ‐ ‐ ‐ ‐ ‐ ‐ ‐ 23 Standalone ‐ ‐ ‐ ‐ ‐ ‐ ‐ ‐
Preface About this Guide This guide provides details about device programming using output from the Achronix CAD Environment (ACE), starting with an existing bitstream contained in a .jam file, through to downloading and device configuration. This guide consists of the following chapters: Chapter 1 – “Configuration Overview” provides an overview of configuring Achronix FPGAs. Chapter 2 – “Software and Driver Install” details the installation of the Bitporter USB drivers and the Achronix STAPL player.
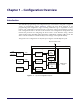
Chapter 1 – Configuration Overview Introduction The embedded programming and configuration logic in the FPGA is designed to support a variety of programming options. Figure 1‐1 outlines the basic block diagram of the programming and configuration logic, including additional logic to implement security features. The configuration management unit controls the startup and shutdown sequence from configuration mode to the user mode and back.
JTAG Configuration using the Bitporter Pod Configuration Overview JTAG Configuration using the Bitporter Pod The Bitporter pod (Figure 1‐2) connects between a host PC via either a 10/100 Ethernet or USB 2.0 connection and a JTAG‐compliant connector on the target system. When connected, the Bitporter pod supports device configuration and debug, along with flash memory programming. Note: USB 1.0 and 1.1 are also supported, but discouraged for performance reasons.
Configuration Overview Minimum Hardware Requirements • For acx_stapl_player with Ethernet‐connected Bitporter pods: Red Hat Enterprise Linux Release 5 and 6, 32‐bit and 64‐bit CentOS 5 and 6, 32‐bit and 64‐bit Microsoft Windows XP Professional SP3 32‐bit Microsoft Windows 7 Pro SP1 64‐bit Note: Other versions of Linux and Windows may work, but are unsupported. Minimum Hardware Requirements • Pentium‐class PC with a minimum of 512 MB of memory (2 GB for Windows 7) • A USB 2.
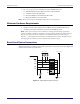
Board-Level Device Connections Configuration Overview Top View PCB Side View PCB 2.54 mm 5.84 mm 1 2 0.64 mm 2.54 mm 13 14 Note: Pin 12 removed to allow for key. ug004_c01_04_v01 Figure 1-4: JTAG Header Mechanical Specifications PAGE 4 www.achronix.
Chapter 2 – Software and Driver Install Introduction Prior to device configuration, both the STAPL player (acx_stapl_player), and (if USB connectivity is desired) the USB drivers for the Bitporter pod must be installed on the host system. There are two ways to install the STAPL player and optional Bitporter USB drivers: • As a standalone command‐line bitstream loading tool. (Useful in a lab environment, this contains no graphical component.) • As part of the ACE software suite.
Standalone STAPL Player and USB Driver Install 2. Software and Driver Install Select the desired language from the pull‐down menu of the Installer Language dialog box (Figure 2‐1) and click OK to open the Achronix STAPL Player Setup wizard. UG004_c02_01_v01 Figure 2-1: Installer Language Dialog Box 3. From the wizard, click Next > to open the License Acceptance dialog box. UG004_c02_02_v01 Figure 2-2: Achronix Stapl Player Setup Wizard PAGE 6 www.achronix.
Software and Driver Install Standalone STAPL Player and USB Driver Install 4. From the License Agreement dialog box (Figure 2‐3), review the license, then click I Agree. UG004_c02_03_v01 Figure 2-3: License Agreement Dialog Box 5. From the Choose Components dialog box (Figure 2‐4), select the desired components to install. Click Next > to continue. UG004_c02_04_v01 Figure 2-4: Choose Components Dialog Box Bitporter User Guide www.achronix.
Standalone STAPL Player and USB Driver Install 6. Software and Driver Install From the Choose Install Location dialog box (Figure 2‐5), set the desired destination folder by either typing the path under Destination Folder or using the Browse button to navigate to the desired location. Click Next > to continue. UG004_c02_05_v01 Figure 2-5: Choose Install Location Dialog Box PAGE 8 7.
Software and Driver Install Standalone STAPL Player and USB Driver Install 9. Once the install completes, click Close from the final dialog box (Figure 2‐6). UG004_c02_06_v01 Figure 2-6: Completing Install Linux After locating the standalone STAPL player installer (standalone_acx_stapl_player.tgz) on the development CD (or after downloading it from the Achronix web site), extract and install the software to the desired installation directory.
ACE, the STAPL Player, and USB Bitporter Drivers Software and Driver Install After the installation completes, the script ends with the following message: Bitporter USB driver, version x.y.z, installed. Note: Linux USB Bitporter connections are currently only supported on CentOS 5 and 6 or RHEL 5 and 6. Other Linux releases are not supported by Achronix, but may work if they include udev.
Software and Driver Install ACE, the STAPL Player, and USB Bitporter Drivers Linux In Linux, the USB driver installation script is found in the same directory as the acx_stapl_player itself. To install the Bitporter USB driver in Linux (after the prerequisite 32‐bit shared libraries are present, as mentioned in the above note): 1. Change to the directory containing the acx_stapl_player % cd ace_install_dir/system/cmd 2.
Chapter 3 – Connecting the Bitporter Pod Introduction Choosing a Connection Type — USB versus Ethernet Ethernet • Ethernet‐connected Bitporter pods are visible from multiple PCs at once: • However, users can overwrite each otherʹs programs. The Achronix acx_stapl_player/Bitporter programming system does prevent multiple users from programming the device simultaneously but does not ensure that the con‐ nected hardware is not already mid‐test. Such test queueing is left up to the user.
Connecting the Bitporter Pod Connecting the Bitporter Pod The Bitporter chooses between its Ethernet interface and its USB interface based solely upon whether DC power is being provided at the “+5V DC” jack. If DC power is being provided, then only the Ethernet interface is active, and the USB interface is ignored by the pod, even if no Ethernet cable is plugged in.
Connecting the Bitporter Pod Connecting the Bitporter Pod ug004_c03_01_v01 Figure 3-1: Found New Hardware Wizard 7. At the next window of the wizard (Figure 3‐2), select Install the software automatically (Recommended), followed by Next >. ug004_c03_02_v01 Figure 3-2: Found New Hardware Wizard PAGE 14 www.achronix.
Connecting the Bitporter Pod Connecting the Bitporter Pod 8. After the wizard has found the Bitporter firmware loader, at the Windows Logo test‐ ing warning window, click Continue Anyway. ug004_c03_03_v01 Figure 3-3: Windows Logo Testing Warning Window 9. At the final wizard window (Figure 3‐4), click Finish to complete the driver install. ug004_c03_04_v01 Figure 3-4: Completing the Found New Hardware Wizard Bitporter User Guide www.achronix.
Connecting the Bitporter Pod Connecting the Bitporter Pod The wizard appears twice during the install: once for the Achronix Bitporter Firm‐ ware Loader and then again for the Achronix Bitporter Pod drivers. The first driver downloads firmware to the Bitporter pod; the second driver connects to the pod for JTAG operations. If not prompted to install these drivers the first time the Bitporter is connected to a USB port, unplug the USB cable, then reboot the host PC.
Connecting the Bitporter Pod Disconnecting the Bitporter Pod By default, all Bitporter pods are set up to use DHCP negotiation the first time they are plugged into an Ethernet network. Since the pod stores its Ethernet configuration in flash memory, the Ethernet configuration typically only needs to be performed once. Note: Only pods on the same subnet (without an intervening router) can be automatically detected by STAPL player (see the -q option, Table 4‐1, page 24).
Power Cycling the Bitporter Pod (and Connected Target Hardware) Connecting the Bitporter Pod 2. Disconnect the JTAG ribbon cable. 3. Disconnect the USB cable for USB‐connected pods, or the Bitporter’s DC power cable for Ethernet‐connected pods. Power Cycling the Bitporter Pod (and Connected Target Hardware) Important! An unpowered Bitporter must never be connected to powered target hardware, or the Bitporter may be damaged.
Connecting the Bitporter Pod Handling Multiple Pods Connected to the Same PC contains elements of Jam STAPL Player Version 2.5 (20040526) Copyright (C) 1997-2004 Altera Corporation ****************************************** * Attempting to find all reachable pods: * ****************************************** Attempting to auto-detect Bitporter pods (USB pods and Ethernet pods on this subnet)... ...autodetection found 3 pods.
Bitporter Connection Errors Connecting the Bitporter Pod Note: The -q command‐line option can be used to list all the pods currently detected by acx_stapl_player, including their current availability (see Table 4‐1, page 24).‐ Bitporter Connection Errors General Connection Errors: Below is a listing of possible error messages that can occur during pod setup or pod operation: “Attempting to auto-detect Bitporter pods (USB pods and Ethernet pods on this subnet)... found 0 pods.
Connecting the Bitporter Pod Bitporter Connection Errors “Unknown Bitporter pod SDK error code! Unable to decode. (-2130669553)” The full error message, usually mixed in with some other PROGRAM ERROR messages: PROGRAM ERROR: Error detecting local Bitporter pods: Unknown Bitporter pod SDK error code! Unable to decode. (-2130669553) Most of the time, if this is reported it means both the Bitporterʹs USB cable and the dedicated DC power cable are connected to the Bitporter.
Bitporter Connection Errors Connecting the Bitporter Pod “USB read error. ” The Windows driver returned an error from a read operation. The Windows error text follows. This error can occur if the unit is powered down or unplugged during operation. “USB write error. ” The Windows driver returned an error from a write operation. The Windows error text follows. This error can occur if the unit is powered down or unplugged during operation.
Chapter 4 – Using the Achronix STAPL Player Introduction The Achronix STAPL Player (acx_stapl_player) takes the bitstream output of the Achronix CAD Environment (ACE) in STAPL format, and then runs (or plays) the STAPL program. The program causes the Bitporter pod to pass these commands to the JTAG port of an Achronix FPGA. The STAPL player executable is run from a Windows or Linux command prompt.
Command Syntax Using the Achronix STAPL Player Command Syntax The STAPL player command syntax is: acx_stapl_player [options] [filename] The available command options are listed in Table 4‐1. Note: The option names are not case sensitive. Table 4-1: Supported acx_stapl_player.exe Command Options Option Description -h Displays the help message. -q Displays the availability of Bitporter pods.
Using the Achronix STAPL Player Picking a STAPL Action (-a option) Table 4-1: Supported acx_stapl_player.exe Command Options Option -p Description Specifies, by name, which Bitporter pod should be utilized by the STAPL Player. Optionally, a comma-separated list of pod names (no spaces allowed) may be specified - the Player will use the first available named pod. If none of the specified pods are available, the program exits with an error message.
Picking a STAPL Action (-a option) Using the Achronix STAPL Player Table 4-2: STAPL Actions Generated by ACE Action Name Description READ_IDCODE Returns the IEEE 1149.1 IDCODE of the target device. PROGRAM Programs the device with an unencrypted bitstream.(1) PROGRAM_ENCRYPTED Programs the device with an encrypted bitstream.(1) VERIFY Verifies the programming of the device.(1)(2) ERASE Performs a bulk erase of the device.(1) READ Reads the programming data of the device.(1) Notes: 1.
Using the Achronix STAPL Player Picking a STAPL Action (-a option) Table 4-3: Standard STAPL Procedures used by ACE Procedure Name Description DO_READ_IDCODE Returns the JTAG IDCODE. DO_ERASE Performs a bulk erase of the device. DO_PROGRAM Programs the device. DO_VERIFY Verifies the programming data of the device.(1) DO_READ Reads the programming data from the device.(1) Notes: 1. Only covers core data excluding block RAMs, I/O, SerDes, etc.
Picking a STAPL Action (-a option) Using the Achronix STAPL Player Table 4-5: Procedures Called During READ_IDCODE Procedure name Optional Recommended DO_SKIP_IDCODE_VERIFICATION DO_ENTER_JTAG DO_READ_IDCODE DO_EXIT_JTAG The PROGRAM Action The PROGRAM action erases the contents of the target device and then downloads the userʹs design. The PROGRAM action will only work correctly with non‐encrypted bitstreams, and allows several procedures to be enabled/disabled to aid in debugging.
Using the Achronix STAPL Player Picking a STAPL Action (-a option) The VERIFY Action The VERIFY action verifies that the design contained in the STAPL file is the same design found in the target device, with results reported to the command‐line. The VERIFY action may be run/played when the device is in user mode, or when out of user mode. By default, only core configuration memory is verified, excluding block RAM.
Picking a STAPL Action (-a option) Using the Achronix STAPL Player Core Configuration Memory Output Each core configuration memory address frame contains 16,384 bits of configuration data (512 words of 32 bits), reported by the STAPL player as 128 x 128‐bit blocks for performance reasons. Each 128‐bit block is composed of four 32‐bit words (Figure 4‐1). The LSB of Word[0] is the LSB of the 128‐bit chunk at offset 0 of a given address.
Using the Achronix STAPL Player Connecting to Specific Pods by Name (-p option) [snip] 0000 0013 0000 0012 0000 0011 0000 0017 0000 0016 0000 0015 0000 001B 0000 001A 0000 0019 0000 001F 0000 001E 0000 001D Exiting JTAG programming mode... Exit code = 0...
Querying the Availability of Connected Pods (-q option) Using the Achronix STAPL Player acx_stapl_player -pusb12348,usb12345,net12347 -aREAD_IDCODE quickstart.jam The command returns: Achronix STAPL Player (acx_stapl_player) (c) Copyright Achronix Semiconductor Corp. All rights reserved. contains elements of Jam STAPL Player Version 2.5 (20040526) Copyright (C) 1997-2004 Altera Corporation Attempting to connect to user-specified pod(s): WARNING: User-specified pod "usb12348" not found/not connected.
Using the Achronix STAPL Player Querying the Availability of Connected Pods (-q option) Autodetection Mode To see a list of the pods currently autodetected by acx_stapl_player, run the following at the command‐line: acx_stapl_player -q This command returns to the command‐line a table of the currently detected pods, using the following criteria: • USB‐connected Bitporter pods: Pods connected to the host are listed by name in the first column only if they are currently not in use by another instance of ac
Querying the Availability of Connected Pods (-q option) Using the Achronix STAPL Player With this information, the user would subsequently connect to either usb12345 or net12347, via the -p command‐line option. Querying the Availability of Named Pods There are two typical cases where a user would desire to query the state of specific pods by name: 1. The user wishes to query the availability of a non‐local pod (a Bitporter connected to a different Ethernet subnet than the host running the STAPL Player).
Using the Achronix STAPL Player • Querying the Availability of Connected Pods (-q option) If the podname contained an IP address, and the provided address was for something other than a Bitporter pod, the status will be something like --Protocol error. Make sure that the device at the supplied network address is an Achronix Bitporter probe.--. As an example, we’ll query the status of a handful of pods: usb10000, usb10001, usb20000, net30000, net30001, net30003, net192.168.100.100, net192.168.100.
Configuring the Bitporter Pod's IP address (-i Option) Using the Achronix STAPL Player Configuring the Bitporter Pod's IP address (-i Option) The user may query a podʹs current Ethernet IP configuration with the -iq option, set the configuration to DHCP (Dynamic Host Configuration Protocol) with the -id option, or set a static IP with the -is option. Bitporter Pod MAC Addresses When adding devices to a network, network administrators frequently need to know the MAC address of the device.
Using the Achronix STAPL Player Configuring the Bitporter Pod's IP address (-i Option) ******************************************** * Checking current Ethernet configuration: * ******************************************** Attempting to connect to user-specified pod(s): Successfully opened Bitporter pod usb54321. Current Bitporter IP Configuration: DHCP = on Configuring the Pod for DHCP (Dynamic IP Address) (-id Option) By default, Bitporter pods are configured to obtain their IP address via DHCP.
Programming a Device Using the Achronix STAPL Player Configuring the Pod to Use a Static IP Address (-is Option) Reconfiguring the pod to use a static IP requires contacting the network administrator to determine the required information: • The podʹs new static IP address, example: 192.168.1.123 • The network mask, example: 255.255.255.0 • The gateway IP address, example: 192.168.1.1 Note: Changing the Ethernet IP configuration of a pod requires a USB connection.
Using the Achronix STAPL Player Programming a Device 1. Connect the Bitporter pod to the target systems per Chapter 3 – “Connecting the Bit‐ porter Pod”. 2. Open a command prompt of the host system (In Windows: Start Run, then enter CMD, and click OK; or Start All Programs Accessories Command Prompt). 3. Locate the directory containing the programming file, and then download the bitstream: acx_stapl_player -aPROGRAM -pusb12345 .
Troubleshooting Exit Codes Using the Achronix STAPL Player Troubleshooting Exit Codes There are a variety of things that can go wrong when using the Bitporter, each of which will report an error code and message. For connection and driver‐level errors, see “Bitporter Connection Errors,” on page 20. The rest of the errors will be briefly discussed in this section.
Using the Achronix STAPL Player Troubleshooting Exit Codes For example: ERROR: Expected device not found at expected location. Expected idcode:0011 0000000000000001 01100100000 1 Found idcode: 0000 0000000000000000 00000000000 0 PROGRAM ERROR: Exit code = 6... Unrecognized device There are several potential solutions, depending upon the contents of the Found idcode. • If the found idcode is all 0s, the Bitporter did not find any device at the specified location in the JTAG scan chain.
Troubleshooting Exit Codes Using the Achronix STAPL Player STAPL Player Exit Codes All negative exit codes refer to problems originating in acx_stapl_player itself, not problems reported by the STAPL code. Typically, these will be problems encountered reading and parsing the STAPL file, or problems during communication with the Bitporter pod.
Revision History The following table lists the revision history of this document. Version 1.0 Revision Initial release version. 1.1 • • • • 1.2 • Added the following section to Chapter 4 – “Using the Achronix STAPL Player” : “Troubleshooting Exit Codes,” on page 40. • Fixed various typos and provided additional clarifications and crossreferences to existing content. 2.3.0 Document title changed from ACE Programming Guide to Bitporter User Guide. Added support for Ethernet-connected Bitporter pods.
Version 5.1.1 Revision • • • • • • • • • • PAGE 44 Updated company address Updated copyright and trademarks Added notice “WARNING! Read Before Using Bitporter,” on page ii Deleted the obsolete sections covering the READ_REV_ID and READ_STATE actions under “Picking a STAPL Action (‐a option),” on page 25. Updated various STAPL Action descriptions to reflect changes for 22iHD1000. Updated document to reflect addition of 64-bit Windows and Linux support.