User Manual
User Manual Contents SAFETY INSTRUCTION ........................................................................................................................................................... 1 CHAPTER 1: DVR FEATURES................................................................................................................................................ 2 CHAPTER 2: LAYOUT .............................................................................................................................
User Manual 5.5 RECORD SEARCH ................................................................................................................................................................ 30 5.6 PTZ CONTROL ................................................................................................................................................................... 30 5.7 RECORD ............................................................................................................................
User Manual Safety Instruction 1. Read Instruction All the safety and operating instruction should be read before the equipment is operated. 2. Power sources This equipment should be operated only from the type of power source indicated on the marking label. If you are not sure of the type of power, please consult your equipment dealer. 3.
User Manual Chapter 1: DVR Features Function Brief and Description Real-time Monitoring Double video output, with Monitor or VGA virtual output, support Net-viewer and Mobile Live monitor, and also support zoom in/out, auto sequence and PIP display. Record Function H.
User Manual Chapter 2: Layout 2.1 DVR Front Panel DVR is a short form of Digital Video Recorder. 2.1.1 4-CH DVR Front Panel Item Key title or Indicator 1 Power button 2 Power Indicator 3 IR Receiver 4 HDD Indicator Remark Function & Description Power on/off If the “Green” indicator is on the system is getting power PWR normally. Receives IR signal from Remote Controller When the “Red” indicator flashes it means the hard drive is HDD being read or written to.
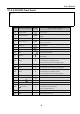
User Manual 2.1.2 8-CH DVR Front Panel pp.jpg Item Key title or Indicator Remark Function & Description 1 Power button Power on/off 2 Power Indicator 3 IR Receiver 4 HDD Indicator 5 SEARCH Record search 6 MUTE Mute on/off 7 CH- Switch to previous channel 8 CH+ Switch to next channel 9 QUAD On live mode, clicking the button will switch to Quad display. 10 REW Move to left; Rewind playing at multiple speeds; Decrease parameter value of image setting.
User Manual 2.2 Rear Panel 2.2.1 4-CH DVR Rear Panel 15.jpg 2.2.2 8-CH DVR Rear Panel 125.jpg Item Physical port Connection method 1 Video input Connect CH1-8 (Virtual) video input device(BNC interface) 2 Video output Connect monitor output (BNC interface) 3 Audio I/O 4CH DVR: 4CH audio input and 2CH output; 8CH DVR: 8CH audio input and 1CH output.
User Manual 2.3 Remote Controller e Key title 1 1-8 2 9、0 Numeric key 3 ALL Multiple display mode 4 Menu 5 ▲ Up direction key, Volume adjust 6 ▼ Down direction key, Volume adjust 7 8 Channel select 1-8; Numeric key Enter into Main menu/Exit ◄/ Left/Down direction key,Decrease/increase parameter value of control bar SEL Select key/Edit key;Confirm the selected operation.
User Manual Chapter 3 DVR INSTALLATION 3.1 HDD Installation Caution: 1. Please do not Install or take out hard drive when DVR is running! 2. Some model has a HDD drawer. Please use provided key to take out the HDD drawer and put HDD into the drawer correctly. HDD Installation: After cutting power, remove screws on two sides of body and on rear panel and open DVR upper cover carefully; Connect data cable and power cord of HDD to main board securely shown as Picture 3-1.
User Manual Chapter 4: DVR Start up 4.1 System Initialization After connecting the Power cable of DVR to wall outlet and pressing the Power button on the front panel, you will enter into the system initializing screen shown as Picture 4-1. Picture 4.2 Live screen After finishing initialization the system will enter into Live screen Picture 4-2 is the 9-split display defaulted by system, which is showing no video input status.
User Manual 5.
User Manual 5.3 Main Menu After clicking right button of mouse, pop-up menu appears on he screen. You can click [main menu] option on pop-up menu mode o enter into Main menu interface (Shown as Picture 5-2). In Main Menu mode, you can control device management settings, such as isplay, Record, Network, Search, Device and System setting etc. Picture 5-2 5.3.1 Display setup Go to [Main menu Camera] to set up the CH name and position for each channel shown as Picture 5-3.
User Manual [Frame rate] include two options – Fixed and Manual. When set to “Manual” and click [Frame rate setup] option, you may allocate the frame rate for each channel. Picture 5-6 [Audio] option allows you turn audio on/off. [Mode] allow you select record modes, including Always and Scheduled. To record 24 hours a day set the [Mode] to Always. To record on motion or a set schedule, select the [Schedule] option. [Pack time] indicates maximum continuous record time (15, 30, 45 and 60 min).
User Manual When selecting PPPoE form the Type, user can input user name and password provided by ISP and set Media and Web port (details please refer to the Picture 5-10). You can visit your DVR via public network without port forwarding when network type is set to “PPPoE” and web port is right.
User Manual above setting. Above steps may differ from the router device depending on the manufacturer. 5.3.4 Record Search Click [Main Menu Record Search] to enter into below window shown as Picture 5-13. Channel: allows you select the channel(s) you desire to search. Time Search: In the Video Search screen, user can search for a specific date and time for a recording and view it in Playback mode. This is useful for hunting a specific recording of an incident if you know the date and time it occurred.
User Manual Note: 1. Backup file will be saved as H264 format; you can playback the recorded files using the Multimedia Player program that comes with the DVR or through the net-viewer program. 2. Please make sure you have connected backup device, such as USB and DVD, well before backing-up. Log Search In the Record Search screen, Click [Log Search] to pop up the Log search screen shown as Picture 5-17(a).
User Manual 3. Select the playback file you desired from the file shown as Picture 5-21. Picture 5-21 Note: Please select the file with *.264 format or *.nvr. The record file backed-up by U flash disk or removable disk is with *.264 format, and DVD Recorder with *.nvr format. 4. Open backup file Double-click the record event at the right side of screen to start record file playback.
User Manual [Forward] button: forward playing the record file at X2, X4, X8 and X16 speeds. [Frame by frame]: Play the record file frame by frame. [Snapshot]: click the button to capture the record image and save the image to a specified position. [Add]: click the button to add one record file [Del]: click the button to delete one record file. [Del all]: click the button to delete all the record files in the event list. 5.3.
User Manual USB FORMAT: Use this option to format USB devices. Note: It is an important first step when configuring your DVR to make sure that the hard drive (HDD) options are correctly set. So, it is strongly recommended that you do format the HDD before start the first record. 5.3.6.2 Alarm Setup Click [Main Menu Device Alarm] to enter into the below window shown as Picture 5-26 (a).
User Manual EMAIL Setup Click [Email Set] to enter into the interface shown as Picture 5-27. Picture 5-27 On the [EMAIL] screen, when Enabling [Email] option, you can set its parameters shown as Picture 5-28. Picture 5-28 SSL: is a security link transport protocol. You can encrypt your communication info (including your email) using SSL to prevent hackers from monitoring your email or communication info and even your password. Generally Gmail.
User Manual Picture 5-30 If you can’t receive email alarm information successfully, please check below points: DVR connection is normal or not; The receiver and sender email support SMTP protocols or not; Emails account setting is correct or not; Email alarm parameters configuration is right or not; DVR is on the status of I/O alarm or Motion detection or not. 5.3.6.
User Manual Mobile Viewer’s Access Instruction The DVR is currently compatible with mobile phones running Windows Mobile, Symbian, Iphone, Blackberry and Androids operating systems. Below are these Mobile Viewer’s installation procedures. 1、Windows Mobile : 1) First you need to copy a program named as “Aseesetup.CAB” that is included on the CD provided by the DVR to the mobile phone.
User Manual Click【ok】to confirm the above setting , and system will return back the previous menu. Auto-connect: When tick-selecting [Auto-Connect] option, the mobile phone will be auto-connected to the DVR. History: Clicking the button will allow you auto-record all the log histories. Click any area of screen to toggle display modes between normal view and full screen. 2、Symbian System Mobiles: 1)First you need to copy a program named as “ASee_AL_3rd _0723.sisx” or “See_AL_5th_0723.
User Manual 8) For first time using or Need some change on the Parameters, click the【Setup】button,you will enter into the window shown as Picture 14; or, Click [Play] button to enter into live display. Address: herein indicate public IP address connected to DVR or dynamic domain name used by DVR. Port: indicate the server port which has been set to your DVR. User’s Name : herein input the user name which has been set on DVR-[Mobile Set] menu.
User Manual ⑥ Click the button to preview History record 4、Blackberry mobile: 1) 2) 3) 4) 5) 6) 7) Download and install the Blackberry Desktop Manager on your PC Connect your Mobile to your PC via USB cable Open the Desktop Manager Choose [Application Loader ] from the Main Menu shown as Picture 18 Click [Start] Button on the 【Add/Remove application】menu shown as Picture 19 Click [browser] button and tick-select [ASee.
User Manual 3) Enter into the below interface. 1 ---Connect/disconnect 2 ---full screen 3 ---snapshot 4 ---setup 5 ---help 6 ---Next CHs Group 7 ---PTZ Control 4) Pic24 Enter the Monitor DVR info in the below Setup Menu; Pic26 Pic25 4.1、Select the Network Type supported by Blackberry phone. Pic27 Pic29 4.2 Click [Save] button to save the above setting, and system will return back to Live display. 4.3 Click the [History] button to enter into the History List shown as Picture 28. 4.
User Manual 5) Click [Next Page] icon to search [Channel] option shown as Picture 32 and Picture 33, and then choose the channel you want to display. Pic32 Pic33 6) Click [Full screen] icon to enter into full screen display mode, again click the [Trackball] button of mobile to quit the full screen mode. 7) Click [Next page] button to find the [PTZ Control] icon and enter into the mode. Now you could freely control your PTZ camera through your Mobile phone.
User Manual 3. Enter into the [E-market] interface shown as Picture 38. 4. Click [Search] icon on the upper right corner and input “Apkinstaller” shown as Picture 39, to search the Apkinstaller program. Highlight and install the program you searched shown as Picture 40 and Picture 41 5. Follow up the installation steps shown as Picture 42 and Picture 43 6. 7. 8. 9. 10. Pic44 Pic45 Pic46 Pic47 Enter into [Program] file and click [Apkinstaller] icon shown as Picture 44 Find the ASee.
User Manual 5.3.6.5 Motion Detect Setup Click [Main Device Motion] to enter into the [Motion Detection] menu shown as Picture 5-33. The [Motion detection] Menu has three sections, including Channel Status, Sensitivity and Motion area. Channel STATUS: This option allow you enable motion detection on any channel. Picture 5-33 SENSITIVITY: This option allows you to set sensitivity level of motion detection from higher to low with 4 being the most sensitive.
User Manual When you set Password Enabled to “ON” (shown as Picture 5-38), you can setup a user password and administrator password respectively. The password supports up to 6 characters. The password defaulted by system is 123456. Picture 5-38 5.3.7.3 Video/Audio Setup Click [Main Menu System Video/Audio] to setup Video and Audio parameters shown as Picture 5-39 (a). Picture 5-39(a) Video System: allow you set Camera system (PAL, NTSC).
User Manual 5.3.7.6 Maintain This option allows you recover the DVR settings to factory default settings, update system software (firmware), and set system auto-maintenance. Click [Main menu System Maintain] to enter into the [System Maintain] menu shown as Picture 5-42(a). Auto Maintain: After enabling [Auto Maintain] function, system will perform regular maintenance as per the schedule you have set.
User Manual 5.5 Record search You could enter into [Record Search] menu from Pop-up menu conveniently and quickly and search/playback the record histories. We introduced Record search details previously in section 5.2.4. 5.6 PTZ Control Picture 5-45 Picture 5-46 Picture 5-47 Picture 5-48 Open auto cruise function on PTZ setting menu if you want to setup cruise function (system default: on), and set up cruise channel, cur point and total quantity and stop time etc.
User Manual Chapter 6: Web Application Manager 6.1 Plug-in download and installation Open your web browser and input the IP address and web port of DVR, such as : http://172.18.6.202:8080/ . If your computer is connected to internet, it will download and install “ActiveX” Plug-in automatically. If your computer system is Vista, you may need to setup the user authority.
User Manual 6.3 Web Client Interface 6.3.1 Menu Bar Menu bar include [Live], [Playback], [Remote setting], [Local Setting] and [Logout] option 6.3.1.1 Live Display After PC Web Client logging in, system will be defaulted to enter into Live mode and connect Audio. Also can set record manualy via shortcut key , like picture 6-2(a)and(b) Left key —— Click the icon of one channel to display the channel’s image Click the icon to start manual record.
User Manual Picture 6-2(a) ① ③ ② Picture 6-2(b) 33
User Manual 6.3.1.2 Playback Click [Playback] option to playback record files from remote DVR by selecting relevant date, channel and type. Details please refer to below Picture 6-3 Picture 6-3 Double-click any file listed or highlight any file and click [Play] button to play the selected recording file. Also can select channel and file type.
User Manual 4CH 8CH Picture 6-5(b) Click [Copy Setting to] option on the right-bottom corner of the interface to copy all the remote setting to any channel shown as Picture 6-5(b) Record setting Enter into [Record Setup] option to set record control parameters, including record enabling, audio enabling, Pack time, Record mode and Frame,Quanlity, Resolution etc. (shown as Picture 6-6) Picture 6-6 If Frame rate is adjustable, you can setup Picture Quality and Frame rate for each chanel.
User Manual Select [Schedule] mode in record setting will see screen as picture 6-8,then can setup record mode on the form which are the same method on DVR menu Picture 6-8 Alarm Parameters Click [Alarm Parameters] option to enter into the Alarm Config interface, which include I/O Status,Video cover, Video loss, HDD loss ,HDD space, Prerecord and Alarm time. Also can setup Email alarm and Full screen enlarge when in Alarm.
User Manual Picture 6-10(b) Picture 6-10(c) Picture 6-10(d) Device Parameters Click [Device] option to enter into the interface . Now you can check Hard disk info (Picture 6-11), PTZ Parameters (Picture 6-12) , Mobile info (Picture 6-13) and Motion (Picuture 6-14).
User Manual Click[PTZ Parameters ] to setup PTZ control ,the setting are same with DVR menu as picture 6-12 Picture 6-12 Mobile phone setup,the same with DVR menu setup as picture 6-13 Picture 6-13 Click“Motion Detection”to setup each channel parameters,including Sensitivity and Motion Area.
User Manual Picture 6-15 System management Extend [System] option to enter into sub menus – System setting, User Authority , DST(Daylight saving time) and DVR information shown as Picture 6-16 Picture 6-16 Click [User] to setup Authority, Log-in name and password for different user,as Picture 6-17 Picture 6-17 39
User Manual DST setting as picture 6-18 DVR system information as picture 6-20 Picture 6-18 Picture 6-19 6.3.1.4 Local setting The option allows you set [Record Save Path], [snapshot Save Path] and [File Save Path] shown as Picture 6-20. Picture 6-20 Note:Record save path --- Save file of remote manual record from netwok File save path --- Save download recording file from DVR.
User Manual Chapter 7: Specifications Model parameter 4CH 8CH NTSC/PAL(Optional) Video System Video/Audio Compression Format Video:H.
List 7-1 User Manual Chapter 8: Appendix 8.1 Record Alarm setting Please refer the below matrix: “⊥” stand for “only alarm but no record”; “AMR” stand for “alarm record”; “NLR” stand for “normal record”; and “NOR” stand for “ no record”. Once alarm is triggered, alarm icon will occur, and when many alarms are triggered, alarm remarks will occur on the screen.
User Manual @yeah.net smtp.yeah.net pop.netease.com @qq.com smtp.qq.com pop.qq.com smtp.163vip.net popx.163vip.net @sina.com.cn smtp.sina.com.cn pop3.sina.com.cn @yahoo.com.cn smtp.mail.yahoo.com.cn pop.mail.yahoo.com.cn @yahoo.com smtp.mail.yahoo.com pop.mail.yahoo.com google.com @gmail.com smtp.gmail.com(465/587) pop.gmail.com(995) www.china.com @china.com smtp.china.com pop.china.com www.sohu.com @sohu.com smtp.sohu.com pop.sohu.com smtp.163.net pop.163.net smtp.163vip.
User Manual 10. Q: Why does the Buzzer keep sounding? A: Please check if motion detection is on and the system has detected motion, make sure the HDD is being detected and has sufficient space available; check if video has lost etc. 11. Q: Why can’t stop [Stop] function? A: Pressing [Stop] button only can stop manual record. If you want to stop Scheduled record, please revise to [No Record] during this period. 8.
User Manual 8.
The material in this document is the intellectual property of our department . No part of this manual may be reproduced, copied, translated, transmitted, or published in any form or by any means without our department prior written permission. Our products are under continual improvement and we reserve the right to make changes without noti ce. But no guarantee is given as to the correctness of its contents. We do not undertake any responsibility for the harms cause by using our product.