Setting up Analogue Node (BEAM-AN-S4) This page provides information on setting up a Analogue Node to work with the offline Ackcio Beam gateway. Installation The Nodes can be directly affixed to a flat surface using M6 screws. However, for more sophisticated mounting scenarios, we recommend using the node bracket. The node bracket can be used to easily mount the node on flat surfaces, on pipes using U-bolts or cable-ties, or in other complicated settings.
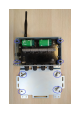
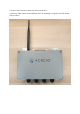
Use four screws and nuts to attach the node to the bracket Connect the SMA antenna to the bulkhead. Once the mounting is complete, the node should look as follows.
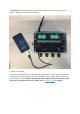
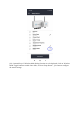
Node Setup 1.Connect the node antenna to the antenna bulkhead. 2. Connect the sensor wires to the node while ensuring that the wires are plugged in correctly. Voltage Output Sensors PWR: +Voltage input to sensor (e.g. +12V) GND: 0 Voltage input to sensor (e.g.
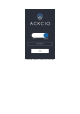
Configuring via the Ackcio Beam App 1.Download Ackcio Beam app at Google Playstore and connect to Gateway WiFi.
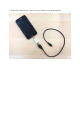
2. Plug in the USB end of the cable via an OTG adapter to your Android phone.
3. Important! Please make sure the Node switch is turned off before connecting to your phone. 4. Plugin micro USB end to the Node. 5. Switch on the Node. 6. Open the Ackcio Beam app on the phone. On toggle button, "Cloud" option is for Ackcio Cloud setup. "Gateway" option is for local or (API/FTP) setup. Please choose "Gateway" to proceed with local setup. (Please note that you need to add the Node and create the project first before you commission the node. Please refer to Gateway Setup for details.
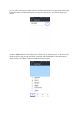
"Gateway" option to connect to Local setup
(i) You will see the project which you have already created once you open your Ackcio app. Click the button to download the project and go in to the project, you will see the project details. (ii) Press "Reset" button on the Node itself. Then click on “Setup Device” on the lower left menu on Ackcio app, the app will show connected node information. If the connection is unsuccessful, press "Reset" button on Node and connect again.
(iii) If Wireless Mesh (Relay) function is to be deployed, click on "Wireless Mesh" toggle button to enable. Once done, click on “Setup Sensor”, you can now configure the sensor settings.
(iv) You will see this page with the available channels. Tap the “Arrow icon” on the respective channel which your sensor is connected to. (v) Sensor Code: Your desired sensor name. Sensor Type: Select respective sensor type. Parameters: Turn on the parameters as connected to the Node. Excitation: Set the warm up time required for the sensor. Excitation Voltage: Select either 5 or 12 or 24, depending on the sensor.
(vi) Click Save Settings. The Node will now read the configured sensor. (vii) The next page, you will see the readings of the sensor. (viii) To get another reading, click on arrow icon. If reading is ok, please turn on blue color icon to enable the sensor. (ix) Repeat above steps to configure other channels of the Node.
(x) Once all sensors are configured, click on “Enable Sensor”, it will take you to next page “Scanning Network” which will scan the wireless signal strength (RSSI) between the Node and Gateway. (xi) After you get the Network Test information, if you need to, you can refresh by pressing the button located at the lower right corner.
(xii) After that, click “Start Monitoring” button then the app will prompt “Device commissioned”. Click OK. (xiii) Important! Next step, please press the Cloud Sync button at lower right area to send all the configuration information back to the gateway. (xiv) If you would like the Node to immediately send a reading to the Gateway, please press the “SYS TEST” button on the device physical circuit board. (xv) For additional node commissioning, repeat the steps above.
(xvi) You can now go to the Gateway software dashboard on your computer and click on your project. You will now be able to see your commissioned devices under “Device Summary” Section. FCC Caution: Any Changes or modifications not expressly approved by the party responsible for compliance could void the user's authority to operate the equipment. This device complies with part 15 of the FCC Rules.