EURACOM® P4 User manual for the ISDN telephone Systems that connect
With the ACKERMANN P4 you have chosen a highly sophisticated and future proof product. This telephone offers you all advantages of the digital Euro ISDN2 network (DSS1), when connected in multi point connection mode. In teamwork with an ACKERMANN EURACOM PABX, the EURACOM P4 archieves maximum efficiency and offers you additional to the advantages of the EURO ISDN network also all advantages of these systems. The features of a modern communication are offered to you in a convenient way.
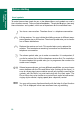
LED’s for signalling Function keys display Minus key Plus key speaker M ABC 1 DEF 2 3 GHI JKL 4 PQRS Dial keys WXYZ 8 ,() 0 Function keys 6 TUV 7 +.
Before operating this telephone Read this user manual carefully carefully and it will enable you to obtain the maximum benefits form your EURACOM P4’s features. If you want to learn about the basic functions Then read the chapter “Basic rules for operation” which describes these. You learn how the display helps you while making a telephone call, how to select functions and how to correct inputs.
Contents / table of contents / summary Get to know your telephone 1 Convenient telephone calls 2 During conversation 3 Before starting 10 Special features of your telephone 11 Supply volume 13 Placing and connecting the telephone 13 Operating the telephone 15 Basic rules for operation 18 Making calls in a normal way 20 Hands-free and speaker phone operation 24 Dialling a stored number 26 If the other subscriber is engaged 33 Silent signalling 34 Further callers (call waiting) 3
Contents / table of contents / summary Individual setup of your telephone 4 Changing basic settings 5 Your telephone switched to EURACOM PABX 6 Programming of call forwarding 56 Programming of Dedicated keys 59 Programming of directory 62 Programming of charging information 66 Programming a date or wake-up call 67 Call filter 69 Changing presettings 72 Programming of connection mode 79 Programming of ringing signal 82 Switching (on/off) of telephone number display 87 Programming e
Contents / table of contents / summary Programming of EURACOM system mode 112 Switching on / off of announcements and intercom 114 Programming of manager office mode 114 Programming of EURACOM PABX 118 Installation of answering machine 120 Switching answering machine on/off 128 Recording of announcements 129 Recording a message 130 Answering machine Call up of the answering machine 131 Listening and accepting calls 133 7 Recording of conversations 134 Forwarding of messages 135 Pro
10 10 Special features of your telephone Help from your display Storing telephone numbers Safety functions Hands-free and speaker phone operation Restricted power supply Operation with a EURACOM PABX Answering machine Operation with headset Connection with a PC 11 11 11 11 11 12 12 12 12 12 Supply volume 13 Placing and connecting the telephone Placing the telephone Connecting the receiver to the telephone Connecting the telephone to the ISDN outlet Taking out the removable plate and replacing it 13 13
Before starting 1 Get you know your telephone Used symbols To make the overview simple for you, a few abbreviations and symbols are used in the instruction manual. These are described below . The printed displays show only those characters and symbols, which are of importance for the mentioned here: g < > a +/- W 10 You have a conversation. Therefore there is a telephone connection. Lift the receiver. You may initiate the dialling process in different ways: press Speaker key or lift receiver.
1 Of course you will be able to make telephone calls with your telephone as usual. Additionally your telephone offers you functions, making telephone calls easier for you. Please make yourself roughly familiar in this chapter with some of the special features. Get you know your telephone Special features of your telephone Help from your display You get a lot of information from your display, eg concerning your current conversation and the occupation state of your S0 access.
Special features of your telephone Restricted power supply 1 Get you know your telephone In case of a power failure, you will be able to switch your EURACOM P4 to restricted mode quite easily. This mode also makes it possible for you to make telephone calls but with reduced functions during loss of power. Operation with a EURACOM PABX It is possible to operate your EURACOM P4 with EURACOM PABX.
Get you know your telephone Supply volume Following parts are supplied with your telephone: Telephone (basic set) Receiver Receiver cord (spiral cable) S0 installation cord (flat cable) 1 • • • • • • • RS 232 installation cord Instruction manual Disc with PC telephone directory programme Placing and connecting the telephone Placing the telephone Concerning several different surface materials of furniture it may occur, that these may get unpleasent marks when in contact with parts of the housing (eg ba
Place the telephone and connect it Connecting the telephone to the ISDN outlet 1 Get you know your telephone On back of telephone: s Insert one of the plugs of the S0 installation cord (flat cable) into the socket marked “LINE”. s Place the ISDN cord into the prepared cable channel. On ISDN outlet: s Insert the remaining plug of the S0 cord into the socket of the ISDN outlet.
On delivery the EURACOM P4 is switched to point to multipoint mode. After having connected your EURACOM P4, you are able to make phone calls immediately (plug & go).
Operating the telephone Operation with a EURACOM PABX 1 Get you know your telephone It is possible to operate the EURACOM P4 with a EURACOM PABX. In that case several more features are offered to you. These functions are then mainly supplied in direct way by the EURACOM PABX and thus depend on the soft- and hardware status of the PABX (eg announcements, manager / office mode, room surveillance).
Automatic adjustment to multiple subscriber or system mode is only possible in restricted power mode. In normal power mode only the selected connection mode is supported. 17 Get you know your telephone IMPORTANT NOTE ! 1 During power failure the PABX cannot be operated. Some PABX´s switch through the external to the internal S0 bus in this case, i.e. although the EURACOM P4 is switched to multiple subscriber mode, it will be operated in system mode during restricted power mode.
Basic rules for operation 1 Get you know your telephone You will find some basic rules for the operation of your telephone in this chapter. Help from your display The display consists of three rows, each showing 24 alphanumerical characters. The fourth row shows several conditions characterized by symbols. These symbols are only shown, if the representable conditions are switched on.
on: flashing: new entry in caller list incoming call alarm on: flashing: wake-up / alarm call activated wake-up / alarm call reached forwarding off: on: no call forwarding call forwarding active message off: on: flashing: answering machine switched off answering machine switches on new message 1 call Get you know your telephone Basic rules for operation LED signalling The light emitting diodes (LED) are placed directly next to the respective keys.
Making calls in a normal way 1 Get you know your telephone You are, of course, able to make phone calls with your EURACOM P4 telephone in the manner you are normally accustomed. All you have to do is dial the desired number directly. When operating on a PABX: dial th line number (eg „0“ first). To make a call < Lift receiver. You hear the dial tone. 27.10.98 PLEASE DIAL 16:01 w a Enter telephone number via Number keys. 27.10.
When you receiving a call, your telephone rings and the call LED flashes. 27.10.98 0231468956 16:01 w < Lift the receiver. You are then connected to the caller. 27.10.98 0231468956 16:01 If the telephone number (if needed with area code) is entered in directory of your EURACOM P4, you will also see the name of the caller. JANE 0231468956 If a name is programmed for the called number, this will also be displayd.
1 Get you know your telephone 22
24 To let someone listen Making a call with receiver on hook (hands-free) Adjusting receiver level Adjusting speaker level 24 24 25 25 Dialling a stored number 26 To redial a number Dialling with direct call Dialling with Dedicated key Dialling from directory Dialling from call list 26 26 27 29 31 If the other subscriber is engaged 33 Initiating call completion on busy subscriber 33 Accepting call completion 33 Early deletion of call completion on busy subscriber 34 Silent signalling 34 To reject
Hands-free and speaker phone operation You are able to hear a caller‘s conversation loud in the room and make a telephone call with the receiver placed on hook. You can also adjust the volume level of receiver and speaker. 2 Convenient telephone calls To let someone listen g You are having a conversation with lift 0,242 POUND 1:24 06838471112 w receiver.
Hands-free and speaker phone operation Adjusting receiver level + - You make a call with receiver off hook. 0,242 POUNDS 1:24 06838471112 w You can raise receiver volume with the Plus key. 0,242 POUNDS 1:24 LEVEL HH You can reduce receiver volume with the Minus key. 0,242 POUNDS 1:24 LEVEL HI convenient telephone calls g w 2 w Note: The receiver volume will be reset to default value after conversation has ended.
Dialling a stored number 2 Convenient telephone calls You may store a telephone number on one of the 10 Dedicated keys or in your own P4 directory and recall the number when required and let it be dialled. Calls are stored in a call list with date and time from where you can recall a telephone number easily and let it be dialled. The 10 last dialled telephone numbers are also stored and can be dialled again when required. You can also dial a prepared direct phone number.
Dialling a stored number Dialling with Dedicated key Without dial preparation < Lift receiver 27.10.98 PLEASE DIAL 16:01 Z Z Press Dedicated key for the first level. The number of the subscriber, stored on first level, will be displayed. NAME KEY 1 06838471112 Press Dedicated key again for second level. The number of the subscriber, stored on second level, will be displayed. NAME KEY 11 022542233 Two seconds after pressing a Dedicated key, the displayed phone number will be dialled. 27.10.
Dialling a stored number With preparatory dialling and correction facilities You intend to call a subscriber programmed on Dedicated key. Z 2 Convenient telephone calls Z Press Dedicated key. The number of the subscriber, stored on first level, will be displayed. NAME KEY 1 06838471112 If necessary, press Dedicated key again for second level. The number of the subscriber, stored on second level, will be displayed. NAME KEY 11 022542233 After two seconds the message “Dial preparation” appears.
Dialling a stored number Dialling from directory Without preparatory dialling 27.10.98 PLEASE DIAL < Lift receiver B Press Directory key P w DIRECTORY SEARCH: A ACADEMY )( w Press Plus or Minus key several times, until the desired entry is displayed. Or: select certain characters via Number keys. Press Programming key. The displayed number will be dialled. DIRECTORY SEARCH: B BAKERY 2 -/+ 16:01 )( w 27.10.
Dialling a stored number With preparatory dialling and correction facilities B 2 -/+ Convenient telephone calls P Press Directory key DIRECTORY SEARCH: A ACADEMY )( y Press Plus or Minus key several times, until the desired entry is displayed. Or: select certain characters with Number keys. DIRECTORY SEARCH: A BAKERY Press Programming key. The number will be displayed.
Dialling a stored number Selecting call list entry A -/+ < Press Call key. If a call LED is on, it will switch to „off“. 27.10.98 022542244 20:01 2x )( 20:01 1x )( y Press Plus or Minus key several times, until the desired entry is displayed. If the phone number is existing in the directory, the assigned name will be displayed. 27.10.98 022542233 Tom Harris y Lift receiver. The displayed number will be dialled. 27.10.
Dialling a stored number Deleting a caller A Press Call key. Call LED will be switched off, if active. 2 Convenient telephone calls -/+ t Press Plus or Minus key several times, until the desired entry is displayed. If the telephone number exists in the directory, the assigned name will be displayed. Press Termination key. The entry is deleted. 20:01 2x )( 27.10.98 022542233 TOM HARRIS y 18:01 1x )( 27.10.98 022542244 20:01 2x )( 27.10.
If the other subscriber is engaged If the other subscriber is engaged, you may initiate to be informed, if the extension is available again. Your telephone is then ringing. When lifting the receiver, your partner will be called automatically. c > The called subscriber is engaged.The automatic call completion will be offered in the display. SUBSCRIBER BUSY AUTOMATICAL RECALL? Press Call completion key. The message for activated automatic call completion is shown in display.
Early deletion of call completion on busy subscriber c 2 Convenient telephone calls -/+ > EURACOM P4 in Idle mode.Press Call completion key. If call completion calls are activated, the corresponding numbers will be shown. AUTOMATICAL RECALL TO: 022369430503 )( Press Plus or Minus key several times, until the desired call completion call is displayed. AUTOMATICAL RECALL TO: 022369430311 )( Press Termination key. Call completion is cancelled.
Silent signalling switching on / off silent signalling EURACOM P4 in Idle mode. 20:01 27.10.98 068388935 20:01 1x )( y A Press Call key again. CALLS SILENT SIGNALLING y switching on silent signalling P Press Programming key, to switch on silent signalling. Thereafter EURACOM P4 afterwards has entered the Idle mode. 27.10.98 C 20:01 y switching off silent signalling t Press Termination key for switching off silent signalling. The EURACOM P4 afterwards has entered the Idle mode. 27.10.
2 Convenient telephone calls 36
38 38 38 39 39 Switching off the microphone 40 Storing a number (notebook) To store a number Dialling stored number 40 40 41 Several connections at the same time Initiate call back Speaking to two subscribers alternatively (brokers call) Switching a third party into the conversation (Three-party call) Speaking only to one conference party Switching off a conference party Terminating three-party conference 41 41 42 Terminal portability Parking a connection Establishing the connection again 45 45 46
Further callers (call waiting) You are allowed to accept or reject another call waiting during a conversation. When you generally do not want to be disturbed by further calls, it is possible to prohibit call waiting. During a call hold, brokers call or three-party call no call waiting is possible. Reject a call waiting 3 g You are having a conversation. 0,242 POUNDS 06838471112 1:24 During conversation w You hear the call waiting tone.
Futher caller (call waiting) Accept a call waiting and terminate active connection g You are having a conversation 0,242 POUNDS 06838471112 1:26 w You hear the call waiting tone t CALL WAITING FROM: 02914635 w Press Termination key. Current connection is terminated, call waiting is accepted. 27.10.98 02914635 1:26 During conversation w 3 Note: You may also accept the call by placing down the receiver. The call waiting will then be signalled as normal ringing.
Switching off the microphone g m You are having a conversation Press the Mute key. The microphone is then switched off. A supervising symbol appears in display. You are now able to talk in the room, without being heard by your phone partner. 0,242 POUNDS 06838471112 1:26 w 0,242 POUNDS 06838471112 E 1:30 w 3 During conversation m Press Mute key, to continue the conversation. Note: During hands-free conversation the hands-free microphone is switched to mute.
Dialling stored number B W 17.10.98 06838471112 Lift receiver. 14:26 w Press Directory key. First directory entry will be displayed. DIRECTORY SEARCH: M MARKET GARDEN )( w Press Redial key. The stored telephone number will be displayed and dialled. NOTEBOOK NUMBER 06838123456 w g Having conversation. 29.11.98 06838123456 15:43 3 w During conversation < Several connections at the same time You are able to speak to several subscribers alternatively.
Several connections at the same time t > Press Termination key, to end broker´s call conversation and to continue the first conversation. or: Place the receiver on hook to terminate both conversations. 0,363 POUNDS 06838471112 2:10 w 16.10.98 18:41 y 3 Note: If the active partner ends the conversation, it is possible to return to the held partner via the Hold / Broker´s key.
Several connections at the same time Switching a third party into the conversation (Three-party call) R a 0,242 POUNDS 06838471112 1:26 w Press call Hold / Broker´s key. The other subscriber hears an announcement. 17.10.98 DIAL R-NUMBER 14:25 w Enter telephone number of the second conference party via the Number keys. 17.10.98 022544637 14:25 w After the second subscriber has lifted the receiver: press Three-party Call key. You and the other two parties are now connected.
Several connections at the same time Switching off a conference party g t You are having a three-party conference conversation. 17.10.98 THREE-PARTY CALL 1:26 w Press Termination key. 17.10.98 PARTNER 1 1:34 PARTNER 2 w 1/2 3 During conversation Select “Partner 1” or “Partner 2” with Number key 1 or 2. Afterwards you only speak toone partner. 0,363 POUNDS 06838471112 1:46 w Note: Back to three-party conference: Press three-party Call key.
Terminal portability With your EURACOM P4 it is possible to switch up to two telephone connections to hold (parking).This feature is not at your disposal in EURACOM system mode. Parking a connection p Press Parking key. 0,242 POUNDS 06838471112 1:26 w During conversation g You are having a conversation. PARK CALL IDENT NUMBER: ap a Enter one-figure identity number and then press Parking key. PARK CALL IDENT NUMBER:1 or: enter two-figure identity number: Connection is parked.
Establishing the connection again < EURACOM P4 in Idle mode. Lift receiver. 17.10.98 PLEASE DIAL 14:26 z p Press Parking key. RESUMPTION IDENT NUMBER: z 3 ap During conversation a Enter one-figured identity number and then press Parking key. or: enter two-figured identity number. RESUMPTION IDENT NUMBER:1 z RESUMPTION IDENT NUMBER:12 w g Conversation. 0,484 POUNDS 06838471112 0:26 w Call forwarding You may forward incoming calls to any extension (eg mobile telephone).
Call forwarding Call forwarding with incoming call (call deflection) In this version of call forwarding the call first comes in. As long as the EURACOM P4 is ringing, you are able to decide, if and to which address the call shall be forwarded. 20.10.98 068385665 r Press call forwarding key. The last call forward destination is being offered in the display. CALL FORWARDING TO 030112233 Press Programming key, to forward to this destination. 20.10.
Looking up charging information The charging information since last deletion is stored and summarised. It is possible to display the total charging information or the total units, as well as the charging information and units of the last connection, be displayed. G 3 During conversation G G G EURACOM P4 in Idle mode. Press Charging key several times. One after another are displayed: date and time. 20.10.98 y 0,242 POUNDS Charging information and duration of connection (last call).
Sending tones With your EURACOM P4 it is possible, to send either DTMF tones, eg for remote control of an answering machine, as also keypad messages for programming of PABX´s or services of your network. As soon as you have lift the receiver and are hear a dial tone, the Number keys will first be sent as dial information (not to be heard). If a connection is established, the Number keys will be sent as DTMF tones (to be heard), eg for remote control of answering machines. a You are having a conversation.
Sending tones Sending keypad information It is possible to program PABX´s or use network services by use of keypad messages (not to be heard). You may send keypad messages before dialling, during dialling and during conversation. Changing to keypad messages P Press Programming key . PROGRAMMING 0011 3 w During conversation * Press Star key. 0,242 POUNDS 0011K 1:34 w Terminating keypad messages P * Press Programming key. w Press Star key.
Messages in display Your EURACOM P4 is capable of showing messages in the display while in Idle mode. This feature allows you to leave your associated users messages. You are able to send a message before having a conversation. During conversation it is possible to receive a message. Switching on messages M P g P EURACOM P4 is in Idle mode. Press Message key. The last activated message will be shown in the display. 20.10.
Messages in display Switching off messages EURACOM P4 is in Idle mode. Message will be shown in the display. M 3 t During conversation P Press Message key. Press Termination key. A message to confirm deletion appears in display. 20.10.98 PLEASE CALL JANE IN THE OFFICE y 12:36 20.10.98 PLEASE CALL JANE IN THE OFFICE y 12:36 CLEAR MESSAGE? PLEASE CALL JANE IN THE OFFICE y Confirm deletion with Programming key. Back to the Idle mode without deletion with every other key.
Messages in display Sending and receiving messages You may send a message in advance of telephone conversation. This message may contain up to 32 characters and must be preconfigured in the programming menu (-> page 98). The message will then be transmitted with each going connection. You may receive messages at any time, being displayed eg as running text. Reception during connection setup / -termination (UUS1) NEW OPENING HOURS!!! 02236943030 During conversation EURACOM P4 is ringing.
Interception of callers It is possible to intercept the telephone number of an undesired caller and let it be stored by your network provider. This facility has to be arranged with your network provider. Interception of callers 3 g During conversation Z You are having a conversation with an undesired caller with his number not being shown. 20.10.98 NUMBER SUPPRESSED Press Dedicated key with the function “interception”. The number of the caller will be recorded.
56 Programming of call forwarding Enter destination of call forwarding To switch on / off call forwarding To set up mode of forwarding 57 57 58 58 Programming of Dedicated keys 59 Programming Dedicated key with telephone number Programming Dedicated key with function Programming Dedicated key with carrier prefix Deletion of programming 59 60 60 61 Programming of directory 62 New entry in directory Change entry Delete entry Load directory from PC 62 63 64 65 Programming of charging information 66
The following pages provide information on how to set up the various functions of your EURACOM P4 (programming). The programming is only possible in the Idle mode of your telephone. The programming will be interrupted by lifting the receiver or pressing the speaker key. All concluded programming steps right up to this moment will be accepted. A programming operation not being concluded, will not be stored. In the case you receive a call during programming, the display information will remain unchanged.
Programming a call forwarding Programming of call forwarding r +/eg 2 EURACOM P4 in Idle mode. Press Programming key. PROGRAMMING Press forwarding key. CALL FORWARDING 0:END 1:MSN1 2:MSN2 3:MSN3 4:MSN4 5:MSN5 y ) ( Press Plus or Minus key, to allow the desired menu point to be shown. CALL FORWARDING 3:MSN3 4:MSN4 5:MSN5 6:MSN6 7:ALL y ) ( Press Number key for the desired MSN, eg MSN2.
Programming of call forwarding To switch on / off call forwarding 2 eg1 Press Number key 2 for the menu point ”State”. CALL FORWARDING MSN2 ACTUAL: OFF 0:END 1:ON 2:OFF y Press Number key for the desired setting or quit the menu point with 0 without change. CALL FORWARDING MSN2 0:END 1:DEST 2:STATE 3:CFU 4:CFB 5:CFNR y Afterwards set up the forwarding mode.
Programming of Dedicated keys Your EURACOM P4 is equipped with 10 Dedicated keys, which you may program twice with telephone numbers. Therefore it is possible, to store your frequently used telephone numbers, functions or carrier on Dedicated keys and activate them with a key stroke. Programming Dedicated key with telephone number a P PROGRAMMING y Press desired Dedicated key once or twice, to select the first or second level. An entry, which is already existing, will be displayed.
Programming of Dedicated keys Programming Dedicated key with function P Z EURACOM P4 in Idle mode. Press Programming key. y Press desired Dedicated key once or twice, to select the first or second level. An entry, which is already existing, will be displayed. ** Press Star key twice, to initiate the programming. Enter two-figure function code. 4 Individual setup of your telephone To correct entry: delete left character with Minus key.
Programming of Dedicated keys Deletion of programming P EURACOM P4 in Idle mode. Press Programming key. PROGRAMMING Z t P Press desired Dedicated key once or twice, to select the first or second level. An entry, which is already existing, will be displayed. PROGRAMMING NAME KEY 1 03012345678 y Delete programming with Termination key. You will be asked to confirm the entry. CLEAR? NAME KEY 1 03012345678 y Individual setup of your telephone y Confirm deletion with Programming key.
Programming of directory You are able to store up to 200 entries with telephone number and name in the directory. In case of an incoming call the name of the caller will also be displayed, if the phone number is transmitted and stored in the directory. However, for all this to function it is vital that the own area code be entered with the subscriber configuration. New entry in directory P 4 B Individual setup of your telephone 1 EURACOM P4 in Idle mode. Press Programming key.
Programming of directory Change entry 2 y Press Directory key. Press Plus or Minus key, if necessary, to allow desired menu point to be displayed. DIRECTORY 0:END 1:NEW ENTRY 2:CHANGE 3:DELETE y Press Number key 2 for the function “Change”. CHANGE DIRECTORY SEARCH ENTRY: A a +/- Enter first character with the dial keys, or let the desired entry be displayed with the help of the Plus and the Minus key.
Programming of directory Delete entry P B 3 EURACOM P4 in Idle mode. Press Programming key. y Press Directory key. Press Plus or Minus key, if necessary, to let the desired menu point be displayed.
Programming of directory Load directory from PC 4 1 PROGRAMMING y Press Directory key. Press Plus or Minus key, if necessary, to allow the desired menu point to be displayed. DIRECTORY 2:CHANGE 3:DELETE 4:LOAD FROM PC y Press Number key 4 for the function “Load from PC”. To abort, press key 0. DIRECTORY LOAD FROM PC 0:END 1:START y Activate load mode with Number key 1. The data will now be transmitted from the PC to the telephone. Everything else will be controlled by the PC.
Programming of charging information The ISDN network is also transmitting charge units. They can be converted into charging information with an adjustable factor in the EURACOM P4 and be displayed. You can also program a currency, described by up to four numerals. The EURACOM P4 adds the charging information of the several connections. These data will be saved also in case of a power failure.
Program currency P 0 Enter the desired currency (max. fourfigures) with Number keys. Delete left characters with Minus key. Proceed to the next character with Plus key. CHARGES INPUT CURRENCY POUNDS y Complete input with Programming key. You are back to the menu “Charges”. CHARGES 0:END 1:DELETE 2:FACTOR 3:CURRENCY y By pressing “0”, you quit the menu and return to the Idle mode. 23.05.98 15:20 y Programming a alarm or wake-up call 4 It is possible for you, to set up an alarm call.
Programming a alarm or wake-up call Delete alarm or wake-up call T t P EURACOM P4 in Idle mode. Press Alarm key. Valid setting is shown. Press Termination key for deletion. Confirm deletion with the Programming key. Return to the Idle mode without deletion with every other key. ALARM DATE:15.10.98 TIME:17:00 y CLEAR ALARM? DATE:15.10.98 TIME:17:00 y 15.10.98 y 4 IMPORTANT NOTE! Individual setup of your telephone 68 • • If an alarm is switched on, the alarm LED is on.
Call filter The assumption is made, that the telephone number of the caller is being transmitted. If you have switched on “Silent signalling”, calls will only be indicated visually. With the assistance of call filters it is possible to specify up to five telephone numbers for additional calls, with following exceptions: Lock filter: calls with telephone numbers, determined in this place, will be signalled silently, all other calls will be signalled normally (loud).
Call filter Set up unlocked numbers P EURACOM P4 in Idle mode. Press Programming key. PROGRAMMING y A Press Call key. INCOMING CALL FILTER 0:END 1:FILTER TYPE 2:LOCKED NUMBERS y ) ( 3 Press key 3 for locked numbers. UNLOCKED NUMBER 0:END 1:UNLOCK NUMBER 1 y ) ( 1 Enter number for the desired unlocked number. UNLOCKED NUMBERS UNLOCK NUMBER 1 4 y Individual setup of your telephone a P Enter the number to be signalled with Number keys. Correct input: Delete left characters with Minus key.
Changing presettings 72 Set up of date and time Set up of display Set up volume of the receiver Set up volume of the speaker Set up ringing level Set up of language Set up of the PIN Save stored numbers Other settings 73 73 74 75 75 75 76 77 78 Programming of connection mode 79 Set up of multiple subscriber connection Set up of system connection 80 81 Programming of call signalling 82 Ring delay Ringer signalling Set up ringer melody Store phone number with a name 83 84 85 86 Switch on/off telep
You are able to set up all of the functions described in this section in the programming mode of your EURACOM P4. It is only possible to do the programming in the Idle mode of your telephone set. The programming will be aborted, if you lift the receiver or press the speaker key. All of the already concluded programming steps will be stored. If you are receiving a call during programming, the display remains unchanged. The programming operation will first be interrupted, if you accept the call.
Changing presettings Set up of date and time In menu “Main settings”: Keysequence: 3 3 P PP1 MAIN SETTINGS 0:END 1:CHANGE PIN y ) ( Press key 3. You have now entered the menu “date and time”. MAIN SETTINGS DATE AND TIME 00.00.00 00:00 y Enter date (six figures) and time (four figures) via Number keys. Delete left character with Minus key. MAIN SETTINGS DATE AND TIME 29.10.98 15:45 y Complete entry with Programming key. You have thus entered date and time.
Changing presettings Set up volume of the receiver In menu “Main settings”: Keysequence: 6 +/- P PP1 MAIN SETTINGS 0:END 1:CHANGE PIN y ) ( Press key 6. You are now in menu “receiver volume”. MAIN SETTINGS HANDSET VOLUME LEVEL H I y You are able to vary the receiver volume in two steps with the Plus or Minus key. MAIN SETTINGS HANDSET VOLUME LEVEL H H y Complete entry with the Programming key. You have this programmed the receiver volume.
Changing presettings Set up ringing level In menu “Main settings”: Keysequence: 8 +/- P PP1 Press key 8. You are now in menu “ringing level”. MAIN SETTINGS 0:END 1:CHANGE PIN y ) ( MAIN SETTINGS RINGER VOLUME LEVEL HHHIIIII y You are able to vary the ringing level in eight steps with the Plus or Minus key. During this set up the EURACOM P4 is ringing. MAIN SETTINGS RINGER VOLUME LEVEL HHHHHIII y Complete entry with the Programming key. You have thus programmed the ringing level.
Changing presettings Set up of the PIN In menu “Main settings”: Keysequence: 1 a P a P PP1 Press key 1. You are asked to enter a new PIN. Enter new PIN (always four-figures) with Number keys. Delete left characters with Minus key. Complete entry with Programming key. Enter your PIN for check again. Complete entry with Programming key. You have thus programmed a new PIN. 5 Changing basic settings Note: In delivey state the PIN “0000” is preset.
Changing presettings Save stored numbers With this function it is possible to protect each of your dial memories (directory, Dedicated keys, call list, redialling) against unauthorized access. With activated protection first the PIN will be asked. This is why only persons, knowing your PIN, will have access to the above mentioned memories. In delivery state this protection mode is not activated. ) ( 2 Press key 2. You are now in menu “PIN locking”.
Change of preselection Other settings In menu “Main settings”: Keysequence: 9 eg 1 eg 1 PP1 Press key 9. You are now in menu “Other functions”. Press Number key for the desired function: Set up of headset: 1 Clear memory: 2 Reset: 3 Softwareupdate: 4 Press Number key to switch on or off the desired function: 1: On / Clear / Reset / Update 2: Off / Abort You are back to the preceding menu.
Programming of connection mode In delivery state the EURACOM P4 is configured for operation in multiple subscriber connection. After connection of your telephone set, you are able of making calls immediately (plug & go). But it is also possible to operate your EURACOM P4 in a system connection. All settings, described here, may be done in the menu subscriber configuration. And this is how you get to the menu “subscriber configuration”: Press Programming key twice. +/- eg 1 ) ( Press key 2.
Programming of connection mode Set up of multiple subscriber connection In delivery state the EURACOM P4 is already preset for operation in multiple subscriber connection. You only have to enter your multiple subscriber numbers (MSNs a maximum of six MSNs is possible). In menu “subscriber configuration”: Keysequence: 1 1 eg 2 P 5 Changing basic settings 0 PP2 ) ( Press key 1. You are now in menu “subscriber configuration”. SUBSCRIBER CONFIG. TYPE: MULTI SUBSCRIBER 0: END )( y Press key 1.
Programming of connection mode Set up of system connection Keysequence: 1 2 1 P PP2 Press key 1. You are now in menu “subscriber type”. Press key 2. You are now in menu “PABX mode”. Press key 1 and afterwards enter base number” via Number keys. Correct input: delete left characters with Minus key. Complete entry with Programming key and back to the preceding menu. You have thus programmed the base number. SUBSCRIBER CONFIG. 0:END 1:SUBSCR. TYPE 2:CALL SIGNALLING y SUBSCRIBER CONFIG.
Programming of call signalling Your EURACOM P4 is capable of indicating an incoming call in different ways. It is therefore possible to program a ring delay for each of the MSNs each with its own ringing rhythm and also speed of the tone sequence. You can further assign a name to the telephone number. In this case an incoming call additionally will be displayed with the name of the subscriber. You have to program all corresponding settings in the menu “call signalling”.
Programming of call signalling Ring delay In menu “call signalling” SUBSCRIBER CONFIG. CALL SIGNALLING 0:END y )( Press key 1. You are now in menu “ring delay”. SUBSCRIBER CONFIG. RING DELAY 0:END 1:MSN1 2:MSN2 y )( Select MSN, which shall be programmed with ring delay, with Number key. SUBSCRIBER CONFIG. RING DELAY MSN1: HHHHIIIIII y Set delay (possible in ten steps) with Plus or Minus key. SUBSCRIBER CONFIG. RING DELAY MSN1: HHHHHHIIII y Complete entry with Programming key.
Programming of call signalling Ringer signalling In this section you learn how to adjust the tone sequence speed of your ringer melody. In menu “call signalling” Keysequence: 2 eg 1 +/- 5 P Changing basic settings 0 . 84 PP22 SUBSCRIBER CONFIG. CALL SIGNALLING 0:END y )( Press key 2. You are now in menu “ringer signalling”. SUBSCRIBER CONFIG. RINGER SIGNALLING 0:END 1:MSN1 2:MSN2 )( y Select MSN, which shall be programmed with ringer signalling, with Number key. SUBSCRIBER CONFIG.
Programming of call signalling Set up ringer melody In this section you will be able to set up different ringer melodies. eg 1 +/- P 0 Press key 3. You are now in menu “ringer melody”. Select MSN, which shall be programmed with ringer melody, with Number key. Select ringer melody with Plus or Minus keys. The EURACOM P4 is ringing during this set up procedure. Complete entry with Programming key. You have then programmed the ringer melody for one MSN.
Programming of call signalling Store phone number with a name It is possible to enter a name additionally for each of the programmed telephone numbers. This name will be displayed, if you are called fromof these numbers. In menu “call signalling Keysequence: 4 eg a P 5 Changing basic settings 0 86 PP22 Press key 4. You are now in menu “name setting”. SUBSCRIBER CONFIG. CALL SIGNALLING 0:END y )( SUBSCRIBER CONFIG.
Switching (on/ off) of telephone number display With your EURACOM P4 it is possible to let your own phone number be transferred to your conversation partner during connection set up (number display outgoing). This will then be shown in the display of your partner´s ISDN telephone. It is also possible, to let your telephone number be transferred, when having been called (number display incoming). In delivery state your EURACOM P4 is programmed in such a way, that the phone number will be shown in both cases.
Switching (on/off) of telephone number display Phone number display- incoming In menu “number display”: Keysequence: 1 eg 2 PP23 SUBSCRIBER CONFIG. NUMBER DISPLAY 0:END 1:INCOMING y )( Press key 1. You are now able to switch on or off the number display. NUMBER DISPLAY INCOMING: ON 0:END 1:ON 2: OFF y Press key, eg 2, to switch off the number display. With key 0 you get to the preceding menu. SUBSCRIBER CONFIG. NUMBER DISPLAY 0:END 1:INCOMING y )( SUBSCRIBER CONFIG.
Programming external line number Some PABX´s need a predialling code, as eg the number “0”, to make telephone calls into a network. In order to make use of the directory or the call list in an efficient way, you may here define an external line number (AKZ), being automatically predialled to the telephone number in case of dialling out of one of these lists. PP EURACOM P4 in Idle mode. Press Programming key twice. 1 eg 0 P Press key 5. You are now in menu “PABX configuration”.
Programming external line number Assign external line number to the dial memories This is where you may select, to which dial memories the external line number shall be prefixed during dialling. In menu “PABX configuration”: SUBSCRIBER CONFIG. PABX CONFIG. 0:END 1:INPUT AKZ y )( Press key 2. You are now in menuassign external line number. SUBSCRIBER CONFIG. ASSIGN AKZ 0:END 1:DIRECTORY y )( Press Number key for the desired dial memory, eg Dedicated key.
Switching call waiting on/off You receive another call while making a phone call. This call is indicated by a special waiting tone. If you do not want to be disturbed in general by further calls, you are able to prevent call waiting. PP EURACOM P4 in Idle mode. PROGRAMMING 0:END 1:MAIN SETTINGS y ) ( Press key 2. You are now in menu “subscriber configuration”. SUBSCRIBER CONFIG. 0:END 1:SUBSCR. TYP 2:CALL SIGNALLING y ) ( Press key 6. You are now in menu “call waiting”. SUBSCRIBER CONFIG.
Programming of telephone numbers You are able to program different types of telephone numbers with your EURACOM P4. You can program locked, unlocked and direct call numbers. Locked numbers are telephone numbers, which can not be dialled (eg 0190...). Unlocked numbers are telephone numbers, which you can dial despite a possible dial lock. Direct call numbers are telephone numbers, being dialled immediately after lifting the receiver (or pressing the speaker key) and pressing any key.
Programming of telephone numbers Programming of locked numbers In menu “locking”: SUBSCRIBER CONFIG. LOCKING 0:END 1:DIRECT CALL y )( Press key 3. You are now in menu “locked numbers”. SUBSCRIBER CONFIG. LOCKED NUMBERS 0:END 1:LOCK#1 y )( Press Number key for the desired locked number. LOCKING LOCKED NUMBER 3 Enter telephone number. Correct entry: delete left characters with Minus key. LOCKING LOCKED NUMBER 3 0190123456789 y Complete entry with Programming key.
Programming of telephone numbers Programming of direct call numbers In menu “locking”: Keysequence: 5 a P PP27 SUBSCRIBER CONFIG. LOCKING 0:END 1:DIRECT CALL y Press key 5. You are now in menu “direct call numbers”. LOCKING DIRECT CALL NUMBER Enter the direct call number. Correct entry: delete left characters with Minus key. LOCKING DIRECT CALL NUMBER 06838123456789 y Complete entry with Programming key. You have thus programmed the direct call number. )( y SUBSCRIBER CONFIG.
Programming of telephone numbers Switch on/off dial lock In menu “locking”: Keysequence: 1 0 Press key 2. You get to the menu “dial locking”. LOCKING DIAL LOCKING: OFF 0:END 1:ON 2:OFF y You are able to switch on or off the dial lock by pressing Number key 1 or 2. LOCKING DIAL LOCKING: ON 0:END 1:ON 2:OFF y J With 0 to the preceding menu. SUBSCRIBER CONFIG. LOCKING 0:END 1:DIRECT CALL y J )( )( Note: The unlocked numbers can also be dialled with activated dial lock.
Programming of own area code In order to let the name (from the directory) during incoming calls with transferred telephone number always be shown in a correct way. The own area code must be programmed in order that the directory name is shown always in a correct way during calls with transferred telephone number. PP EURACOM P4 in Idle mode. Press Programming key twice. 2 8 a 5 Changing basic settings P 96 Press key 2. You are now in menu “subscriber configuration”.
Programming of carrier prefix You may program a carrier prefix with up to six figures, being inserted, if activated, in front of each dialled phone number. By programming a Dedicated key with **20, you are able to switch off this automatic insertion facility at times. PP EURACOM P4 in Idle mode. Press Programming key twice. 2 9 eg 1 Press key 2. You are now in menu “subscriber configuration”. PROGRAMMING 0:END 1:MAIN SETTINGS y SUBSCRIBER CONFIG. 0:END 1:SUBSCR.
Programming of message text It is possible to transmit short messages (so-called UUS messages) with your EURACOM P4 during every connection set up. PP EURACOM P4 in Idle mode. 2 4 eg 1 Press Programming key twice. PROGRAMMING 0:END 1:MAIN SETTINGS y ) ( Press key 2. You are now in menu “subscriber configuration”. SUBSCRIBER CONFIG. 0:END 1:SUBSCR: TYPE 2:CALL SIGNALLING y ) ( Press key 4. You now get to the menu “UUS message” SUBSCRIBER CONFIG.
6.
Your EURACOM PABX already makes additional displays and features available in normal mode. The occupation status of the existing ISDN ports and the busy condition of a maximum of eight subscribers will be indicated. You are able to configure these displays as you please (->page 111 “subscriber monitor”). It is possible to connect a PC to your EURACOM P4 and configure your EURACOM PABX in that way eg. In order to make use of the features of a EURACOM PABX, you first have to make a telephone call.
Forwarding a subscriber from hold g You are having a conversation with 0304711265 for forwarding on a another internal subscriber and a another subscriber (08152233445) is in hold condition. 27.10.98 030471165 16:01 w z Forwarding without announcement c R Press Call completion key, you are asked to enter the subscriber with internal destination (in this case subscriber 13) for transfer.
Making telephone calls in a group (manager/office) In order to make use of the manager office function, specific conditions have to be arranged (-> page 114 “programming of manager/office mode”). In the following examples it is assumed, that the used EURACOM P4 is configured as subscriber 23 connected to the 2. S0 bus of a EURACOM 182 and is used as an office telephone. For the manager key manager 1 (subscriber 32 on 3. S0 bus) has been selected. Call manager < Z EURACOM P4 in Idle mode. Lift receiver.
Making telephone calls in a group (manager/office) Call back to manager g You are having a conversation. 27.02.99 08124455123 16:49 w y y Z Press Dedicated key, programmed with manager function. Manager 1 will be called. g 27.02.99 16:49 CALL BACK MANAGER1 w y y Broker´s call. t Press Termination key, to end the broker´s call and to continue the original conversation. 27.02.
Making telephone calls in a group (manager/office) Forwarding to manager g Z g > You are having a conversation. 27.10.98 11 11 w y y Press Dedicated key, programmed with manager function. Manager 1 will be called. 27.10.98 16:01 CALL BACK MANAGER 1 11 32 w y w Call Back conversation. You may now announce your manager the caller. After you have hung up, your manager is connected to the caller. 27.10.98 16:01 CALL BACK MANAGER 1 11 32 w y w Replace the receiver on hook.
Making telephone calls in a group (manager/office) Forwarding to manager from hold g You are having a conversation with 0304711265. Another subscriber is in hold condition (12). Z Press Dedicated key, programmed with manager function. Manager 1 will be called. g Call Back conversation. You may now announce the caller to your manager. R Press Hold key, the caller 0304711265 will be forwarded to the manager und you return to your original conversation partner 12. 27.10.
Making telephone calls in a group (manager/office) Accepting calls for manager Calls for the manager are also signalled at the same time at the office telephone. Both are able to accept the call. Specially, if the manager telephone is switched to “silent signalling”, thus no call will be lost. EURACOM P4 in Idle mode. Incoming call for the manager will be signalled by speaker and flashing call LED. < Lift receiver. 27.10.98 08152233445 CALL FOR MANAGER w w w 16:01 27.10.
Using announcements and intercom With a EURACOM P4, connected to a EURACOM PABX you are able to make announcements from every connected telephone. These announcements will be signalled at every connected system telephone automatically to the corresponding subscribers. The announcements can only be received from the EURACOM P4 in Idle mode. Receiving announcements and intercom EURACOM P4 in Idle mode. An incoming announcement / intercom is being signalled visually and acoustically.
Using announcements and intercom Making announcements < p EURACOM P4 in Idle mode. Lift receiver. Sound of dial tone. Press intercom key. 27.10.98 PLEASE DIAL 16:01 w y y 27.10.98 INTERCOM TO: 16:01 w y y a Entry of the intercom function 00: global announcement 10 to 99: intercom with subscriber After positive acknowledgement tone of the EURACOM PABX, it is possible to operate the announcement / intercom. > Place receiver on hook and terminate announcement / intercom.
Supervising of a room With your EURACOM P4 with installed answering machine it is possible to supervise a room by remote access. But if you do not have installed an answering machine, in system mode you may use the function room surveillance of the EURACOM PABX. The connection to the EURACOM P4 is first activated with a call and at the same time the microphone of the EURACOM P4 is switched on. You therefore have to switch your EURACOM PABX into the room surveillance mode for the EURACOM P4 to operate.
Programming of EURACOM monitoring Assigning ISDN ports It is possible to assign the existing S0 bus symbols according to your own ideas to the maximum of four possible ISDN ports of your PABX in a completely free way. You may also switch a symbol inactive, with the consequence, that no ISDN port will be shown at this place. It will not be checked, if this ISDN port is really existing in the PABX.
Programming of EURACOM monitoring Subscriber monitor You can furthermore assign telephone numbers to the existing eight subscriber display messages (subscriber monitoring ). You can also delete a telephone number with the consequence, that no internal subscriber will be shown at this place. There is no check, if internal subscribers are really existing in the PABX.
Programming of EURACOM system mode In order to make use of the special features in the system mode, you have to program the EURACOM P4 for the operation mode EURACOM mode. Set up of EURACOM P4 as system telephone PP EURACOM P4 in Idle mode. +/- 2 1 +/- 3 6 P Press Programming key twice. PROGRAMMING 0:END 1:MAIN SETTINGS y y y ) ( Select menu point “subscriber configuration” with Plus and Minus key. PROGRAMMING 2:SUBSCRIBER CONFIG. 3:ANSWERING MACHINE y y y ) ( Press key 2.
Programming of EURACOM system mode Programming in EURACOM system mode The following functions can only be programmed in EURACOM system mode: • • • Lock before announcements All functions of the manager / office mode Programming of EURACOM PABX And this is how you enter the menu “EURACOM system mode”: PP EURACOM P4 in Idle mode. Press Programming key twice. +/- PROGRAMMING 4:EURACOM MONITORING 5:EURACOM SYSTEM MODE y y y ) ( EURACOM SYSTEM MODE 0:END 1:INTERCOM y y y ( Press key 5.
Switching on / off of announcements and intercom A system telephone accepts announcements / intercom in any case. Before the global announcement is made, there is the possibility for individual locking. In menu “EURACOM system mode”: Keysequence: 1 eg 1 0 PP5 EURACOM SYSTEM MODE 0:END 1:INTERCOM y y y Press key 1. You are now in menu “Intercom”. INTERCOM ANNOUNCEMENT LOCK OFF 0:END 1:ON y y y Switch on or off announcement lock with Number key 1 or 2.
Programming of manager office mode Switching on manager office mode In menu “EURACOM system mode”: Keysequence: 2 1 eg 1 0 PP5 EURACOM SYSTEM MODE 0:END 1:INTERCOM y y y Press key 2. You are now in menu “Manager / Office mode”. MANAG. OFF. MODE 0:END 1:ACTIVATE MODE y y y Press key 1. You are now in menu “Activate mode”. MANAG. OFF. MODE ACTIVATE MODE: OFF 0:END 1:ON 2:OFF y y y Switch on or off manager / office mode with Number key 1 or 2. MANAG. OFF.
Programming of manager office mode a P 2 After selection of first number input, enter the two-figure internal telephone number of manager. MANAGER_1 NUMBER _ y y y Complete your entry with Programming key. You are now in preceding menu. MANAGER_1 0:END 1:NUMBER 2:DIRECT DIAL y y y With selection of the Dedicated key you will be asked to press the Dedicated key, being prepared to call this partner. The number of the Dedicated key will be displayed.
Programming of manager office mode Programming manager telephone set Concering the manager telephone you only determine the Dedicated key for the office. Resulting from the set up of the office telephone, your EURACOM P4 was already activated for the manager / office mode. In menu “Manager / office mode”: Keysequence: P ( To determine the Dedicated key, select manager mode with 2. DIRECT DIAL MANAGER 1:DIRECT DIAL y y y Press key 1. You will be asked, to press the Dedicated key with to call the office.
Programming of EURACOM PABX You are able to program the EURACOM PABX menu guided via your EURACOM P4. These features are only related to PABX functions. As far as you change the configuration of your own subscriber number affects the settings of your EURACOM P4, these data will be adjusted. It should be noted that certain PABX functions are named in a similar way to those of the direct call of the EURACOM P4 telephone, but are executed in a different manner.
120 Installation Programming of operation mode Programming the call number Number assignment Setting up PIN remote control Programming of time limit Monitoring calls automatically 120 121 122 122 125 126 127 Switch on / off of answering machine 128 Recording of announcements 129 Recording a message 130 Call up of the answering machine 131 Listen to messages Skip messages Call back to recorded message, just heard Clear recorded messages 131 132 132 133 Monitoring and accepting calls 133 Record
The EURACOM P4 is prepared for upgrading with an answering machine module. The EURACOM P4 recognizes the upgrade module automatically and then puts at your disposal the corresponding functions for use and programming. Installation of answering machine Installation s Prior to installation unplug the EURACOM P4 from ISDN socket.
Installation of answering machine Programming of operation mode Where your answering machine is required to make only an announcement or record messages, the following is the programming procedure: In menu “Answering machine”: Keysequence: 1 +/- PP3 Press key 1. You are now in menu “Operation mode”. Scroll to the corresponding menu points with Plus or Minus key. Selection of the menu point by number input.
Installation of answering machine Programming the call number In menu “Answering machine”: Keysequence: 2 +/- P PP3 Press key 2. You are now in menu “call number”. Set the call number between 1 and 9 with Plus or Minus key. The call number indicates, after how many ringing signals the answering machine accepts the call. Complete entry with Programming key.
Installation of answering machine Number assignment to all MSN In menu “Number assignment”: Keysequence: 1 a PP33 ANSWERING MACHINE NUMBER ASSIGNMENT 0:END 1:ALL MSN y )( ALL MSN: ON NUMBER ASSIGNMENT 0:END 1:ON 2:OFF y )( ANSWERING MACHINE NUMBER ASSIGNMENT 0:END 1:ALL MSN y )( Press Plus or Minus key, until the menu “Individual MSN” appears. ANSWERING MACHINE NUMBER ASSIGNMENT 2:INDIVIDUAL MSN y )( Press Number key 2. You are now in menu “Individual MSN”.
Installation of answering machine IMPORTANT NOTE! • All MSN, programmed for the EURACOM P4, as also the special MSN (the individual MSN for the answering machine) will be offered for assignment. • You are able to assign more than one MSN to the answering machine, if programmed a multi subscriber connection. Programming special MSN The “special MSN” is a specially assigned MSN for the answering machine.
Installation of answering machine Setting up PIN remote control In order to make sure, that no unauthorized person is able to access your answering machine, it is possible to program a Remote access PIN here. Keysequence: +/- 4a P a PP3 Press Plus or Minus key, until the menu “Remote access PIN” appears. Press Number key 4. You are now in menu “Remote access PIN”. Afterwards enter your old PIN. Complete entry with Programming key. Enter new PIN with Number keys.
Installation of answering machine Programming of time limit This is where you may determine, how much time shall be available for a recording. You may determine eg, that callers have available a maximum of 60 seconds for their messages. In menu “Answering machine”: Keysequence: +/- 6 +/- a 7 Answering machine 0 PP3 Press Plus or Minus key, until the menu “Time limit” appears. Press Number key 6. You are now in menu “Time limit”.
Installation of answering machine Monitoring calls automatically It is possible to adjust your answering machine in that way, that every time a message is recorded the speaker will be switched on. You will then monitor the message of your caller. +/- 7 a 0 PP3 ANSWERING MACHINE 0:END 1:OPERATION MODE) 2:CALL NUMBER ( y Press Plus or Minus key, until the menu “Monitoring” appears. ANSWERING MACHINE 7:MONITORING 8:CALL TRANSFER y Press Number key 7. You are now in menu “Monitoring”.
Switch on / off of answering machine Switching on M P EURACOM P4 in Idle mode. Press Message key. ANSWERING MACHINE 0:END 1:ON 2:OFF 3:REPLAY 4:MAILBOX y Switch on answering machine with Programming key. Message LED will be switched on. 27.10.98 ) ( 16:01 y Switching off t Switch off answering machine with Termination key. Message LED turns off. 27.10.98 16:01 y IMPORTANT NOTE! • • 7 Answering machine 128 The message LED indicates the status of the answering machine.
Recording of announcements This is where it is possible, to record your individual message text. This message will then be heard by your callers. You may record two different message texts and one “only message text”. After the “only message text” no message can be left by your callers. This message text is for information only. A typical “only message text” would be eg “This is company xy. Our telephone number has changed. Please dial...
Recording a message It is possible for you, to record messages on your answering machine yourself, without making a call. It is thus possible to leave a message eg for your family members. These messages will then be signalled like a normal call. M +/- 5 P 7 Answering machine 130 EURACOM P4 in Idle mode. Press Message key. ANSWERING MACHINE 0:END 1:ON 2:OFF 3:REPLAY 4:MAILBOX y ) ( Scroll to desired menu point with Plus and Minus key. Select menu point with number.
Call up of the answering machine Your answering machine is prepared to record messages up to 40 minutes. Each message will be recorded with date, time and telephone number (if available). During replay of messages you may skip messages and clear single messages purposely. While listening to a message, the phone number of the subscriber will be shown in the display of your EURACOM P4. If you lift the receiver, this number will be dialled immediately.
Call up of the answering machine Skip messages You replay messages of your answering machine. + With Plus key to next message. - With Minus key to last message. ANSWERING MACHINE REPLAY MESSG.1 30.10.98 14:59 022369430321 y ANSWERING MACHINE REPLAY MESSG.2 30.10.98 17:00 01727298856 y ANSWERING MACHINE REPLAY MESSG.1 30.10.98 14:59 022369430321 y IMPORTANT NOTE! • You may scroll forwards and backwards by pressing Plus and minus key several times.
Clear recorded messages t P You are listening to messages from your answering machine. ANSWERING MACHINE REPLAY MESSG.02 31.05.98 14:00 022369430321 y Press Termination key. Reconfirmation of the clear function. ANSWERING MACHINE REPLAY MESSG.02 DELETE? 022369430321 y Confirm deletion with the Programming key. With every other key back without deletion. 31.05.
Recording of conversations It is possible to record a telephone conversation at all times. In this case you can avoid written notes eg But please inform your conversation partner about it. g You are having a conversation. 02.12.98 022369430321 15:02 w M M Press Message key. The current conversation will be recorded. 02.12.98 022369430321 RECORDING w 15:02 Press Message key again. The recording will be terminated early. 02.12.
Transfer of messages With the EURACOM P4 it is possible to signal newly received messages immediately to any telephone number (call transfer). This may be a mobile number, any telephone or a pager number. A programmed announcement will be transmitted to the mobile telephone and a programmed number sequence to the pager. But this telephone number must first be programmed. Overviewing to the steps: • • • Record call transfer announcement or enter pager message.
Transfer of messages Enter call transfer pager message In menu “call transfer”: Keysequence: +/- 2a P PP38 ANSWERING MACHINE CALL TRANSFER 0:END 1:ANNOUNCEMENT )( y Press Plus or Minus key until the menu “pager” appears. ANSWERING MACHINE CALL TRANSFER 2:PAGER 3:NUMBER y Press key 2. You are now in menu “pager”. Afterwards enter the characters, that shall be transmitted. ANSWERING MACHINE PAGER-MESSAGE 023468#723 y Complete entry with Programming key.
Switch on / off call transfer In menu “call transfer”: Keysequence: +/- 4a PP38 Press Plus or Minus key until the menu “state” appears. Press key 4. You are now in menu “state”. Switch on call transfer to telephone with key 1, to pager with key 2 and switch off call transfer in general with key 3. ANSWERING MACHINE CALL TRANSFER 0:END 1:ANNOUNCEMENT )( y ANSWERING MACHINE CALL TRANSFER 4:STATE y )( ANSWERING MACHINE CALL TRANSFER: ANN.ON 0:END 1:ANN.
Programming of VIP-function Switch on / off VIP In menu “VIP”: Keysequence: 1 a PP391 Press key 1. You are now in menu “state”. Switch on or off VIP function with number key 1 or 2. ANSWERING MACHINE VIP-FUNCTION 0:END 1:STATE 2:CODE y VIP-FUNCTION STATE: OFF 0:END 1:ON y 2:OFF VIP-FUNCTION STATE: ON 0:END 1:ON y 2:OFF Enter VIP code In menu “VIP”: Keysequence: 2 PP391 Press key 2. You are now in menu “code”.
Releasing room surveillance With the function room surveillance it is possible to monitor a room from remote via the hands-free microphone. You can lock the room surveillance to be protected against unnoticed monitoring. In menu “Answering machine”: 9 +/- 2 a Press Plus or Minus key until the menu “More functions” appears. Press Number key 9. You are now in menu “More functions”. Press Plus or Minus key until the menu “Room inspection” appears. Press key 2. You are now in menu “Room inspection“.
Use of mailbox The mailbox is a special speech memory, which can record speech, can be listened to or cleared from local or remote location. In any case only one mailbox message at the same time can be stored. M 4 P 7 Answering machine 140 EURACOM P4 in Idle mode. Press Message key. ANSWERING MACHINE 0:END 1:ON 2:OFF 3:REPLAY 4:MAILBOX y Select menu point “mailbox”. Record mailbox message via the receiver. The message may vary between 0 and 60 seconds.
Using remote control facility With input of a remote control PIN unequal “0000”, the remote control is activated. If the remote control is switched on, you may control your answering machine remotely from any telephone with DTMF (tone dialling). If during remote control your phone is ringing for two extra ring periods this indicates no messages have been received. Therefore there is no need for being connected to your answering machine.
Using remote control facility List of codes, overview 7 Answering machine Reproduction of new messages of all messages call transfer announcement announcement 1 announcement 2 end announcement only announcement mailbox message complete Next message Last message / repeat message Clear current message Clear all old messages call transfer announcement announcement 1 announcement 2 end announcement only announcement mailbox message Record call transfer announcement announcement 1 announcement 2 end announceme
Using remote control facility Calling as VIP s Dial up the desired connection. s Answering machine accepts the call. s During announcement: enter # VIP code #. 7 Answering machine s Answering machine is interrupted, call will be signalled by tone ringer again.
7 Answering machine 144
8.
Troubleshooting Whenever your EURACOM P4 does not function, never assume there is a major technical problem. First carry out a check to see if any of the cords are connected properly. If the problem persists, eneavour to repair matters yourself to save time and money before calling the EURACOM service center. Your ISDN connection is equipped with a network termination of your network provider. For power supply reasons this device is connected to the mains of your department or house.
Tróubleshooting Dialling not possible • Telephone locked (symbol in display): Unlock telephone. Your conversation partner cannot hear you • Microphone is switched off (symbol in display): Switch on microphone again. No ringer tone when called • “Silent signalling” is activated: Switch off “silent signalling”. No incoming calls possible • Wrong multiple subscriber number programmed: Check multiple subscriber number and program again, if necessary.
Troubleshooting No registration as system telephone • Your EURACOM PABX does not support this function yet: Read release number and upgrade PABX. • The programmed telephone number is already reserved for another system telephone: Check setting and program correct telephone number. • No EURACOM mode selected: Check setting. IMPORTANT NOTE! In some cases it might be of help if you unplug and the reintroduce the cord plug (reset of software). Never open the telephone yourself.
Making telephone calls with headset We recommend to connect a headset via an adapter box which is available from your EURACOM sockist. This has the advantage, that headset and receiver can be connected both at the time and used alternatively without the need for rearranging the telephone on each occasion. Therefore plug the cord of the adapter box instead of the receiver cord into the receiver socket at the base of the telephone. Plug the receiver and the headset in the prepared sockets of the adaptor box.
Your telephone and your PC Minimum requirement for your PC Your PC should meet at least the following requirements: • • • • • Operating system Windows 95 or Windows NT 3,5 ” disc drive 1 MB of free hard disc space VGA graphic card (640 x 480 pixel) RS 232C interface with 9-pin D-Sub socket Connect telephone with PC Install only with PC switched off ! s Unplug connection cord of your EURACOM P4 from ISDN socket. Display turns off.
Further important notes Positioning EURACOM P4 Concerning the variety of different surface materials of furniture it might be possible, that these receive unpleasant marks, when in contact with parts of the housing (eg base of set). It is therefore recommended, to place the EURACOM P4 on a non-slip surface. Care and cleaning When cleaning your EURACOM P4, please: • Never use a dry cloth (electrostatic charge might cause damages to the electronics).
Futher important notes Technical data 8 Problem-solving Euro ISDN basic network access Connection Protocol Operation mode TNV-1 circuit Basic access: 2xB-, 1xD- channel DSS1 (Euro ISDN) Multiple subscriber mode (point-tomultipoint) System connection (point-to-point) EURACOM PABX system mode Power supply phantom feeding Power consumption Operation without answering machine Operation with answering machine Idle mode typ. 300 mW typ.
Futher important notes Warranty certificate The manufacturer guarantees a warranty of 12 months for the EURACOM P4, staring from the date stated on receipt from the reseller, excluding compensation, change or other claims. Please keep your receipt for prove of purchasing date. All parts covered by this warranty, which have been damaged by production or through material failures, will be repaired or replaced free of charge.
Index A 8 Problem-solving accepting calls answering machine 133 adapting the ringing level 21 AKZ 89 alarm call 67 alarm or wake-up call 67 delete 68 enter 67 announcement mode 121 announcements making 108 receiving 107 switch on/off 114 answering machine 12 announcement mode 121 assign number 122 call back recorded messages 132 call monitoring automatical 127 call number program 122 call transfer phone number 136 call transfer switch on/off 137 call up 131 calling as VIP 143 clear recorded messages 133 c
connection list 31 connection mode 79 multi subscriber connection 80 system connection 81 connection with a PC 12 contents 5, 6, 7 cords disconnecting 151 correcting of inputs 19 currency 67 date 73 Dedicated key 27 delete 61 programming with carrier prefix 60 programming with function 60 with correction facilities 30 with preparation and correction facilities 30 without dial preparation 27 Dedicated keys programming 59 dial lock switch on/off 95 dial preparation with correction facilities 30 without 27 di
directory dialing 29 with preparation 29 without preparation 29 display 11 display contrast set up 73 display information interrupt 53 display messages 51 interrupt 53 display overview 18 display set up 73 display symbols 7, 18 display view 7 DTMF tones 49 E environmental protection 7 EURACOM monitoring ISDN ports assigning 110 programming 109 subscriber monitor 111 EURACOM PABX mode 16 programming 118 EURACOM system mode 113 announcement switch on/off 114 intercom switch on/off 114 external line number 89
N name setting 86 notebook 40 number assig answering machine 122 number display incoming 87 number display outgoing 87 number storing 40 O office telephone 115 operation during power failure 16 operation in multiple subscriber mode 15 P PABX mode 81 pager message 136 PC minimum requirement 150 PC programme install 150 PIN locking 77 PIN remote control 125 PIN set up 76 placing EURACOM P4 151 placing the telephone 13 plate removeable 14 programming of EURACOM PABX 118 R receiver volume set up 74 reception
ring delay 83 ringer melody 85 ringer signalling 84 ringing level adapting 21 ringing level set up 75 ringing symbol 7, 18 room surveillance 139 S 8 Problem-solving S0-bus symbol 7, 18 safety functions 11 sending DTMF tones 49 sending keypad information 50 service center 153 several connections 41 silent signalling 34 reject a caller 34 switching on/off 35 skip messages 132 softwareupdate 78 speaker level 74 speaker phone operation 11 speaker symbol 7, 18 speaking to two subscribers 42 specifications 151
8 Problem-solving For your notes 159
For your notes 8 Problem-solving 160
The display helps you C D E z J F ringing symbol symbolizes activated silent signalling speaker symbol symbolizes activated speaker or hands-free mode.
Codes, continuation Clear all old messages 22 call transfer announcement 23 announcement 1 24 announcement 2 25 end announcement 26 only announcement 27 mailbox-message 28 Record call transfer announcement 33 announcement 1 34 announcement 2 35 end announcement 36 only announcement 37 Mailbox message 38 complete 0 Switch off answering machine S0 0S Announcement operation, announcement 1 S1 1S Announcement operation, announcement 2 S1 2S Announcement operation, only announcement S1 3S Asking for remaining m
Printed eco-friendly on recycled paper © Ackermann 1999 Information in this manual and the components used in our systems are subject to change without notice as a result of innovation and progressive development. While every effort is made to ensure the accuracy of the information in this manual, Ackermann Ltd. does not accept any responsibility whatsoever for any error or omission or for any loss arising out of reliance placed an any material or components and statements contained herein.