XperiorTM 5R BEAM F User Guide Please read these instructions carefully before use
XP-5R Beam F TABLE OF CONTENTS 1. Safety Instruction............................................................................... 2 2. Installation .......................................................................................... 4 3. Technical Specification ..................................................................... 5 4. Description ......................................................................................... 8 4.1 Description of the fixture ...............................
1. Safety Instruction Please read carefully the instruction manual, which includes important information about the installation, usage and maintenance. WARNING Please keep this User Guide for future consultation. If you sell the unit to another user, be sure that they also receive this instruction manual. Important: Damages caused by the disregard of this user manual are not subject to warranty. The dealer will not accept liability for any resulting defects or problems.
XP-5R Beam F during its operation, and allow about 15 minutes for cooling the unit down before replacing bulb or maintenance as it could be very hot. y Avoid any inflammable liquids, water or metal objects entering the unit. Once it happens, cut off the mains power immediately. y Do not operate in dirty or dusty environment; do clean the fixture regularly. y Do not touch any wire during operation as there might be a hazard of electric shock. y Avoid power wires twist other cables.
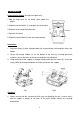
2. Installation Unpacking the fixture (for flight case pack only) 1. Stop the flight case via the brake sheet above the wheels. 2. Unlock the lock modules (1) and open the cover board. 3. Prop the cover board with lid bracket. 4. Take out the fixture. 5. Unlock the lock module (2) take out omega clamps. Installation: 1. Bolt each clamp (1) to the Omega holder with screw and lock nut through the hole in the holder. 2.
XP-5R Beam F y Also always use a safety cable that can hold 12 times of the weight of the unit when installing the fixture. y Make absolute sure that the unit is firmly fixed in way that no vibrating or slipping would occur during operation. y The equipment must be installed beyond the areas where persons may walk by or be seated. y The rigging has to be operated by or under the guide of a skilled person. 3.
Dimmer/Shutter - Mechanical dimmer - Mechanical shutter and adjustable speed strobe effect Color wheel - Color wheel: 14 fixed colors - Rainbow effect in both directions. - Easy calibration and maintenance by magnetic home positioning. Gobo wheel - Gobo Wheel: 17 fixed gobos, index able, - Easy calibration and maintenance by magnetic home positioning. Prism -8-facet rotating prism Frost Cooling: - Fan cooling Protocols - DMX 512 - Data input/output: 3/5 Pin XLR socket Dimension - 415.1×343.6×514.
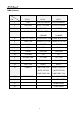
XP-5R Beam F DMX Channels Mode CH Mode 1 Mode 2 Mode 3 15-CH 14-CH 18-CH 1 PAN COLOUR WHEEL COLOUR WHEEL 2 PAN FINE STOP / STROBE STOP / STROBE 3 TILT DIMMER DIMMER 4 TILT FINE STATIC GOBO STATIC GOBO CHANGE CHANGE 5 PAN /TILT SPEED 6 FUNCTION PRISM ROTATION PRISM ROTATION 7 COLOR FROST FROST 8 GOBO PAN PAN 9 PRISM PAN FINE PAN FINE 10 R-PRISM TILT TILT 11 R-PRISM FINE TILT FINE TILT FINE 12 FROST FUNCTION FUNCTION 13 SHUTTER RESET RESET 14 DIMMER
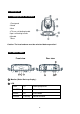
4. Description 4.1 Description of the fixture 1. Front panel 2. Head 3. Arm 4. Tilt arm self-locking handle 5. pan self-locking handle 6. Handle 7. Base Caution: The head and arm must be unlocked before operation! 4.
XP-5R Beam F 3 ○ Button MENU UP To enter into, move backward or leave the menu Move up in the menu DOWN Move down in the menu ENTER 4 ○ Enter the desired functions DMX input/output: For DMX 512 operation, use 3/5-pin XLR plug cable to link the units together 5 ○ Fuse (T 5 A): Protect the unit from damage of overcurrent. 6 ○ Power Cable: To connect to the mains supply 7 ○ Power Switch: Turns On/Off the power 5. Gobo-wheel and Lamp 5.
5.2 Lamp Philips MSD Platinum 5R (8000K) y Because of its high internal pressure, there might be a risk that the Discharge lamp would explode during operation. The lamp emits intense UV radiation which is harmful to the eyes and skin. The high luminance of the arc can cause severe damage to the retina if you take a close look at the lamp.
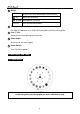
XP-5R Beam F Fig4 Fig3 2. Follow the Fig.3 and Fig.4: Loosen the two screws and apart the entire assembly Fig5 Fig6 3. Follow the Fig.5 and Fig.6: Unplug all the connect wires over the lamp and wear Anti-static gloves to take on the lamp 4. Change a new lamp 6. How to Set the Unit 6.1 Power On Display Every time you turn on the unit, it will run built-in program to reset all motors to their home position, the display will show as fig.4, you may hear some noises for about 20 seconds.
Fig.4 Fig.5 Explanation of fig.5: Base 40°C 001 Md.1 15Ch. Show temperature of base CPU is 40°C Show start address Show channel mode is mode 1 (15 channels mode) 6.2 Main Function Turn on the unit, press MENU button into menu mode, press UP and DOWN button until the required function is shown on the monitor. Select the function by ENTER button. Use UP and DOWN button to choose the submenu, press the ENTER button to store and automatically return to the last menu.
XP-5R Beam F 13--
DMX Functions Enter menu mode, select DMX Functions, press ENTER button to confirm, use UP and DOWN button to select DMX Address, DMX Channel Mode or View DMX Value DMX Address—DMX512 address setting Select DMX Address, press ENTER button to confirm, the present address will blink on the display, use UP and DOWN button to adjust the address from 1 to 512, press ENTER button to store. Press MENU button back to the last menu or let the unit idle one minute to exit menu mode.
XP-5R Beam F to exit menu mode. View DMX Value Select View DMX Value, press ENTER button to confirm. Channel function and its value will show on the display, use UP and DOWN button to view other DMX value. Press MENU button back to the last menu or let the unit idle one minute to exit menu mode. WDMX Setting—wireless control setting (For the unit with wireless receiver built-in only) Select WDMX Setting, press ENTER button to confirm.
Change or BL.O. Gobo Change. Pan Inverse Select Pan Inverse, press ENTER button to confirm, present mode will blink on the display, use UP and DOWN button to select No (normal) or Yes (pan inverse), press ENTER button to store. Press MENU button back to the last menu or let the unit idle one minute to exit menu mode.
XP-5R Beam F BL.O. Gobo Change—Blackout while change gobo Select BL.O. Gobo Change, press ENTER button to confirm, present mode will blink on the display, use UP and DOWN button to select No (normal while changing gobo) or Yes (blackout while changing gobo), press ENTER button to store. Press MENU button back to the last menu or let the unit idle one minute to exit menu mode. Lamp Setting Attention: The lamp will not be on unit detected temperature is lower than 45°C.
“yes” mode). On If DMX On— Lamp turns on when DMX signal is detected Select On If DMX On, press ENTER button to confirm, present mode will blink on the display, use UP and DOWN button to select Yes (Lamp turns on when DMX signal is detected) or No (keep the present state), press ENTER button to store. Press MENU button back to the last menu or let the unit idle one minute to exit menu mode (If the lamp is off via DMX signal, you can reconnect the DMX controller to make the lamp on).
XP-5R Beam F or Temperature unit. Display Inverse Select Display Inverse, press ENTER button to confirm, present mode will blink on the display, use UP and DOWN button to select No (normal display) or Yes (inverse display), press ENTER button to store. Press MENU button back to the last menu or let the unit idle one minute to exit menu mode.
automatically test pan, tilt, color, gobo, gobo rotation, shutter, dimmer, prism, prism rotation, frost, focus, and lamp on/off. . Press MENU button back to the last menu or exit menu mode after auto test.
XP-5R Beam F Reset Functions Enter menu mode, select Reset Function, press ENTER button to confirm, use UP and DOWN button to select Pan/Tilt, Shutter/Prism/Frost, Color, Gobo or All. Pan/Tilt—Reset Pan/Tilt Select Pan/Tilt, press ENTER button to confirm, use UP and DOWN button to select Yes (the unit will run built-in program to reset pan and tilt to their home positions) or No, press ENTER button to store. Press MENU button back to the last menu or let the unit idle one minute to exit menu mode.
Special Functions Enter menu mode, select Special Functions, press ENTER button to confirm, use UP and DOWN button to select Fixture Maintenance or Factory Setting. Fixture Maintenance Select Fixture Maintenance, press ENTER button to confirm, use UP and DOWN button to select Interval or Remain Time. Interval Select Interval, press ENTER button to confirm, the interval time will show on the display. Press MENU button to exit.
XP-5R Beam F Pan—pan home position adjust Enter offset mode, Select Pan, press ENTER button to confirm, the present position will blink on the display, use UP and DOWN button to offset the value from -128 to 127, press ENTER button to store. Press MENU button to exit. Tilt—Tilt home position adjust Enter offset mode, Select Tilt, press ENTER button to confirm, the present position will blink on the display, use UP and DOWN button to offset the value from -128 to 127, press ENTER button to store.
Gobo—Gobo home position adjust Enter offset mode, Select Gobo, press ENTER button to confirm, the present position will blink on the display, use UP and DOWN button to offset the value from -128 to 127, press ENTER button to store. Press MENU button to exit. Prism—Prism home position adjust Enter offset mode, Select Prism, press ENTER button to confirm, the present position will blink on the display, use UP and DOWN button to offset the value from 0 to 255, press ENTER button to store.
XP-5R Beam F 6.4. Error Information Lamp Startup Fail It appears when there is no lamp or some wires are damaged. Temperature Sense Error It appears when temperature check board is damaged. Lamp Too Hot Power Off It appears when temperature is detected higher than 110℃. Check if the unit is properly ventilated, or fans or temperature check board may is damaged. Lamp Too Hot Low Power It appears when temperature is detected higher than 105℃. the unit will run on a low power level.
7. Control By Universal DMX Controller 7.1 Connection unit 1 unit 2 unit3 unit4 1. At last unit, the DMX cable has to be terminated with a terminator. Solder a 120-ohm 1/4W resistor between pin 2(DMX-) and pin 3(DMX+) into a 3-pin XLR-plug and plug it in the DMX-output of the last unit. 2. Connect the unit together in a “daisy chain” by XLR plug cable from the output of the unit to the input of the next unit. The cable cannot be branched or split to a “Y” cable. DMX 512 is a very high-speed signal.
XP-5R Beam F 5. The end of the DMX 512 system should be terminated to reduce signal errors. 6. 3 pin XLR connectors are more popular than 5 pins XLR. 3 pin XLR: Pin 1: GND, Pin 2: Negative signal (-), Pin 3: Positive signal (+) 5 pin XLR: Pin 1: GND, Pin 2: Negative signal (-), Pin 3: Positive signal (+), Pin4, Pin5 not used. 7.
7.4 DMX 512 Configuration Please refer to below configurations to control the fixtures Attention: 1. The unit will maintain the last condition until reset if you cut-off the DMX signal. 2. For the channel Function, keep the value for about 5 seconds, then the corresponding function will take into effect.
XP-5R Beam F 15 Channels mode1: 29--
30-
XP-5R Beam F 14 Channels mode 2: 31--
32-
XP-5R Beam F 18 Channels mode 3: 33--
34-
XP-5R Beam F 7.5 Lighting Library Download The whole series of Xperior fixtures’ personalities have been built into the most widely used consoles from Avolites, Compulite, Daslight, MA Lighting, Wholehog and Zero 88. Please visit their websites or ours: http://www.acme.com.cn/ to download the latest Fixture Personality Library. To apply Xperior lighting libraries into the above mentioned consoles, please refer to the following example: Pearl 2008/2010 & Tiger You will need a USB memory stick. 1.
9. Troubleshooting Following are a few common problems that may occur during operation. Here are some suggestions for easy troubleshooting: A. The unit does not work, no light and the fan does not work 1. Check the connect power and main fuse. 2. Measure the mains voltage on the main connector. 3. Check the power on LED to see if it can be light up or not. B. Not responding to DMX controller 1. DMX LED should be on. If not, check DMX connectors, cables to see if they are linked properly. 2.
XP-5R Beam F E. If The pan belt is broken 1. Turn off the mains power. 2. Loosen the screws (A),open the cover (B). 3. Loosen the screws (C). 4. Unplug all the connect wires over the belt. 5. Change a new belt (D), put the belt around the axis gear and motor gear. 6. Plug all the connect wires back upon the belt. 7. Tighten all the screws. F. If The tilt belt is broken 1. Turn off the mains power. 2. Loosen all the screws (A) and open the right arm cover (B). 3. Loosen the screws (C) that fix the bridge.
10. Maintenance and Cleaning Maintenance: Ballast A. As the pictures shown above, please replace the cable or cable joints immediately once they’ve turned yellow. B. Do maintain the fixtures every two months and make sure that all the screws and terminals have been locked firmly to make sure the normal performance of the fixtures. Negligence of maintenance would cause malfunction of the fixture.
Innovation, Quality, Performance 39393610525212112112222222222222236