KC/KCP Series KVM Rear Kit for LCD Console Drawer User Manual KC/KCP Series: Combo Cat KVM Switch 8/16/32 port with 1/2 user console 14628 Central Ave, Chino, CA 91710 tel:909.597.7588, fax:909.597.1939 © Copyright 2013 Acnodes, Inc. All rights reserved. Product description and product specifications are subject to change without notice. For latest product information, please visit Acnodes’ web site at www.acnodes.com.
Legal Information First English printing, October 2002 Information in this document has been carefully checked for accuracy; however, no guarantee is given to the correctness of the contents. The information in this document is subject to change without notice. We are not liable for any injury or loss that results from the use of this equipment. Safety Instructions Please read all of these instructions carefully before you use the device. Save this manual for future reference.
Contents < Part 1 > Combo Cat6 KCP802 1.1 1.2 1.3 1.4 1.5 1.6 KCP1602 KCP3202 Package contents KVM port & Cat6 dongle connection IP console connection IP console setting KVM Cascade Specifications < Part 2 > Combo Cat6 KC802 2.1 2.2 2.3 2.4 2.5 KVM Kit P.1 P.2 P.3 P.4 P.5 P.6 2-console KVM Kit KC1602 KC3202 Package contents KVM port & Cat6 dongle connection Remote console connection KVM Cascade Specifications P.7 P.8 P.9 - 10 P.11 P.12 < Part 3 > Combo Cat6 KVM Kit KC801 3.1 3.2 3.3 3.
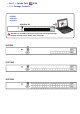
< Part 1 > Combo Cat6 < 1.1 > Package Contents KVM KCP802 KCP1602 KCP3202 KVM Rear Kit back The power of the KVM rear kit may be changed to external power design based on the LCD console drawer series and model.
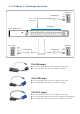
< 1.2 > KVM port & Cat6 dongle connection USB Servers DG-100SD DVI-USB dongle CAT 5 / 6 cable max. 40 meters USB DVI-D Cat6 KVM port Drawer KVM Rear Kit PS/2 Servers USB Servers PS/2 VGA DG-100S VGA-USB dongle DG-100 VGA-PS/2 dongle CAT 5 / 6 cable max.
< 1.3 > IP console connection CAT 5 / 6 cable max.
< 1.4 > IP console setting After the cable connection, please take the following steps to configure the IP KVM : 1. Download IPKVMsetup.exe 2. Double click IPKVMsetup.exe to configure the IP KVM by device setup as below. 3. Click Refresh Device to search the connected IP KVM 4. Select the M.A.C. address, which you want to setup, then click Query Device 5. Enter Super user login. The default is super 6. Enter Super user password. The default is pass 7. Enter the new super user password 8.
< 1.5 > KVM Cascade ■ ■ Cascade up to 8 levels, 256 servers Cascading multiple KVM with CBC-6 cascade cable. Cascaded KVMs from level 2 to 8 must be the models of KC801 / 1601 / 3201. When multiple combo Cat6 KVMs cascade together, the master KVM at level 1 will take all control of other slave KVM switches (e.g. level 2 to 8).
< 1.
< Part 2 > Combo Cat6 2-console KVM < 2.1 > Package Contents KC802 / 1602 / 3202 KVM Rear Kit • Receiver box for remote console x 1 • Power adapter w/ power cord ( for receiver ) x 1 • CE-6 6ft Combo KVM cable for receiver box x 1 back The power of the KVM rear kit may be changed to external power design based on the LCD console drawer series and model.
< 2.2 > KVM port & Cat6 dongle connection USB Servers DG-100SD DVI-USB dongle CAT 5 / 6 cable max. 40 meters USB DVI-D Cat6 KVM port Drawer KVM Rear Kit PS/2 Servers USB Servers PS/2 VGA DG-100S VGA-USB dongle DG-100 VGA-PS/2 dongle CAT 5 / 6 cable max.
< 2.3 > Remote console connection Receiver Remote USB console CAT 5 / 6 cable max.
How to use a receiver to connect a remote console Receiver Local Computer Monitor Remote I/O Front Rear Power USB K/B Mouse Local Button to PC Remote Console Remote Button to KVM switch Drawer KVM Rear Kit Monitor Local computer ( Optional setup ) Combo Cat6 cable up to 150m KVM cable 12V DC Power Adapter Front Rear
< 2.4 > KVM Cascade ■ ■ Cascade up to 8 levels, 256 servers Cascading multiple KVM with CBC-6 cascade cable. Cascaded KVMs from level 2 to 8 must be the models of KC801 / 1601 / 3201. When multiple combo Cat6 KVMs cascade together, the master KVM at level 1 will take all control of other slave KVM switches (e.g. level 2 to 8).
< 2.
< Part 3 > Combo Cat6 KVM < 3.1 > Package Contents KC801/ 1601/ 3201 KVM Rear Kit back The power of the KVM rear kit may be changed to external power design based on the LCD console drawer series and model.
< 3.2 > KVM port & Cat6 dongle connection USB Servers DG-100SD DVI-USB dongle CAT 5 / 6 cable max. 40 meters USB DVI-D Cat6 KVM port Drawer KVM Rear Kit PS/2 Servers USB Servers PS/2 VGA DG-100S VGA-USB dongle DG-100 VGA-PS/2 dongle CAT 5 / 6 cable max.
< 3.3 > KVM Cascade ■ ■ Cascade up to 8 levels, 256 servers Cascading multiple KVM with CBC-6 cascade cable. Cascaded KVMs from level 2 to 8 must be the models of KC801 / 1601 / 3201. When multiple combo Cat6 KVMs cascade together, the master KVM at level 1 will take all control of other slave KVM switches (e.g. level 2 to 8).
< 3.
Part 4. Usage 4.1 KVM Button Power ON ■ Turn off all servers and KVM switches ■ Make sure all cables / connectors are properly connected ■ Recommend Power ON sequence is monitor, KVM switch finally computer Front Panel - Port LED Indications 8 ports Bank no. PC port LEDs Channel button 16 ports 32 ports Bank no.
< 4.2 > Password The password is enabled by default, the default password is “00000000” eight zeros (Do not use “0” on number pad) ■ Enable password 1. Press the KVM hotkey Scroll Lock + Scroll Lock + U 2. Logout the KVM by pressing the hotkey Scroll Lock + Scroll Lock + P 3. In SUPERVISOR level, enter “00000000” eight zeros in user name & password field (Do not use “0” on number pad) 4.
< 4.
< 4.4 > KVM Hotkey & Remote Console Hotkey Local Console Hotkey Function Scroll Lock + Scroll Lock + Space Bar Calling OSD menu Right-button mouse + Esc Calling OSD menu Scroll Lock + Scroll Lock + Switch to previous port Scroll Lock + Scroll Lock + Switch to next port Scroll Lock + Scroll Lock + PgUp / PgDn Switch to previous bank or next bank Scroll Lock + Scroll Lock + Bank no. + Port no.
< 4.5 > DC Power 12V, 24V, 48V Input Model 12V 24V 48V Input voltage: 12-Volt 24-Volt 48-Volt Input range: 9 ~ 18V 18 ~ 36V 36 ~ 75V - No load 50 mA 50 mA 50 mA - Full load 4950 mA 2450 mA 1220 mA Output voltage: 12-Volt 12-Volt 12-Volt Output current: 4.16A 4.16A 4.