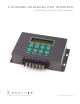
3 - C H A N N E L A D VA N C E D D M X I N T E R FA C E DMXINFADV INSTRUCTION MANUAL Complete Integrated LED Lighting Solutions Tech Support: 212.629.
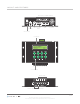
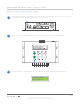
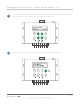
L AYO U T A N D F E AT U R E S DMX Input / Output Options O I USB Power Input Terminal Block RJ45 3-Pin XLR Power Switch LCD Display Control Buttons Out to LEDs 12-24 V DC Power From Driver PA G E 1 All artwork and images copyright Acolyte Industries Inc. Use or reprinting prohibited unless explicitly approved by Acolyte Industries.
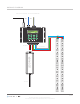
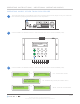
WIRING DIAGRAM DMX In From Controller / Out to Next DMXINFADV 12V-24 DC + R G B OR + R G B OR 151 151 151 151 151 151 DC to LEDs + R G B + R G B + R G B + R G B LED DRIVER 151 AC Input 151 151 151 151 151 151 151 151 151 151 151 151 151 151 151 151 151 + R G B + R G B PA G E 2 All artwork and images copyright Acolyte Industries Inc. Use or reprinting prohibited unless explicitly approved by Acolyte Industries.
PRODUCT SPECS Input voltage DC 12 V ~ DC24 V Max load current 8 Amps per channel x 3 (24 Amps Max) Max load power 288 Watts (12 V) / 576 Watts (24 V) Number of operating modes 39 modes DMX standard DMX 512 / 1990 DMX input types Terminal block, RJ45, 3-pin XLR Operating temperature -22º F ~ 149º F / -30º C ~ 65º C Dimensions (L x W x H) 6.42” x 4.25” x 1.57” / 163mm x 108mm x 40 mm Weight 1.65 lbs / 750 g PA G E 3 All artwork and images copyright Acolyte Industries Inc.
O P E R AT I N G I N S T R U C T I O N S - Q U I C K S TA R T Q U I C K S TA R T D M X D E C O D E M O D E 1 After all components in your lighting system are connected and powered, begin use of your Advanced DMX Interface by flipping the Power Switch to the ON position. O I 2 Use the MODE+ and MODE- buttons to select between the various modes available (1-39). 3 Press the MODE+ or MODE- button until you reach Mode 29 DMX DECODE (highlighted below).
O P E R AT I N G I N S T R U C T I O N S - Q U I C K S TA R T 4 Enter the DMX address by holding the Setup button for 3 seconds. Use the Mode+ and Mode- buttons to set the first digit, use the Speed+ and Speed- buttons to set the second digit, and use the BRT+ and BRT- buttons to set the third digit. 5 Press the setup button to accept this DMX address. Use this address when setting up your controller to control the LEDs connected to this interface.
O P E R AT I N G I N S T R U C T I O N S - A D D I T I O N A L O P E R AT I N G M O D E S O P E R AT I N G M O D E S O T H E R T H A N D M X D E C O D E 1 After all components in your lighting system are connected and powered, begin use of your Advanced DMX Interface by flipping the Power Switch to the ON position. O I 2 Use the MODE+ and MODE- buttons to select between the various modes available (1-39). 3 Use the MODE+ and MODE- buttons to select between the various modes available (1-39).
O P E R AT I N G I N S T R U C T I O N S - A D D I T I O N A L O P E R AT I N G M O D E S 31 PLAY ON 2014-03-21 05:40 ... 39 PLAY1-PLAY8 2014-03-21 4 38 PLAY ON 2014-03-21 05:40 05:40 31-38 - DMX 512 Control Modes 39 - Automatic Timing Run Change Mode For the Preset Color modes (1-28), the speed (only modes 9-27) and brightness of the color change can be controlled with the Speed+, Speed-, Brt+ and Brt- buttons. PA G E 7 All artwork and images copyright Acolyte Industries Inc.
O P E R AT I N G I N S T R U C T I O N S - P R E S E T C O L O R M O D E S ( 1 - 2 7 ) PRESET COLOR MODES 1 Determine which Preset Color mode you intend to use from the chart below. Mode Number Mode Name Description 1 Black 2 Static Red 3 Static Green 4 Static Blue 5 Static Yellow Light is YELLOW and does not change. 6 Static Purple Light is PURPLE and does not change. 7 Static Cyan Light is CYAN and does not change. 8 Static White Light is WHITE and does not change.
O P E R AT I N G I N S T R U C T I O N S - P R E S E T C O L O R M O D E S ( 1 - 2 7 ) 2 Press the Speed+ and Speed- buttons to increase/decrease the speed of the color change (modes 9-27) and press the Brt+ and Brt- buttons to increase/decrease the brightness. 3 Press and hold the setup button for 3 seconds to fine tune the settings for each mode. PA G E 9 All artwork and images copyright Acolyte Industries Inc. Use or reprinting prohibited unless explicitly approved by Acolyte Industries.
O P E R AT I N G I N S T R U C T I O N S - P R E S E T C O L O R M O D E S ( 1 - 2 7 ) 4 Use the Mode+ and Mode- buttons to cycle through the four submenu options: Running Time Adjustment: RUN TIMES : 003 000=NOT RUNNING Does not work on Preset Color modes (1-27) Default Set Recovery: LOAD DEFAULT SET PRESS BRT + - KEY Press either the BRT+ or BRT- button to restore the default settings for the current mode Adjust the speed multiple: SPEED MULTIPLE: 001 Press the BRT+ button to increase and the B
O P E R AT I N G I N S T R U C T I O N S - R G B D I M M I N G M O D E ( 2 8 ) RGB DIMMING MODE 1 Set a specific RGB value by pressing the Speed+ and Speed- buttons to select the R, G and B values, and use the BRT+ and BRT- to increase/decrease the value. PA G E 1 1 All artwork and images copyright Acolyte Industries Inc. Use or reprinting prohibited unless explicitly approved by Acolyte Industries.
O P E R AT I N G I N S T R U C T I O N S - M O D E S 3 0 - 3 9 DMX MODES 30-39 At this time, modes 30-39 (as pictured below) are incompatible with our controllers and control systems. 30 DMX MODE DMX ADDRESS: 001 31 PLAY ON 2014-03-21 05:40 ... 39 PLAY1-PLAY8 2014-03-21 29-30 - DMX 512 Control Modes 38 PLAY ON 2014-03-21 05:40 05:40 31-38 - DMX 512 Control Modes 39 - Automatic Timing Run Change Mode PA G E 1 2 All artwork and images copyright Acolyte Industries Inc.