C H A N N E L I N S TA L L AT I O N G U I D E SCREW-IN CHANNEL Complete Integrated LED Lighting Solutions Tech Support: 212.629.
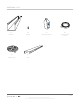
M AT E R I A L L I S T (A) (B) (C) (D) Channel Screws Rubbing Alcohol Double Sided Tape (E) (F) RibbonLyte Lens PA G E 1 All artwork and images copyright Acolyte Industries Inc. Use or reprinting prohibited unless explicitly approved by Acolyte Industries.
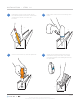
I N S TA L L AT I O N - - S T E P S 1 - 4 1 Mark points every 1 meter (3.28’) along the intended path of channel. If channel is shorter than 1 meter, 2 screws will be used. 2 Drill a pilot hole for the screws along each mark. (A) (A) 3 Screw in the screws (A) into the pilot hole. 4 Clean the mountain surface free of dust and debris using a wet cloth. For metal mounting surfaces use rubbing alcohol (D) to wipe clean.
I N S TA L L AT I O N - - S T E P S 5 - 8 5 After surface is dry, apply 1/16” double-sided tape (E) to the desired mounting path of the RibbonLyte inside your channel. 6 Remove backing from double-sided tape (E). (E) (E) 7 Remove the backing from the RibbonLyte (F) that you are going to be applying atop the double-sided tape.
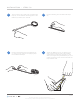
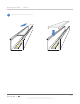
I N S TA L L AT I O N - - S T E P 9 9 Slide or snap the lens (G) into place. (G) (G) (A) (A) PA G E 4 All artwork and images copyright Acolyte Industries Inc. Use or reprinting prohibited unless explicitly approved by Acolyte Industries.
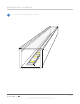
I N S TA L L AT I O N I S C O M P L E T E -- Your Screw In channel installation is complete. PA G E 5 All artwork and images copyright Acolyte Industries Inc. Use or reprinting prohibited unless explicitly approved by Acolyte Industries.