
User guide


WR-G+ 54M Wireless Router User Guide
- 57 -
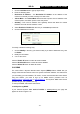
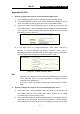
your browser, and then click "MAC Clone" submenu link. On the "MAC Clone"
page, if your PC’s MAC address is proper MAC address, click the "Clone MAC
Address" button and your PC’s MAC address will fill in the "WAN MAC Address"
field. Or else, type the MAC Address into the "WAN MAC Address" field. The
format for the MAC Address is XX-XX-XX-XX-XX-XX. Then click the "Save"
button. It will take effect after rebooting.
Figure A-3 MAC Clone
3. I want to use Netmeeting, what do I need to do?
1) If you start Netmeeting as a sponsor, you don’t need to do anything with the
router.
2) If you start as a responsor, you need configure Virtual Server or DMZ Host.
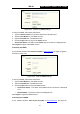
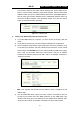
3) How to configure Virtual Server: Login to the router, click the “Forwarding” menu
on the left of your browser, and click "Virtual Servers" submenu. On the "Virtual
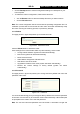
Server" page, click Add New, then on the “Add or Modify a Virtual Server” page,
enter “1720” into the blank behind the “Service Port”, and your IP address
behind the IP Address, assuming 192.168.1.169 for an example, remember to
“Enable” and “Save”.
Figure A-4 Virtual Servers
A-5 Add or Modify a Virtual server Entry
Note: Your opposite side should call your WAN IP, which is displayed on the
“Status” page.
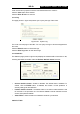
4) How to enable DMZ Host: Login to the router, click the “Forwarding” menu on
the left of your browser, and click "DMZ" submenu. On the "DMZ" page, click
“Enable” radio and type your IP address into the “DMZ Host IP Address” field,
using 192.168.1.169 as an example, remember to click the "Save” button.