user manual guide de l'utilisateur EN ARIRC200 ARIRC205 It is important to read this instruction book prior to using your new product for the first time. Nous vous recommandons de lire ce manuel d’instructions avant d’utiliser votre nouveau produit pour la première fois.
Contents Safety information Internet Radio Technical specification ............................................................. 3 Electrical power source ............................................................ 3 Accessing Internet Radio ......................................................... 19 Listening to Internet Radio ..................................................... 19 Recording Internet Radio ........................................................ 20 Adding Internet Radio stations ....
Safety information FCC information This device complies with part 15 of the FCC rules. Operation is subject to the following two conditions: (1) This device may not cause harmful interference, and (2) This device must accept any interference received including interference which may cause undesired operation. This equipment has been tested and found to comply with the limits for a Class B digital device, pursuant to Part 15 of the FCC Rules.
Safety information Product registration Important battery precautions Go to www.acoustic-research.com for online registration. • For your records Keep your sales receipt for proof of purchase to obtain warranty parts and service. In the event that service should be required, you may need both the model number and the serial number. In the space below, record the date and place of purchase, and the serial number: Model No. Date of Purchase Place of Purchase Serial No.
Safety information IMPORTANT SAFETY INSTRUCTIONS EN PLEASE READ AND SAVE FOR FUTURE REFERENCE Some of the following information may not apply to your particular product; however, as with any electronic product, precautions should be observed during handling and use. • Read these instructions. • Keep these instructions. • Heed all warnings. • Follow all instructions. • Do not use this apparatus near water. • Clean only with dry cloth. • Do not block any ventilation openings.
End user license agreement End user license agreement IMPORTANT: READ CAREFULLY BEFORE DOWNLOADING OR INSTALLING THIS SOFTWARE! THIS END USER LICENSE AGREEMENT (THIS “EULA”) IS A LEGAL AGREEMENT BETWEEN YOU AND AUDIOVOX CORPORATION AND, AS APPLICABLE, ANY AUDIOVOX SUBSIDIARY, AS DEFINED BELOW (COLLECTIVELY “AUDIOVOX”), FOR THE ACOUSTIC RESEARCH® BRAND INTERNET RADIO DEVICE APPLICATION/DRIVER SOFTWARE PROGRAM WHICH MAY INCLUDE ASSOCIATED SOFTWARE COMPONENTS, SOFTWARE LICENSED BY AUDIOVOX FROM THIRD PARTIES (
End user license agreement LIMITATION OF LIABILITY OF CONSEQUENTIAL OR INCIDENTAL DAMAGES, THE ABOVE LIMITATION MAY NOT APPLY TO YOU. (b) YOU ASSUME RESPONSIBILITY FOR THE SELECTION OF THE APPROPRIATE PROGRAM TO ACHIEVE YOUR INTENDED RESULTS, AND FOR THE INSTALLATION, USE, AND RESULTS OBTAINED. 7. WINDOWS MEDIA This product is protected by certain intellectual property rights of Microsoft. Use or distribution f such technology outside of this product is prohibited without a license from Microsoft.
Before you begin Dear Acoustic Research customer, Thank you for purchasing the AR Wi-Fi Internet Radio. This product will let you listen to Internet Radio, AM/FM tuner, weather forecast and music stored in the internal memory or a USB device. To start using your Wi-Fi Internet Radio, please follow the setup instructions in the following pages. 1.
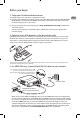
Before you begin 2. Setup your AR Infinite Radio accounts To simplify setup on the radio please complete these steps: A. Find the Setup Information Card that contains your radio’s MAC address number (MAC: 00-00-0000-00-00) and activation PIN # (PIN: 0000). (This number is also found in the Device Info screen under the Settings menu in your radio.) B. Using any Internet-connected computer, go to www.arinfiniteradio.com/setup and follow the online instructions.
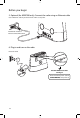
Before you begin 5. Optional (for ARIRC200 only): Connect the radio using an Ethernet cable Use an Ethernet cable if you do not have a Wi-Fi access point. LAN LAN Broadband modem or Ethernet router/hub/switch LAN 6. Plug in and turn on the radio Electrical outlet Exit the DEMO mode after turning on Press and release preset 1, then SLEEP/SNOOZE, then preset 6.
Before you begin 7. Set up the radio Refer to Using the menus on page 16 for more information on making choices and inputting information in menus. A. NOTE: When you turn on the radio for the first time, it will be in "DEMO" mode. To exit this mode, press and release preset 1, then SLEEP/SNOOZE, then preset 6 on top of the radio. B. After exiting the DEMO mode, the radio displays the Select Language screen. Press or to choose your language and then press SELECT.
Before you begin • • Detect Networks: to automatically scan for available networks and display a list of networks to choose from. Go to step 6 to complete the connection. Enter SSID: to manually enter your networks information. Select this option if your Networks SSID is hidden. Go to step 7 to complete the connection. 6. If Detect Networks is selected, the SSID (network name) of those found will be displayed after searching. Press or to select a desired network and then press SELECT. • • • • • 7.
Before you begin Demonstration mode Back view The radio has a pre-installed demonstration. To exit the demonstration, press and release in sequence the buttons on top of the radio: preset 1, then SLEEP/SNOOZE, then preset 6. EN WAN port – connect to your existing access point, broadband modem or Ethernet router/hub/switch Power adapter jack Getting the latest firmware and information RESET The radio will automatically alert you for upgrade if a new firmware is available. You may also go to www.
Before you begin To turn on the Wi-Fi Enabler: The Enabler will turn on automatically when power is connected. To check the AR Wi-Fi Enabler's status by reading the LEDs (Lights): • Normally the POWER, WAN and WIRELESS LEDs will be on when the enabler is operating as a router. • The LAN LED will be on if there is an Ethernet cable connected from the LAN port on the Enabler to a computer. • The MODE LED will be off when the Enabler is operating as a Router.
General controls Front and top EN Sleep timer/ snooze Station presets On/standby Audio source Volume Alarm set WEATHER Clock set Weather information Home/Main menu “Love It” “Ban It” Record “Tag it” Play/pause Display Menu up Next/scan/fast forward/menu forward Previous/scan back/reverse/ menu back Menu down Menu select Rear AM loop antenna socket FM antenna LAN port (for ARIRC200 only) Power adapter input socket Headphone/ audio line-out Full-speed USB port You can connect USB devices t
General controls Turning on or off Press ON/STANDBY to turn the radio on or off (standby mode). To navigate in the menus: • Use the navigation controls to make choices and input information. Volume control Rotate the VOL. knob to adjust the volume. Source selection Press SOURCE repeatedly to select among the following audio content sources: • Internet Radio • USB Input • Internal Memory • FM Tuner • AM Tuner Weather forecast Press WEATHER to check current and 3-day forecast.
General controls • Commands: press or (or or ) to choose the desired command and then press SELECT. To exit the input screen without saving, select the Cancel command.
Clock and alarm Using the alarm clock To set the wake time and sound: 1. Press and hold ALARM until the hour time of the alarm clock is highlighted (reversed color) on the display. 2. Press or to select the wake hour time. 3. Press to shift to minute time. 4. Press or 5. Press to shift to AM/PM. 6. Press or to select the wake minute time. 2. If alarm is off, press ALARM again to activate it. • If alarm is already on, press ALARM again to deactivate it.
Internet Radio With Internet radio, you can listen to music, news, sports, weather or talk radio in other countries or from your home town. It offers the most music selections from around the world and most stations are free. Accessing Internet Radio • • Press SOURCE repeatedly to select Internet Radio. OR Press or to highlight Internet Radio in the Source menu and then press SELECT.
Internet Radio To assign the current station as the wake sound of the alarm clock: 1. Press . 2. Press or to highlight Send to Alarm and then press SELECT. Recording Internet Radio Warning! Use of the recording feature is for personal use only. (Files cannot be transferred or moved from the internal memory.) To record the current station: 1. Press to start recording. 2. Press to stop recording. • Recording will be stored in the internal memory of the radio.
FM/AM Tuner FM/AM antenna • • For FM reception, uncoil the FM antenna at the back of the radio, ensuring it is fully extended (you may even want to tape it to the wall behind the radio if possible. The higher the better.) For AM reception, connect the AM antenna loop to the back of the radio. Rotate the AM loop antenna for better reception. Accessing FM/AM Radio • • Press SOURCE repeatedly to select FM Tuner or AM Tuner.
Internal Memory The radio's internal memory stores up to 10 hours of recordings from Internet Radio and FM/ AM Tuner. Deleting recordings Accessing Internal Memory 2. Press or to highlight Delete and then press SELECT. • • Press SOURCE repeatedly to select Internal Memory. OR Press or to highlight Internal Memory in the Source menu and then press SELECT. Listening to recordings 1. Press or to highlight a recording and then press SELECT. 1.
USB Input The radio can play back music files (mp3, wma and RealAudio (RA8 and G2) formats) stored on an external USB device connected to it. The USB connection port is located at the back of the radio. Deleting files 1. Press or to highlight an unwanted file and then press SELECT. EN 2. Press or to highlight Delete and then press SELECT. Accessing USB Input mode • • Press SOURCE repeatedly to select USB Input. OR Press or to highlight USB Input in the Source menu and then press SELECT.
Weather Weather broadcast Your radio includes a complimentary 4 year weather subscription from WeatherBug® A digital weather broadcast is available including: • Text-to-speech reading of weather forecast for the postal code associated with the radio (can be turned on or off in the Settings menu). Audio playback will pause during reading. • On screen display of conditions including current temperature, high and low temperatures of the day, current weather condition, humidity and wind conditions.
Settings Changing radio's settings Weather To change the radio settings: 1. Press to display the Source menu. • • 2. Press or to highlight Settings and then press SELECT. 3. Press or to highlight a setting and press SELECT to enter the sub-menu. Advanced settings • • • Repeat this step to browse for more settings and sub-menus. 4. To change setting, press or to highlight a desirable option and then press SELECT to confirm. Postal code To edit the postal code for time and weather functions.
More information Troubleshooting tips The radio cannot be turned on. • Plug the AC power adapter securely into the radio and a wall outlet. • Check the power outlet by plugging in another device. • Press and hold ON/STANDBY for 10 seconds to reboot the unit. No sound. • Increase the volume setting. • Make sure the headphones are not plugged in. The radio does not respond to key presses. • The radio may temporarily cease to function if subjected to electrostatic disturbance.
More information Cannot record radio. • Record feature is only available for Internet Radio, AM and FM Tuner. • The internal memory of the radio may be full. Remove some of the old recordings. Further help on Wi-Fi Enabler (for ARIRC205) Cannot play back music files on connected USB device. • Make sure USB device is securely connected. • Digital Right Management (DRM) type music files will not be played. • The radio supports FAT12, 16 and 32 file systems only.
More information 5. In the Network Setup screen, press to highlight Enter SSID and then press SELECT. 9. The radio should then connect with the Wi-Fi Enabler and the Internet. If your AR Infinite Radio accounts have not been activated, the radio will then display a Server Error message. Please press SELECT to continue. You will be asked to enter your postal code before the radio connects successfully. 6. The Network Security screen will be displayed.
More information Web-based utility of Wi-Fi Enabler • • • This section is provided for advanced users that would like to verify their Enabler's configurations via the Enabler’s web-based utility. The utility can be accessed via your web browser through the use of a computer connected to LAN port of the Wi-Fi Enabler. Refer to page 9, step 4 for more information. Major pages in the utility and the page’s key functions will be described below.
More information 8. Click Status from the left menu to view the current connection status. 10. To view the Wireless Security configuration, click Configure on the Wireless screen. • 9. Click Wireless from the left menu to view the wireless settings. The SSID shows here must match the SSID of the radio. • A quick way to check the SSID on the radio: press , select Settings, select Network Setup, and then select Connection Info.
More information Copyright warning This player is for your personal use only. Unauthorized recording or duplication of copyrighted material may infringe upon the rights of third parties and may be contrary to copyright laws. EN Check for updates Visit www.arinfiniteradio.com for the latest news and firmware upgrades for our Wi-Fi Internet Radio.
Warranty information Limited warranty 12 Month Limited Warranty Applies to Acoustic Research Audio/Video Products AUDIOVOX ELECTRONICS CORP.
Warranty information • • Properly pack your unit. Include any remotes, memory cards, cables, etc. which were originally provided with the product. However DO NOT return any removable batteries, even if batteries were included with the original purchase. We recommend using the original carton and packing materials. Include evidence of purchase date such as the bill of sale. Also print your name and address and a description of the defect.
Illustrations contained within this publication are for representation only and subject to change. The descriptions and characteristics given in this document are given as a general indication and not as a guarantee. In order to provide the highest quality product possible, we reserve the right to make any improvement or modification without prior notice. The English version serves as the final reference on all products and operational details should any discrepancies arise in other languages.