ART7 USER MANUAL INSTRUCCIONES DEL USUARIO INSTRUCTIONS D'UTILISATEUR R
IMPORTANT SAFETY INSTRUCTIONS Congratulations on your purchase of the Acoustic Research ART7 Alarm Clock, HD Radio and iPod docking station. This radio is constructed to provide years of reliable, trouble-free service. 1. 2. 3. 4. 5. 6. 7. 8. 9. 10. 11. 12. 13. 14. 15. 16. Read these instructions. Keep these instructions. Heed all warnings. Follow all instructions. Do not use this apparatus near water. Clean only with a damp cloth. Do not block any of the ventilation openings.
ART7 17. Always leave sufficient space around the product for ventilation. Do not place product in or on a bed, rug, in a bookcase or cabinet that may prevent air flow through vent openings. 18. Do not place lighted candles, cigarettes, cigars, etc. on the product. 19. Care should be taken so that objects do not fall into the product. 20. The MAINS plug is used as the disconnect device and shall remain readily operable. 21.
Important Battery Precautions • • • • • Any battery may present a risk of fire, explosion, or chemical burn if abused. Do not try to charge a battery that is not intended to be recharged, do not incinerate, and do not puncture. Non-rechargeable batteries, such as alkaline batteries, may leak if left in your product for a long period of time. Remove the batteries from the product if you are not going to use it for a month or more.
ART7 PACKAGE CONTENTS • • • • • • • • • HD Radio Receiver with iPod Docking Station x 1 Remote Control x 1 3.
PRODUCT FEATURES 1. 2. 3. 4. HD RadioTM Technology HD Radio technology is the most technological breakthrough to radio broadcasting since the introduction of FM radio more than forty-five years ago. HD Radio technology is the standard for digital FM and AM radio. HD Radio broadcasting offers both FM and AM listeners the selection, quality and interactive data services consumers expect from other digital technologies, and it's free of charge, all subscription-free. HD Radio Advantages • CD-quality sound.
ART7 COMPATIBILITY CHART The chart below shows iPod options compatible with the ART7.
OVERVIEW OF ART7 Front View MENU SOURCE SLEEP FAVORITES POWER / ENTER TUNE VOLUME 1. 2. 3. 4. 5. 6. 7. TAG POWER/ENTER: • Press to turn the power on. • In the preset menu, press and hold to store the current radio station under the selected number (1-10). The unit will display "Memory 'Selected No' ". • In the main menu, press to enter the submenu. • During menu execution, press to confirm the alarm, preset, clock settings and master reset. MENU: Enter the main menu List.
ART7 8. TUNE V (Backward): • During radio mode, press to decrease the radio frequency; press and hold for 2-3 seconds to automatically seek and tune to the previous strong radio station. • During iPod mode, press to go to previous track; press and hold for fast backward. • In the main menu and preset list, press to move downward in the list. • In other submenus, press to decrease alarm time, time setting, tone and display control level. 9. VOLUME /\ (Up): Increase the volume level and cancel Mute mode. 10.
Back View ANTENNA 120V 60Hz / 25W 1. 2. 3. 4. 5. 6. OFF POWER AUX IN ON VIDEO OUT 75Ω FM AM Power Cable: Connect the power cable to an electric outlet. POWER OFF/ON Mechanical Switch: Press to reboot the system when it fails after improper operation. AUX IN: Connect with a 3.5mm audio cable to an auxiliary music device. Composite VIDEO OUT: Use to connect iPod to a TV. FM ANTENNA: Connect to FM straight wire pigtail antenna. AM ANTENNA: Connect to AM loop antenna.
ART7 REMOTE CONTROL Radio Aux iPod 1 2 3 4 5 6 7 8 9 10 ALARM iPOD TAG VOL VOL MUTE MENU iPOD MENU TUNE TUNE SLEEP ENTER R 1. 2. 3. 4. 5. 6. 7. 8. 9. Power button: Turn on the power. iPod button: Go to iPod mode. Aux button: Go to Aux mode. Radio button: Toggle between FM and AM mode. Number 1-10 buttons: Press to recall stored preset station; press and hold any number 1-10 button to save the current station to the corresponding preset number.
• • • • 10. 11. 12. 13. 14. Press the TUNE +/- buttons to go to the next/previous track. Press and hold the TUNE +/- buttons to fast forward/backward the current track. Press the arrow up/down buttons to move up or down in the iPod Menu List. During radio mode, press the TUNE +/- buttons to increase/decrease the radio frequency. • Press and hold the TUNE +/- buttons for 2-3 seconds to automatically seek the next/ previous strong radio station.
ART7 OPERATION Place the ART7 on a stable surface such as a table, desk, counter or shelf. Display 1. Source Display: The selected source, which is "RADIO" in the above image, is always displayed in the top right corner. "FM" is indicated toward the right side of the display. Other indicators include iPod, and AUX. 2. 3. iPod Display: If an iPod is docked, the iPod icon ( ) is appears until you remove the iPod.
USING THE ART7 Table 2: Basic Operation Item 1.1 Button Display POWER/ENTER Setup POWER ON: 1. Press POWER/ENTER button to turn on the ART7. 2. Acoustic Research Logo shown on the display for 2 seconds. POWER / ENTER The ART7 will stay in the last listening mode (default: FM Mode, 87.5 MHz). 1.2 POWER/ENTER STAND BY MODE: 1. The ART7 will show the clock time on the display. 2. The ART7 alarm function is still active and the status shows near the bottom of display. 1.3 VOLUME UP VOLUME UP: 1.
ART7 Table 2: Basic Operation Item 1.5 Button Display SOURCE Setup SOURCE SELECTION: 1. Press the SOURCE button to select Audio Mode. 2. Press SOURCE Button to cycle through Audio Modes when an iPod is docked (FM " AM " iPod " AUX). 3. Press the SOURCE button to cycle through Audio Modes when the iPod is not docked (FM " AM " AUX). 4. Automatically return to FM mode when iPod is not docked. 1.6 SNOOZE/MUTE SNOOZE: 1.
Table 3: Audio Mode (Source: FM-AM-iPod-AUX) Item 2.1 Button Display FM Radio Mode Setup FM RADIO: (Auto detect HD mode. See “HD Radio Notes”.) 1. Press the SOURCE button to choose the FM music source (FM Frequency: 87.5~108.1 MHz Step 100KHz). 2. Auto Scanning: Press and hold the TUNE +/TUNE - button for 2 seconds to automatically seek the strong station. 3. VOL +/VOL - button: Press to adjust the volume. 2.2 AM Radio Mode AM RADIO: (Auto detect HD mode. See “HD Radio Notes”.) 1.
ART7 HD Radio Station Notes 1. 2. 3. 4. 5. When a radio station is broadcasting an HD Radio signal, the HD icon ( ) will blink to indicate ART7 is acquiring the HD Radio signal. When the signal is acquired, the HD icon will stop blinking and appear on the display. Multicasting Note: Multicasting is a feature of HD Radio technology that enables stations to broadcast multiple streams of data on sub-channels of their main frequency.
Table 4: MENU Setup Item Menu Page Display Description 3.1 Menu Page Main MENU List: 1. MENU page will auto stay at the first setting, which is ALARM1 set. 2. Press the TUNE +/TUNE - button to move UP/DOWN the list. 3. Press the POWER/ENTER button for confirmation. 3.2 ALARM 1/ ALARM 2 ALARM SETTING: 1. Choose ALARM 1 or ALARM 2 by pressing TUNE +/TUNE - button. (ALARM 1 will be the first item to choose from default setting). 2. Press the POWER/ENTER button for confirmation. MODE MODE SETTING: 1.
ART7 Table 4: MENU Setup Item Menu Page Display VOLUME Description ALARM VOLUME SETTING: 1. Press the TUNE+/TUNE- button to increase/decrease the alarm volume. 2. Press the MENU button to save and return to the last menu. Slow Wake up Feature: The alarm will start at volume of 0% and increase over 20 seconds to the user-defined volume setting. DISPLAY after ALARM SETTING: After ALARM set up, the alarm symbol and time of ALARM 1/ ALARM 2 will show on the bottom of the display during Stand-by Mode.
Table 4: MENU Setup Item Menu Page Display Description 3.3 FM PRESETS FM PRESETS: (Default: Empty) 1. Press the TUNE +/TUNE - button to select a number. 2. Press the POWER/ENTER button to recall a preset station. 3. Press and hold the POWER/ ENTER button to store a preset station. 4. Press the PLAY/PAUSE button to exit the favorites menu. 5. If you enter the FM presets through the main menu while the radio is in AM mode the ART7 will display an error message (see left). 3.
ART7 Table 4: MENU Setup Item 3.6 Menu Page Display TONE CONTROL Description ACCESS TONE CONTROL: 1. Select “TONE CONTROL”. 2. Press the POWER/ENTER button for confirmation. TONE CONTROL SETTING: 1. Select “TREBLE LEVEL/BASS LEVEL”. 2. Press the POWER/ENTER button for confirmation. TREBLE SET TREBLE LEVEL SETTING: 1. Press the TUNE +/TUNE - button to adjust the treble level (Default: 0 dB). 2. Press the MENU button to confirm and return to the previous menu. BASS SET BASS LEVEL SETTING: 1.
Table 4: MENU Setup Item 3.7 Menu Page Display Description DISPLAY CONTROL DISPLAY CONTROL SETTING: 1. Select “DISPLAY CONTROL”. 2. Press the POWER/ENTER button for confirmation. CONTRAST CONTRAST SETTING: 1. Select “CONTRAST”. 2. Press the POWER/ENTER button for confirmation. CONTRAST SETTING: 1. Press the TUNE +/TUNE - button to adjust the contrast level (Default: 33%). 2. Press the MENU button to confirm and return to the previous menu. BRIGHTNESS ACCESS BRIGHTNESS CONTROL: 1.
ART7 Table 4: MENU Setup Item Menu Page Display Description 1. View the software version info (see example to the left). 2. Press the POWER/ENTER button to return to the previous menu. 3.9 MASTER RESET MASTER RESET: 1. Press the TUNE +/TUNE - button to choose MASTER RESET. 2. Press the POWER/ENTER button for confirmation. MASTER RESET: 1. The ART7 will ask "Are you sure to restore to the factory default?". 2. Choose “YES” to restore all factory default settings. Press “NO” to cancel. 3.
Table 5: Alarm Setup Item Menu Page Display Description 4.2 ALARM PRIORITY ALARM SOUNDING PRIORITY: 1. Alarm priority: Alarm 1, Alarm 2. The Snooze period is set for every 7 minutes until the user presses the POWER/ENTER button to return to standby mode. 2. If either alarm has sounded and is in SNOOZE mode, the second alarm will still interrupt the SNOOZE mode. 4.3 SNOOZE SNOOZE: 1. Press the SNOOZE button to mute the Alarm. 2. The Snooze time interval is every 7 minutes. 3.
ART7 Table 6: Preset Station Setup Item 5.3 Menu Page Display MY FAVORITE PRESET/ RECALL Description MY FAVORITE PRESET SETTING: 1. Press the PLAY/PAUSE button during AM or FM mode to enter the favorites menu. 2. Press the TUNE +/TUNE - button to select a number. 3. Press the POWER/ENTER button to recall a preset station. 4. Press and hold the POWER/ ENTER button to store a preset station. 5. Press the PLAY/PAUSE button to exit the favorites menu.
Table 7: iTunes Tagging Setup Item 6.1 Menu Page Display iTunes Tagging STORAGE Description SUCCESSFUL STORAGE OF TAGS TO ART7: The icon shows on the screen when iPod connected. The icon shows on the screen when the tag function supported. 1. Press the TAG button to initiate the iTunes Tagging function (you can tag up to 100 songs). 2. Each tag is cleared after it is sent to the iPod (when the iPod is docked on the ART7). 3.
ART7 Table 7: iTunes Tagging Setup Item Menu Page Display Description 6.4 iTunes Tagging Tag Full TAG FULL MESSAGE: "Unable to store tag" shows on the screen when tags storage is full. 6.5 iPod Tag Feature Not Support iTUNES TAGGING NON-SUPPORTING MESSAGE FOR iPOD: "Not supported..." shows on the screen when your iPod does not support the iPod tag feature. (See “Compatibility Chart” on page 6).
TROUBLESHOOTING If anything is missing or damaged, or if your ART7 fails to operate, notify your dealer immediately. We recommend keeping your original carton and packing materials in case you need to ship the unit in the future. Contact the Audiovox Consumer Service Center.
ART7 Table 8: iTunes Tagging Setup Symptom No Songs in the Tag List Root Cause What to Do • Tags have been transferred to iPod • • No tagging function available • 28 They may have been transferred to your iPod when docked. The list is deleted once the tags are transferred to an iPod. Check if the Tag icon is displayed on the screen. HD Radio reception required to get TAG information.
SPECIFICATIONS • • • • • • • Average Output Power (R.M.S): 10W (5W x 2) Driver: 2.
ART7 1-YEAR LIMITED WARRANTY AUDIOVOX CORPORATION (the Company) warrants to the original retail purchaser of this product that should this product or any part thereof, under normal use and conditions, be proven defective in material or workmanship within 1 year from the date of original purchase, such defect(s) will be repaired or replaced with new or reconditioned product (at the Company's option) without charge for parts and repair labor.
INSTRUCCIONES IMPORTANTES DE SEGURIDAD Felicitaciones por su compra del Reloj Alarma, Radio HD y Estación de Puerto iPod Acoustic Research ART7. Esta radio ha sido fabricada para proveer años de servicio confiable y libre de problemas. 1. 2. 3. 4. 5. 6. 7. 8. 9. 10. 11. 12. 13. Lea estas instrucciones Guarde estas instrucciones Preste atención a estas advertencias Siga todas las instrucciones No use este aparato cerca del agua.
ART7 14. Sólo use con un carrito, pedestal, trípode, soporte,o mesa especificada por el fabricante o vendida con el aparato. Cuando es usado un carrito, tenga cuidado cuando mueve la combinación carrito/aparato para evitar daños por caídas. 15. El aparato no debe exponerse a goteos o salpicaduras y no deben colocarse sobre el aparato objetos llenos con líquidos, tales como vasos. 16. No sobrecargue el tomacorriente de pared. Use sólo la fuente de energía como se indica. 17.
• • • • Reoriente o reubique la antena de recepción. Aumente la separación entre el equipo y el receptor. Conecte el equipo en un tomacorriente o circuito distinto al que está conectado el receptor. Consulte al distribuidor o un técnico experimentado en radio/TV para obtener ayuda. Un APARATO Clase II deberá estar marcado permanentemente con las palabras "DOBLE AISLACIÓN" o "Doble Aislado" y "Cuando se lo repare use sólo partes de repuesto idénticas.
ART7 CONTENIDOS DEL EMPAQUE • • • • • • • • • Receptor de Radio HD con Estación de Puerto de iPod x 1 Control Remoto x 1 Cable de la entrada estéreo de 3.
CARACTERÍSTICAS DEL PRODUCTO 1. 2. 3. 4. Tecnología de Radio HDTM La tecnología de Radio HD es el mayor avance tecnológico en transmisión de radio desde la aparición de la radio de FM hace más de cuarenta y cinco años. La tecnología de Radio HD es el estándar para radio digital de FM y AM.
ART7 GRÁFICO DE COMPATIBILIDAD La siguiente tabla muestra las opciones iPod compatibles con el ART7.
GENERALIDADES DE ART7 Vista Frontal MENU SOURCE SLEEP FAVORITES POWER / ENTER TUNE VOLUME 1. 2. 3. 4. 5. 6. 7. TAG POWER/ENTER (ENCENDER/INGRESAR) : • Presione para encender la unidad. • En el menú preset, presione y mantenga pulsado para almacenar la estación de radio actual bajo el número seleccionado (1-10). La unidad mostrará "Memory 'Selected No' " (Memoria seleccionada Nro). • En el menú principal, presione para ingresar al submenú.
ART7 • En otros submenús, presione para aumentar el tiempo de alarma, fijación de hora, tono y mostrar el nivel de control. 8. TUNE (SINTONIZAR) V (hacia atrás): • Durante el modo radio, presione para disminuir la frecuencia de radio; presione y mantenga pulsado por 2-3 segundos para buscar automáticamente y sintonizar la anterior estación fuerte de radio. • En modo iPod, presionar para ir a la pista anterior presione y mantenga pulsado para retroceso rápido.
Vista Posterior ANTENNA 120V 60Hz / 25W 1. 2. 3. 4. 5. 6. OFF POWER AUX IN ON VIDEO OUT 75Ω FM AM Cable de Alimentación: Conectar el cable de alimentación a un tomacorriente eléctrico. Interruptor Mecánico de ENCENDIDO/APAGADO: Presione para reiniciar el sistema cuando falla después de una operación indebida. AUX IN: Conecta con un cable de audio de 3.5mm a un dispositivo auxiliar de música. SALIDA DE VIDEO Compuesto: Use para conectar un iPod a una TV.
ART7 CONTROL REMOTO Radio Aux iPod 1 2 3 4 5 6 7 8 9 10 ALARM iPOD TAG VOL VOL MUTE MENU iPOD MENU TUNE TUNE SLEEP ENTER R 1. 2. 3. 4. 5. 6. 7. 8. Botón de Encendido: Enciende la unidad. Botón iPod: Va a modo iPod. Botón Aux: Va a modo Aux. Botón Radio: Intercambia entre modo FM y AM.
9. 10. 11. 12. 13. 14. Botones Reproducir/pausar, TUNE + (hacia adelante)/TUNE - (hacia atrás), y flechas arriba/ abajo. • Durante el modo iPod, presione el botón reproducir/pausar para reproducir/pausar una canción. • Presione los botones TUNE +/- para ir a la pista siguiente/previa. • Presione y mantenga pulsado los botones TUNE +/- para avance/retroceso rápido de la pista actual. • Presione los botones flecha arriba/abajo para mover la Lista de Menú de iPod hacia arriba o abajo.
ART7 OPERACIÓN Coloque el ART7 en una superficie estable tal como una mesa, escritorio, mesada o estante. Mostrar 1. Mostrar Fuente: La fuente seleccionada, la cual es "RADIO" en la imagen de arriba, es siempre mostrada en la esquina superior derecha. "FM" está indicado hacia el lado derecho de la pantalla. Otros indicadores incluyen iPod, y AUX. 2. Mostrar iPod: Si un iPod está en el puerto, el icono iPod ( ) aparece hasta que se remueva el iPod. 3.
COMO USAR EL ART7 Tabla 2: Operación Básica Ítem 1.1 Botón Mostrar POWER/ENTER: (ENCENDER/ INGRESAR) Configuración Encendido; 1. Presione el botón POWER/ ENTER para encender el ART7. 2. Logo de Acoustic Research mostrado en la pantalla por 2 segundos. POWER / ENTER El ART7 permanecerá en el último modo de reproducción (predeterminado: Modo FM, 87.5 MHz). 1.2 POWER/ENTER: (ENCENDER/ INGRESAR) MODO DE ESPERA: 1. El ART7 mostrará la hora del reloj en la pantalla. 2.
ART7 Tabla 2: Operación Básica Ítem 1.5 Botón Mostrar SOURCE (FUENTE) Configuración SELECCIÓN DE FUENTE: 1. Presione el botón SOURCE para seleccionar un Modo de Audio. 2. Presione el botón SOURCE para cambiar entre los Modos de Audio cuando un iPod está en el puerto (FM " AM " iPod " AUX). 3. Presione el botón SOURCE para cambiar entre los Modos de Audio cuando un iPod no está en el puerto (FM " AM " AUX). 4. Vuelve automáticamente al modo FM cuando un iPod no está conectado. 1.
Tabla 3: Modo de Audio (fuente: FM-AM-iPod-AUX) Ítem 2.1 Botón Mostrar Modo de Radio FM: Configuración RADIO FM: (detección automática de modo HD. ver “Notas de Radio HD”.) 1. Presione el botón SOURCE para seleccionar una fuente de música FM (Frecuencia de FM: 87.5~108.1 MHz, Paso 100KHz). 2. Búsqueda Automática Presione y mantenga pulsado los botones TUNE +/TUNE - por 2 segundos para buscar automáticamente la estación fuerte. 3. Botón VOL +/VOL -: Presione para ajustar el volumen. 2.
ART7 Tabla 3: Modo de Audio (fuente: FM-AM-iPod-AUX) Ítem 2.4 Botón Mostrar Modo AUX IN Configuración AUX: 1. Presione el botón SOURCE para seleccionar una fuente AUX. 2. Botón VOL +/VOL -: Presione para ajustar el volumen. Notas de Estación Radio HD 1. 2. 3. 4. 5. Cuando una estación de radio está transmitiendo una señal de Radio HD, el icono HD ( ) parpadeará para indicar que el ART7 está adquiriendo la señal de Radio HD.
un problema de la transmisión de Radio HD. Esto será corregido por la estación más adelante. La programación analógica actual sólo está presente en el canal principal. Si selecciona un canal HD predeterminado y sintoniza directamente un canal multitransmisión digital de la estación de Radio HD, el ART7 demorará aproximadamente cinco segundos para comenzar la reproducción. Esto es funcionamiento normal. Tabla 4: MENÚ de Configuración Ítem Menú de Página Mostrar Descripción 3.
ART7 Tabla 4: MENÚ de Configuración Ítem Menú de Página Mostrar Descripción TIME FIJACIÓN DE HORA DE ALARMA 1. Presione el botón POWER/ ENTER para seleccionar un campo (ON/OFF, horas/minutos, AM/PM, Zumbador/Música). 2. Presione el botón TUNE +/TUNE para aumentar/disminuir la Hora/ minutos. 3. Presione el botón MENU para guardar y volver al último menú. (Predeterminado: ALARM1 "OFF”, HORA "12:00 AM”, FUENTE "ZUMBADOR”, VOLUMEN "40%”). SOURCE (Fuente) FUENTE DE SONIDO DE ALARMA: 1.
Tabla 4: MENÚ de Configuración Ítem Menú de Página Mostrar VOLUMEN Descripción FIJACIÓN DE VOLUMEN DE ALARMA 1. Presione el botón TUNE +/TUNE para aumentar/disminuir el volumen de alarma. 2. Presione el botón MENU para guardar y volver al último menú. Dispositivo de Despertar Lento: La alarma arrancará a un volumen de 0% y aumenta en 20 segundos a la fijación de volumen definida por el usuario.
ART7 Tabla 4: MENÚ de Configuración Ítem Menú de Página Mostrar Descripción 3.4 MEMORIAS PREDETERMIN ADAS de AM MEMORIAS PREDETERMINADAS DE AM: (Predeterminado: Vacío) 1. Presione el botón TUNE +/TUNE para seleccionar un número prefijado. 2. Presione el botón POWER/ ENTER para recuperar una estación prefijada. 3. Presione el botón POWER/ ENTER para almacenar una estación prefijada. 4. Presione el botón PLAY/PAUSE para salir del menú favoritos. 5.
Tabla 4: MENÚ de Configuración Ítem 3.6 Menú de Página Mostrar CONTROL de TONO Descripción ACCESO al CONTROL de TONO: 1. Seleccione "CONTROL de TONO". 2. Presione el botón POWER/ ENTER para confirmar. FIJACIÓN del CONTROL de TONO: 1. Seleccione “TREBLE LEVEL/ BASSLEVEL” (nivel de agudos/ nivel de graves). 2. Presione el botón POWER/ ENTER para confirmar. FIJACIÓN DE AGUDOS FIJACIÓN DE NIVEL DE AGUDOS: 1. Presione el botón TUNE +/TUNE para ajustar el nivel de agudos (Predeterminado: 0 dB). 2.
ART7 Tabla 4: MENÚ de Configuración Ítem 3.7 Menú de Página Mostrar Descripción CONTROL de PANTALLA FIJACIÓN del CONTROL de PANTALLA: 1. Seleccione "CONTROL de PANTALLA". 2. Presione el botón POWER/ ENTER para confirmar. CONTRASTE FIJACIÓN DE CONTRASTE: 1. Seleccione "CONTRAST". 2. Presione el botón POWER/ ENTER para confirmar. FIJACIÓN DE CONTRASTE: 1. Presione el botón TUNE +/TUNE para ajustar el nivel de contraste (Valor predeterminado: 33%). 2.
Tabla 4: MENÚ de Configuración Ítem Menú de Página Mostrar Descripción 1. Ver la información de versión de software (ver ejemplo a la izquierda). 2. Presione el botón POWER/ ENTER para volver al menú anterior. 3.9 RESTAURACIÓ N MAESTRA RESTAURACIÓN MAESTRA: 1. Presione el botón TUNE +/TUNE para seleccionar MASTER RESET (restauración maestra). 2. Presione el botón POWER/ ENTER para confirmar. RESTAURACIÓN MAESTRA: 1.
ART7 Tabla 5: Fijación de Alarma Ítem 4.1 Menú de Página Mostrar SONORIDAD DE ALARMA Descripción SONORIDAD DE ALARMA, ESPERA: 1. Cuando el ART7 está en modo espera, si la hora de fijación de alarma es igual a la hora de la radio actual, sonará automáticamente. 2. Presione el botón POWER/ ENTER para volver al modo de espera. SONORIDAD DE ALARMA, AUDIO: 1. Cuando el ART7 está en modo audio (Zumbador/FM/AM), si la hora de fijación de alarma es igual a la hora de la radio actual, sonará automáticamente. 2.
Tabla 6: Fijación de Estación Prefijada Ítem 5.1 Menú de Página Mostrar PREFIJADA Descripción FM /AM PREFIJADAS EN CONTROL REMOTO CONTROL: Presione y mantenga pulsado el botón 1-10 para almacenar una prefijada. Cuando está almacenada el ART7 mostrará MEMORY (1-10). 5.2 RECUPERAR RECUPERAR ESTACIONES PREFIJADAS DESDE EL CONTROL REMOTO: Presione el botón 1-10 en el control remoto para recuperar una estación prefijada. 5.3 PREFIJAR/ RECUPERAR MIS FAVORITOS FIJACIÓN DE MIS FAVORITOS 1.
ART7 Tabla 7: Fijación de Etiquetado iTunes Ítem 6.1 Menú de Página Mostrar Etiquetado de iTunesALMACENAMIE NTO Descripción ALMACENAMIENTO EXITOSO DE ETIQUETAS AL ART7: El icono se muestra en pantalla cuando está conectado en el iPod. El icono se muestra en pantalla cuando está soportada la función etiqueta. 1. Presione el botón TAG (etiquetar) para iniciar la función de Etiquetado de iTunes (Puede etiquetar hasta 100 canciones). 2.
Tabla 7: Fijación de Etiquetado iTunes Ítem Menú de Página Mostrar Descripción 6.4 Etiquetado de iTunesEtiquetado lleno MENSAJE DE ETIQUETADO LLENO: "Unable to store tag" (no se puede almacenar etiqueta) se muestra en la pantalla cuando el almacenamiento de etiquetas está lleno. 6.5 Función Etiquetado iPod No Soportado ETIQUETADO iTUNES MENSAJE, DE NO SOPORTADO PARA iPOD: "Not supported..." (No soportado) se muestra en pantalla cuando su iPod no soporta la función de etiquetado iPod.
ART7 RESOLUCIÓN DE PROBLEMAS Si algo está faltando o se encuentra dañado, o si su ART7 falla al funcionar, notifique a su distribuidor inmediatamente. Recomendamos guardar su caja original y materiales de empaque en caso que deba enviar la unidad en un futuro. Contacte al Centro de Atención al Cliente de Audiovox.
Tabla 8: Fijación de Etiquetado iTunes Síntoma Mala Recepción de AM Causa principal Qué hacer • Antena de AM no instalada adecuadamente • • Los factores ambientales causan mala calidad de recepción de AM • Verificar que la antena de AM está conectada adecuadamente o trate de mover la antena para lograr una mejor recepción. Podría estar en un área con señales de AM débiles. Recepción Inestable de Radio HD.
ART7 ESPECIFICACIONES • • • • • • • Potencia Promedio de salida (R.M.S.): 10W (5W x 2) Controlador: Controlador de Rango Completo de 2.
GARANTÍA LIMITADA DE 1-AÑO AUDIOVOX CORPORATION (la Compañía) garantiza que el comprador original de tienda de este producto que si este equipo o cualquier parte del mismo, bajo uso y condiciones normales, se prueba defectuoso en material o mano de obra dentro del año de la fecha original de compra, tales defectos serán reparados o reemplazados con un producto nuevo o reacondicionado ( a decisión de la compañía) sin cargo por partes y mano de obra.
ART7 62
INSTRUCTIONS DE SECURITE IMPORTANTES Félicitations d’avoir acheté une stations d’amarrage, une radio HD, un réveil-matin ART 7 d’Acoustic Research. Cette radio est construite pour fournir des années de service fiable sans problèmes. 1. 2. 3. 4. 5. 6. 7. 8. 9. 10. 11. 12. 13. Lisez ces instructions. Gardez ces instructions. Faites attention à tous les avertissements. Suivez toutes les instructions. N’utilisez pas cet appareil près de l’eau. Nettoyez avec un tissu moite uniquement.
ART7 14. N’utilisez qu’avec un chariot; un guéridon, un trépieds; une equerre ou une table spécifiés par le fabricantou vendu avec l’appareil. Lorsque le chariot es utilisé soyez prudent lorsque vous vous déplacez avec la combinaison chariot/appareil pour évitez des blessures d’un renversement. 15. L’appareil ne doit pas être exposé aux égouttements ou au eclaboussures et qu’aucun objet rempli de liquides, tels que des vases, ne seront pas placé sur l’appareil. 16. Ne surchargez pas la sortie murale.
• • • • Réorientez ou resituez l’antenne de réception. Augmentez la séparation entre l’équipement et le récepteur. Branchez l’équipement à une sortie sur un circuit différent de celui auquel le récepteur est branché. Consultez le concessionnaire ou un technicien de radio/TV pour aide. Un APPAREIL Classe II sera marqué à permanence avec les mots « DOUBLE INSULATION » ou « Double Insulated » et « When servicing use only identical replacement parts ».
ART7 CONTENU DU PAQUET • • • • • • • • • Récepteur radio HD avec station d’amarrage iPod x 1 Télécommande x 1 Câble d'entrée de stéréo de 3.
CARACTERISTIQUES DU PRODUIT 1. 2. 3. 4. HD RadioTM Technology La technologie HD Radio est l’avancée technologique la plus signifiante dans le domaine de la transmission de radio depuis l’introduction de la radio FM il y a 45 ans. La technologie Radio HD est un standard pour la radio digitale FM et AM.
ART7 TABLEAU DE COMPATIBILITE Le tableau ci-dessous montre les options iPod compatibles avec le ART7.
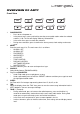
VUE D’ENSEMBLE D’ART 7 VUE D’AVANT MENU SOURCE SLEEP FAVORITES POWER / ENTER TUNE VOLUME 1. 2. 3. 4. 5. 6. 7. TAG POWER/ENTER: • Pressez pour allumer la puissance. • Dans le menu des préréglés, pressez et maintenez pour mettre la station de radio actuelle en mémoire sous le numéro sélectionné (1 à 10). L’appareil va afficher « Memory 'Selected No' ». • Dans le menu principal, appuyez pour entrer dans le sous-menu.
ART7 • Dans le menu principal et la liste des préréglés, pressez pour vous déplacer vers le haut dans la liste. • Dans les autres sous-menus, pressez pur augmenter l’heure de reveil, le réglage de l’heure, la tonalité et le niveau de contrôle de l’affichage. 8. TUNE V (En arrière): • Durant le mode radio, pressez pour diminuer la fréquence de radio, pressez et maintenez pour 2 à 3 secondes pour automatiquement chercher et syntoniser à la station de radio forte précédente.
Back View ANTENNA 120V 60Hz / 25W 1. 2. 3. 4. 5. 6. OFF POWER AUX IN ON VIDEO OUT 75Ω FM AM Câble puissance: Branchez le câble puissance à une sortie électrique. POWER OFF/ON Interrupteur mécanique: Pressez pour recharger le système lorsqu’il fait faillite après une opération abusive. AUX IN: Branchez avec un câble d’audio 3,5 mm. Composite VIDEO OUT: Utilisez-le pour brancher iPod à la télévision. FM ANTENNA: Branchez au fil droit FM antenne à queue de porc.
ART7 TELECOMMANDE Radio Aux iPod 1 2 3 4 5 6 7 8 9 10 ALARM iPOD TAG VOL VOL MUTE MENU iPOD MENU TUNE TUNE SLEEP ENTER R 1. 2. 3. 4. 5. 6. 7. 8. Bouton Puissance: Allumez la puissance. Bouton iPod : Allez au mode iPod. Bouton Aux : Allez au mode Aux. Bouton Radio : Basculer entre les modes FM et AM.
9. 10. 11. 12. 13. 14. Play/Pause, TUNE + (en avant)/TUNE - (en arrière), et des boutons flèches vers le haut/vers le bas. • Durant le mode iPod, pressez le bouton play/pause pour jouer/faire pause pendant la reproduction d’une chanson. • Pressez les boutons TUNE +/- pour aller à la piste prochaine/précédente. • Pressez et maintenez les boutons TUNE +/- pour faire avance/recul rapide dans la piste actuelle.
ART7 OPERATION Placez le ART7 sur une surface stable telle qu’une table, un bureau, un comptoir ou un rang. Affichage 1. Affichage de source : La source sélectionnée qui est « RADIO » dans l’image ci-dessus, est toujours affiché dans le coin droite en haut. ‘FM’ est indiqué à droite de l’affichage. D’autres indicateur comprennent iPod et AUX. 2. Affichage iPod Display :Si un iPod est amarré, l’icône iPod ( ) apparaît jusqu’à ce que vous n’enleviez le iPod. 3.
UTILISER LE ART7 Table 2: Basic Operation Item 1.1 Bouton Affichage POWER/ENTER Configuration Puissance Allumée: 1. Pressez le bouton POWER/ ENTER pour allumer le ART7. 2. Le logo Acoustic Research est montré sur l’affichage pendant 2 secondes. POWER / ENTER Le ART7 restera dans le mode d’écoute le plus récent (par defaut: FM Mode, 87.5 MHz). 1.2 POWER/ENTER MODE D’ATTENTE: 1. Le ART7 montrera l’heure de l’horloge sur l’affichage. 2.
ART7 Table 2: Basic Operation Item 1.5 Bouton Affichage SOURCE Configuration Sélection de Source: 1. Pressez le bouton SOURCE pour sélectionner Mode Audio. 2. Pressez le bouton SOURCE pour traverser les modes audio lorsqu’un iPod est amarré (FM, AM, iPod, AUX). 3. Pressez le bouton SOURCE pour traverser les modes audio lorsque le iPod n’est pas amarré (FM, AM, AUX). 4. Revient automatiquement au mode FM lorsque le iPod n’est pas amarré. 1.6 SNOOZE/MUTE SNOOZE: 1.
Table 3: Audio Mode (Source: FM-AM-iPod-AUX) Articl e 2.1 Bouton Affichage FM Radio Mode Configuration FM RADIO: (Détecter automatiquement le mode HD. Voir « HD Radio Notes ».) 1. Pressez le bouton SOURCE pour choisir la source de musique FM (FM Frequency: 87.5~108.1 MHz Step 100KHz). 2. Scannage automatique: Pressez et maintenez le bouton TUNE +/ TUNE - pour 2 secondes pour chercher automatiquement des stations fortes. 3. Bouton VOL +/VOL -: Pressez pour ajuster le volume. 2.
ART7 Table 3: Audio Mode (Source: FM-AM-iPod-AUX) Articl e 2.4 Bouton Affichage AUX IN Mode Configuration AUX: 1. Pressez le bouton SOURCE pour choisir une source AUX. 2. Bouton VOL +/VOL - : Pressez pour ajuster le volume. Notes sur les stations de radio HD 1. 2. 3. 4. 5. Lorsqu’une station de radio émet un signal HD Radio, l’icône HD ( ) clignotera pour indiquer que le ART7 est en train d’acquérir le signal HD Radio.
être corrigé par la station tôt ou tard. Le programme analogue d’aujourd’hui n’est présent que sur la chaîne principale. Si vous sélectionnez une chaîne HD préréglée et syntonisez directement à la chaîne de multidiffusion digitale de la station HD Radio, le ART7 va prendra à peu près cinq secondes pour commencer à jouer: C’est une opération normale. Table 4: Configuration MENU Article Page Menu Affichage Description 3.1 Menu Page Liste de MENU principal : 1.
ART7 Table 4: Configuration MENU Article Page Menu Affichage Description SOURCE SOURCE AUDIO DU REVEIL: 1. Choisissez Buzzer ou AM/FM pour le son du réveil (AM/FM exige la sélection d’une station préréglée. L’appareil a recours au réglage de défaut si le préréglé sélectionné est vide.) 2. Pressez le bouton POWER/ ENTER pour sélectionner un champ (ON/OFF, heure/minute, AM/PM, Buzzer/Music). 3. Pressez le bouton TUNE +/TUNE pour sélectionner buzzer ou musique. 4.
Table 4: Configuration MENU Article Page Menu Affichage Description Affichage après le réglae du réveil: 1. Après le réglage d’ALARM, le symbole du réveil-matin et l’heure de ALARM 1/ALARM 2 se montrera pendant le Mode d’Opération. 3.3 FM PRESETS Préréglés FM : (par défaut : Vide) 1. Pressez le bouton TUNE +/TUNE pour sélectionner un numéro. 2. Pressez le bouton POWER/ ENTER pour rappeler une station préréglée. 3.
ART7 Table 4: Configuration MENU Article 3.5 Page Menu Affichage CLOCK SET Description Régler l’horloge : Pressez le bouton POWER/ENTER pour confirmation. Régler l’Heure : 1. Choisir les heures/minutes ou AM/ PM pour réglage de l’heure. 2. Pressez le bouton POWER/ ENTER pour sélectionner un champ (heure, minute, AM/PM). 3. Pressez le bouton TUNE +/TUNE pour augmenter/ diminuer l’heure/ minute ou sélectionner AM/PM. (Pressez et maintenez pour scanner les heures/minutes). 4.
Table 4: Configuration MENU Article 3.7 Page Menu Affichage Description DISPLAY CONTROL REGLAGE DU CONTROLE D’AFFICHAGE: 1. Sélectionnez « DISPLAY CONTROL ». 2. Pressez le bouton POWER/ ENTER pour confirmation. CONTRAST REGLAGE DU CONRASTE: 1. Sélectionnez « CONTRAST ». 2. Pressez le bouton POWER/ ENTER pour confirmation. REGLAGE DU CONTRASTE: 1. Pressez le bouton TUNE +/TUNE pour ajuster le niveau du contraste (Par défaut: 33%). 2. Pressez le bouton MENU pour confirmer et revenir au menu précédent.
ART7 Table 4: Configuration MENU Article Page Menu Affichage Description 1. Visionner l’information sur la version du logiciel (voir l’exemple à gauche). 2. Pressez le bouton POWER/ ENTER pour revenir au menu précédent. 3.9 MASTER RESET REINITIALISATION DU MAÏTRE: 1. Pressez le bouton TUNE +/TUNE pour choisir MASTER RESET. 2. Pressez le bouton POWER/ ENTER pour confirmation. REINITIALISATION DU MAITRE: 1. Le ART7 demandera, « Etes vous sûr de vouloir rétablir les réglages par défaut d’usine? » 2.
Table 5: Configuration du réveil matin Articl e 4.1 Page Menu Affichage ALARM SOUNDING Description SONNERIE DU REVEIL, EN ATTENTE: 1. Lorsque le ART7 est en mode d’attente, si le réglage de l’heure du réveil égale l’heure de la radio actuelle, il sonne automatiquement. 2. Pressez le bouton POWER/ ENTER pour revenir au mode d’attente. SONNERIE DE REVEIL, AUDIO: 1.
ART7 Table 6: Configuration de stations préréglées Articl e 5.1 Page Menu Affichage PRESET Description DES PREREGLES FM /AM SUR LA TELECOMMANDE: Pressez et maintenez un bouton 1 à 10 pour mettre un préréglé en mémoire. Lorsqu’il est mis en mémoire le ART7 va afficher MEMORY (1-10). 5.2 RECALL RAPPELER UNE STATION PREREGLEES DEPUIS LA TELECOMMANDE : Pressez le bouton 1-10 sur la télécommande pour rappeler une station préréglée. 5.3 MY FAVORITE PRESET/ RECALL MON REGLAGE DE PREREGLE FAVORIS: 1.
Table 7: Configuration de balisagte de iTunes Articl e 6.1 Page Menu Affichage iTunes Tagging STORAGE Description MISE EN MEMOIRE REUSSIE DES BALISES A ART7: L’icône se montre sur l’écran lorsque le iPod est branché. L’icône se montre sur l’écran lorsque la fonction balise est soutenue. 1. Pressez le bouton TAG pour initier la fonction iTunes Tagging (vous pouvez baliser jusqu’à 100 chansons). 2. Chaque balise est dégagée après qu’elle soit envoyée à l’iPod (lorsque le iPod est amarré à l’ART7). 3.
ART7 Table 7: Configuration de balisagte de iTunes Articl e Page Menu Affichage Description 6.4 iTunes Tagging Tag Full MESSAGE COMPLET DE BALISE: « Unable to store tag » se montre sur l’écran lorsque la mémoire des balise est pleine. 6.5 iPod Tag Feature Not Support MESSAGE DE NON-SOUTIEN DES BALISES ITUNES POUR L’iPOD: « Not supported...» se montre sur l’écran lorsque votre iPod ne soutien pas la fonction de balisage de l’iPod (Voir « TABLEAU DE COMPATIBILITE » à la page 68).
DEPANNAGE S’il y a des éléments qui manque ou sont endommagés, ou si ART7 n’opère pas, notifiez immédiatement votre concessionnaire. Nous recommandons que vous gardiez votre carton et matériau d’emballage originels au cas où vous auriez besoin d’expédier l’appareil dans l’avenir. Prenez contact avec Audiovox Consumer Service Center.
ART7 Table 8: iTunes Tagging Setup Symptôme Réception AM de mauvaise qualité Cause fondamentale Que faire? • Antenne AM n’est pas bien installée • • Des facteurs environnementaux peuvent être la cause d’une réception AM de mauvaise qualité • Vérifiez que l’antenne AM est bien branchée ou bien essayez de déplacer l’antenne afin d’avoir une meilleure réception. Vous pouvez être placé dans une région où les signaux AM sont faibles.
SPECIFICATIONS • • • • • • • Puissance de sortie moyenne (R.M.S): 10W (5W x 2) Pilote: 2.
ART7 GARANTIE LIMITEE D’UN AN AUDIOVOX CORPORATION (la Société) garantit à l’acheteur originel auprès du détaillant de ce produit que si ce produit ou une partie quelconque de ce produit, dans des conditions d’utilisation normale, s’avèrent défectueux en matériau ou l’artisanat, dans un an après la date d’achat d’origine, de tels défauts seront réparés ou remplacés par un produit neuf ou reconditionné (à la discretion de la Société) sans charge pour les pièces défectueuses ni pour le travail de réparation.
Audiovox Electronics Corporation 150 Marcus Blvd Hauppauge, New York 11788 © 2009 Audiovox Electronics Corporation Acoustic Research is a registered trademark of Audiovox Electronics Corporation. PRINTED IN CHINA. www.acoustic-research.com V1.