UNO Owners Manual
Contents Unpacking............................................................................................. 3 Getting Started.................................................................................... 3 Tour of the Remote.............................................................................. 4 Hard keys...........................................................................................................................4 Interactive LCD screen.........................................
Unpacking Before you start, make sure you’ve found the following parts included in your Xsight™ Uno package: • The Xsight™ Uno remote • 4 AAA batteries • CD-ROM • The Setup Guide • 1 USB adapter cable Getting Started The Xsight™ Uno setup has three easy steps to get started: IMPORTANT: Please refer to the Setup Guide for more detailed setup information. 1. Install the batteries Remove the battery door from the back of the Xsight™ Uno.
Tour of the Remote Your Xsight™ Uno remote control offers two ways of controlling your home entertainment devices: • the interactive LCD screen gives you the ultimate control over your home entertainment system by letting you customize and simplify your home entertainment experience • hard keys let you control common device features, much like the keys on your original remote controls Hard keys Power turns devices on and off.
Tour of the Remote ENTER/— operates channel enter and 10+ digit entry. For digital TV channels, this key also separates the main channel from the subchannel. For example, to choose the channel 59.1, press “5”, “9”, ENTER/–, and “1”. Interactive LCD screen Your remote’s customizable LCD screens can be set up via the remote or by connecting to your PC. To select an item on the remote screen, all you have to do is highlight and select. To highlight an item: Use the up and down arrow keys beneath the screen.
Home Screen Home Devices Activities The Home Screen of the Xsight™ Uno is your gateway to the remote’s full functionality. To access the Home Screen at any time, hold down the (Home/Back) key for 2 seconds. Pressing this key once takes you back one screen.
Activities Activities The Activities menu gives you access to all of the One-Touch Activities you’ve set up using the EZ-RC™ Remote Control Setup Wizard website. Hello Good Night IMPORTANT: Activities can only be created or edited using the EZ-RC™ Remote Control Setup Wizard website. Watch DVD To access the “Activities” Screen at any time: Press the (Activities) shortcut key underneath the screen. An activity lets you condense a multi-step action to a single touch.
Activities Using Activities Hello 1. When you start using your home theater—before you turn anything on—choose the Hello activity on the Xsight™ remote. IMPORTANT: Keep the remote pointed at your home entertainment devices until you can see the activity has finished and your devices have responded to the remote’s commands. Need help after the “Hello” activity has finished? Select Assist. Then select Power to turn devices on manually. Use the arrow keys below the screen to access more devices.
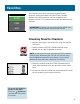
Favorites The Favorites menu gives you access to your Favorite Channels, which you choose using the EZ-RC™ Remote Control Setup Wizard website. You can choose up to 12 favorite channels. This section explains how to choose favorite channels. Favorites ESPN CNN IMPORTANT: Favorites can only be created or edited using the EZ-RC™ Remote Control Setup Wizard website. ABC Choosing Favorite Channels 1. Connect the Xsight™ Uno to your PC using the supplied USB cable. 2.
Settings Settings Device Setup The Settings menu lets you add or delete devices, learn functions from your original remote control, and adjust various options on your remote. The following section details each option in the Settings menu. Learning Volume Control Device Setup The Device Setup menu lets you add or delete devices. This menu also lets you see the individual codes the remote is using to operate your devices. Adding a Device The Add Device procedure is similar to the initial setup. 1.
Settings Add Device Enter a name for the device: TV Clear 5. Enter a name for your device. To accept the default name for the device (for example, “TV” for a TV, “DVD” for a DVD player, etc.), press to select continue. To change the name, press to clear the text. Then use the number keys on the remote like the number keys on your mobile phone to “text” in a new name for the device. Press to enter the name. OK 6. Follow the on-screen prompts to begin testing the first code.
Settings Settings Device Setup Learning Volume Control Deleting a Device You can remove devices from the remote’s memory if you no longer want to use the Xsight™ Uno to control them. To remove these devices: 1. Select Device Setup from the Settings menu. 2. Select Delete Device. The first page of devices is displayed. NOTE: If you don’t see the device you want, press the down arrow key beneath the screen to scroll through the pages to view more devices.
Settings Settings Device Setup Learning Volume Control Learning The Learning feature lets you learn functions from your original remote control(s) to the Xsight™ Uno. This process can be used to add missing keys or replace existing keys on devices that have already been set up, or even to add a complete new device to your remote. NOTE: Your original remote must still be in working order to learn from it. Learning a New Device Learning For which device? 1. Select Learning from the Settings menu. 2.
Settings Learning Point the original remote towards the top lens and press the key you want to learn. 6. Locate the remote for the device you want to learn from. Align the top of the source remote with the top end of the Xsight™ Uno, no further than 5 inches apart, preferably between 2 and 5 inches (5cm and 12cm). 7. On the remote you are learning from, press the first key you want to learn. NOTES: If the function is not learned correctly, the Xsight™ Uno screen displays an error message.
Settings Settings Device Setup Learning a New Function 1. Select Learning from the Settings menu. Learning VolumeLearning Control For which device? New Device TV Cable Box 2. Select the device you want to use the function with. NOTE: If you don’t see the device you want, press the down arrow key to scroll through more device pages 3. Select the key on the Xsight™ Uno you want to learn onto—either a physical key or an on-screen soft key (press On-Screen keys to choose a soft key).
Settings 6. If the Xsight™ Uno successfully learns the key, it saves the learned function to its memory. To access the Home Screen at any time: Hold down the (Home/Back) key for 2 seconds. Pressing this key once takes you back one screen. NOTE: If you’re learning an on-screen key, the remote will prompt you to save a label. Use the number keys on the Xsight™ Uno to enter letters and numbers (like texting on a mobile phone). Press to delete the previous character. Press when you’re finished.
Settings Volume Control Lock Volume Unlock Device UnlockAll Volume Unlock Select a device TV Cable Box Satellite Box Unlock All Are you sure you want to unlock the Volume Control? No Yes Removing a Device from Lock 1. Select Volume Control from the Settings menu. 2. Review the explanatory screen, then select OK. (Or select Tell me more if you’d like more information.) 3. Select Unlock Device. The first page of devices is displayed.
Settings Contrast Set contrast: Contrast This setting allows you to adjust the contrast of the remote’s screen. 1. Select Contrast from the Settings menu. OK Brightness Set brightness: 2. Use the up and down arrow buttons below the remote’s screen to adjust the level of contrast. Press when you’ve finished to set the contrast level. Brightness This setting allows you to adjust the brightness of the remote’s screen. 1. Select Brightness from the Settings menu. OK Timeout Timeout: 15 sec 2.
Settings Language Language English The Language setting lets you change the Language of your remote’s on-screen display. Once selected, all menus and instructions will be displayed in the language chosen. The remote’s initial setup allows you to choose your preferred language. If you ever need to change that setting, you can do so in this menu. Español Deutsch To access the Home Screen at any time: Hold down the (Home/Back) key for 2 seconds. Pressing this key once takes you back one screen.
Settings Reset Are you sure you want to reset the remote? Reset The reset screen will delete all learned functions and labels. Devices, Activities and Favorites you have added will remain in the remote menu. 1. Select Reset from the Settings menu. The remote will display the Reset Screen. No Yes 2. Select Reset. 3. Select Yes in the confirmation screen to delete all Learning and Labels (the screen will return to the Settings menu). Select No to cancel the reset and retain all settings.